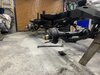
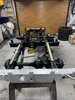
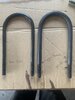
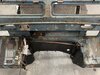
Series 3 SWB Nut and Bolt rebuild

This site contains affiliate links for which LandyZone may be compensated if you make a purchase.

Having freshly galvanized the original chassis do I paint it black or leave it as it is ?

  • Yes - Etch, prime and paint black

    Votes: 10 90.9%
  • No - Leave it galvanized

    Votes: 1 9.1%

  • Total voters
    11
  • Poll closed .
SUSPENSION !
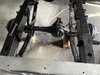
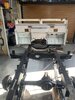
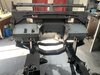
No point asking whether to go for parabolic or not, as this is a standard rebuild so standard leaf it it. But here is the question? been on John Craddocks and the front SWB springs are 11 leaf - tick in the box, great that's what was on the old girl, righ then from the photos on the JC web site the rear springs have 9 leaves ? where as the old springs that I took off had 7 ?? any ideas what should be on the rear ?
 
Have you considered cleaning up old springs , it’s quicker than fitting new ones.
1F146242-00BA-42DF-BD79-E73881DF3AF1.png
 
Hi Resurgam,
The secret is high build 2pk primer, wet and dry in-between coats don't be tempted to use stopper or filler as it may crack; at the end of the day they are wheels and will no doubt will take some punishment.
Thanks, I'll remember that for next time! Good to see someone else from Anglesey on here. Whereabouts on the island are you?
 
Quick update from todays tinkering..... cleaned blasted and primed the steering arms and relay, cleaned blasted some engine items (fan, sump, alt brackets, oil filler etc) Cleaned the main end bearing caps and cleaned up the bearing shells to get the numbers off them to look at ordering replacements from Turners eng. (big thanks to Frida Turner for identifying the bearings so quickly) glad to hear that they are all standard size, except the thrust washer .025
Will hand fire with the order until I get the block back from the engine specialist just in case there is any changes (such as a regrind etc).
 

Attachments

  • IMG_8745.JPG
    IMG_8745.JPG
    234.1 KB · Views: 136
  • IMG_8746.JPG
    IMG_8746.JPG
    313.8 KB · Views: 132
  • IMG_8747.JPG
    IMG_8747.JPG
    370.3 KB · Views: 134
  • IMG_8749.JPG
    IMG_8749.JPG
    301.8 KB · Views: 137
  • IMG_8750.JPG
    IMG_8750.JPG
    285.8 KB · Views: 140
Quick update on todays progress, started to get the engine items ready for when the block and head return, took the oil pump apart, cleaned and bolted back together, had thought of a new one but after reading the notes on Turners web page about the new ones being particularly noisy as they have straight cut gears and their advice to inspect and clean existing I listed and saved myself a few quid! Still need a gasket, o ring and rubber washer for the strainer but they are pennies.
Primed all the items that were blasted yesterday first thing this morning and then just top coated them before retiring for the evening as its 16:64 ! No thats not BST Welsh time its beer time !
 

Attachments

  • 350F9420-B1C0-4E64-85B5-602640BB5DB5.jpeg
    350F9420-B1C0-4E64-85B5-602640BB5DB5.jpeg
    299.4 KB · Views: 144
  • 5AB9758A-AA57-4EDF-954B-18B02694FA21.jpeg
    5AB9758A-AA57-4EDF-954B-18B02694FA21.jpeg
    267.4 KB · Views: 148
  • 3D5B3A7B-BD8D-468A-9BD1-D3FEE6DCAAD0.jpeg
    3D5B3A7B-BD8D-468A-9BD1-D3FEE6DCAAD0.jpeg
    269.8 KB · Views: 141
  • 46549781-7F52-4E13-B0C4-8E2B2F48ED7C.jpeg
    46549781-7F52-4E13-B0C4-8E2B2F48ED7C.jpeg
    261.4 KB · Views: 143
Progress had started to slow up a bit as I was waiting for parts, but today the FedEx fairy arrived with rear springs, U bolts, shackle plates and bolts so armed with an extra pair of smaller hands (my youngest son William) we managed to fit the rear axle.
Then after lunch a DPD delivery with more parts! .... talk about everything at once! so we made up lost time today and managed to fit the rear and front axles... Wow these things are heavy ! no wonder a SWB alone can pull 3.5T trailer its basically a tractor with three seats!
Still waiting for the poly bush kit so haven't fully finished, plus two of the rear U bolts were different to the other two even though the part numbers were the same ? (see photos)
 

Attachments

  • IMG_8761.JPG
    IMG_8761.JPG
    330.3 KB · Views: 127
  • IMG_8783.JPG
    IMG_8783.JPG
    356.6 KB · Views: 140
  • IMG_8782.JPG
    IMG_8782.JPG
    324.8 KB · Views: 138
  • IMG_8764.JPG
    IMG_8764.JPG
    180.1 KB · Views: 141
  • IMG_8766.JPG
    IMG_8766.JPG
    362.3 KB · Views: 116
Started on the bulkhead last night, I recon those guys at Solihull got paid by the weld as there were 15 spot welds holding each of the lower bulkhead brackets on ! it wasn't until I googled a few photos that I realized they were welded. So after a bit of cleaning I found them. Drilled them out and voila !
 

Attachments

  • IMG_8792.JPG
    IMG_8792.JPG
    415.4 KB · Views: 120
  • IMG_8805.JPG
    IMG_8805.JPG
    321.4 KB · Views: 121
  • IMG_8804.JPG
    IMG_8804.JPG
    245.9 KB · Views: 123
With the bulkhead all cleaned up its easier to see what part of the footwell to replace (easy all of it!)
 

Attachments

  • IMG_8812.JPG
    IMG_8812.JPG
    447.4 KB · Views: 146
  • IMG_8814.JPG
    IMG_8814.JPG
    297.1 KB · Views: 141
  • IMG_8815.JPG
    IMG_8815.JPG
    298.1 KB · Views: 127
Well the bulkhead looks like Swiss cheese after drilling all the spot welds that held both foot wells.
Will spend the day tomorrow tidying it all up with some sandpaper ready to weld the new footwells and pillar brackets. Will give it a coat of 2pk aluminium primer first.
 

Attachments

  • 343BFC90-C957-494B-81A7-441929EB0C99.jpeg
    343BFC90-C957-494B-81A7-441929EB0C99.jpeg
    409 KB · Views: 125
Yes Mick, Here it is shotblasted with the drivers side footwell welded back up. Passanger side to do tomorrow along with the pillar brackets and its ready to go next Wednesday to the galvanisers.
 

Attachments

  • 5F422C92-DD5D-4708-BAAB-F7ABDB5DC054.jpeg
    5F422C92-DD5D-4708-BAAB-F7ABDB5DC054.jpeg
    293.3 KB · Views: 126
  • A86399AC-740F-4740-8090-0DEBDA8796E9.jpeg
    A86399AC-740F-4740-8090-0DEBDA8796E9.jpeg
    295.8 KB · Views: 131
This morning job before i started on the bulkhead was fitting the shocks! What a job! Heres a picture of how I managed to squeeze the lower bushes in enough to fit the washer and split pin. A length of unistrut and a large gee clamp!
 

Attachments

  • C7521386-AF6B-4C03-B27C-9BA7A1C4F49B.jpeg
    C7521386-AF6B-4C03-B27C-9BA7A1C4F49B.jpeg
    389.3 KB · Views: 123
  • DD525B76-CD39-431E-8E2A-F51516A38E7F.jpeg
    DD525B76-CD39-431E-8E2A-F51516A38E7F.jpeg
    263.3 KB · Views: 134
HELP! Right then the front diff outer pinion bearing stuck out more that the rear and there wasn't a spacer (539745) Therefore I ordered a new bearing 539707G and a spacer, after a lot of welding and pulling I managed to set the old outer bearing race off the diff casing. However the new bearing it too small (diameter wise) the bearing that I took out is a SKF 3120 outer 3193 inner ? any idea why what where?
 
In a word.......no. Sorry about that. I'm sure one of the more intelligent people will be along soon to help. Good luck mate.
 
quick update on the last few days, brake pipes all done, what a pain in the a*%e to fit the front cylinder link pipes.... grr ended up having to remove the steering arm bolts and lock tab to get them into position.
 

Attachments

  • IMG_8851.JPG
    IMG_8851.JPG
    218.7 KB · Views: 118
  • IMG_8850.JPG
    IMG_8850.JPG
    336.8 KB · Views: 116
  • IMG_E8835.JPG
    IMG_E8835.JPG
    351.3 KB · Views: 116
Bulkhead all welded up and ready for sending to the galvanizers next week, here it is fitted to the chassis to check that the lower pillar brackets were aligned before welding up the spot welds. (Top tip, the brackets came powder coated, which is difficult to remove with a blast cabinet, so I made a small fire with all the carboard boxes that I had in the garage in the fire bin and hung them to the inside with some wire, 15 min later the coating was turned to dust)
 

Attachments

  • IMG_8842.JPG
    IMG_8842.JPG
    297.3 KB · Views: 113
  • IMG_8843.JPG
    IMG_8843.JPG
    277.3 KB · Views: 115
The mystery of the differential....... finally found out what and where but not when.... the diff casing seems to be from a S11 which has a larger pinion bearing had thought of changing the diff for a 2a or 3 but decided to leave it as the diff seems ok I have changed to oil seal and will order the correct bearing.
 
Engine update, a light hone of the block revealed that No 1 bore was slightly worn. A quick call to Turner Engineering and some over sized pistons were posted out in exchange for the std ones. What a great company do deal with very helpful and knowledgeable. They even picked up that I had selected the incorrect core plug kit on my web order and called me to check! So just waiting for the block to be bored out (could be today) cylinder head is ready with new valve guides, cut seats and valve lapped in. Cant wait to get it back to the garage and start building it back up.
Gearbox to attack next! any recommendations ? what to check, change? Some companies offer a refurb kit (bearings seal etc) but I am rather skeptical regarding quality.
 
Back
Top