Series 3 SWB Nut and Bolt rebuild

This site contains affiliate links for which LandyZone may be compensated if you make a purchase.

Having freshly galvanized the original chassis do I paint it black or leave it as it is ?

  • Yes - Etch, prime and paint black

    Votes: 10 90.9%
  • No - Leave it galvanized

    Votes: 1 9.1%

  • Total voters
    11
  • Poll closed .
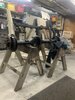
Well what a day, plan was to start building up the axles, did think that I would be well on the way with both front and back but ever the optimist! Day started with ' Mothers day' ! a delivery of flowers and card and I'm back in the garage and still in the good book's!
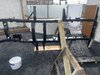
Thought I would start with the easiest of the two, the back axle. Read the haynes manual last night before going to sleep, so in theory I had slept on it, dreamt it, and made a mental plan.....
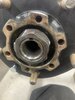
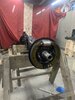
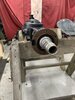
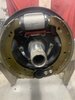
Well that plan went to rat s**t! think I must have got up too early or something, wasn't until I had folded all the flippin retaining tabs on the stub axle bolts did I realized that the brake back plate was 90 degree out !!! grrrrrr.
Thank god for before photos! That reminds me, I need to order a new case for my phone as this one stinks of oil
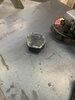
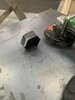
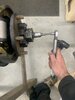
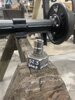
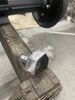
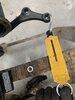
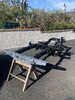
Right then, back plates back on properly I turned my hand to the stub axles.... s**t I forgot to order a socket to tighten the stub axle nuts?? No bother I'm sure that the 3/4 socket set will have a socket to fit.. no!!!!, it only goes up to 50mm and the nut is 52mm ! buggger !
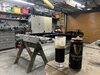
Well I cant carry on without tightening the stub axle nuts and torqueing the lock nut so what the hell .. I'll make a socket !
 

Attachments

  • IMG_8702.JPG
    IMG_8702.JPG
    281.6 KB · Views: 133
  • IMG_8705.JPG
    IMG_8705.JPG
    179.8 KB · Views: 132
Last edited:
Making a 52mm socket, its easier than you think. I cut a strip of 2mm sheet steel 25mm wide and 300mm ish long with a grinder. Bent the strip in the vice to the same angle as the large nut, then carried on bending around the nut in the vice. Cut the surplus then weld it onto a hexagonal base.
 

Attachments

  • IMG_8708.JPG
    IMG_8708.JPG
    307 KB · Views: 159
  • IMG_8709.JPG
    IMG_8709.JPG
    266.9 KB · Views: 145
I was going to weld a m12 nut onto the top but found a surplus 19mm socket which I thought would be better as it would fit directly to my 1/2" torque wrench.
After welding it on I realized that the 1/2" torque wrench only went down to 30nm therefore I made a few reducers to fit my 1/8" wrench
 

Attachments

  • IMG_8711.JPG
    IMG_8711.JPG
    176.3 KB · Views: 163
Last edited:
Result! Both rear stub axle nuts are on, tightened, torqued and secured.
 

Attachments

  • IMG_8713.JPG
    IMG_8713.JPG
    276.8 KB · Views: 118
Last edited:
1/2 " drive 52mm (ish) socket ! hey what can I say... bet you wont find one of these in Halfords, screwfix, tool station or machine mart ! I should know as I have already looked.
 

Attachments

  • IMG_8715.JPG
    IMG_8715.JPG
    256.3 KB · Views: 140
  • IMG_8716.JPG
    IMG_8716.JPG
    206.2 KB · Views: 154
Last edited:
Rear drums cleaned with thinners and painted with black high temp stove black paint should be dry for the morning ready to fit. Think I deserve a beer after all that graft.. oh hang on a min I better go and give Mrs H a hand with the chicken dinner seeing that its mothers day.
 

Attachments

  • IMG_8718.JPG
    IMG_8718.JPG
    323.5 KB · Views: 123
Top marks for ingenuity, I would have used a chisel to tighten hub nut :rolleyes:
On the pic above have you got the trailing shoe anchor plate fitted to the leading shoe
Hi Steve
Correct, I had spotted the error after taking the photo! Very observant! Heres a photo of the other side.
 

Attachments

  • 36E24F43-521A-4249-97D1-7FDEE02691EE.jpeg
    36E24F43-521A-4249-97D1-7FDEE02691EE.jpeg
    244.7 KB · Views: 125
Don't wish to discourage you but I used britpart shoes and slave cylinders when I built mine and they're crap. I've ended up binning them within a few months. I've fitted Delphi cylinders and on the recommendation of another member fitted borg&beck shoes as they are a bit softer and so give a far far better braking feel. I couldn't lock the brakes before but can now if I mash the pedal. The slave cylinders went rusty:(
 
Considering I have spent all day in the garage I haven't got much to update, progress has been rather slow but rewarding. Both swivel hubs have been re built and preload tension set to around 6.5kg (14lb ish) without the large oil seal, the UJ's have been changed in both half shafts and I managed to get the half shaft bearing and collar off with the help of a grinder. Heated up the new inner bearing race and collar with a camping stove to get them onto the half shaft. Wheels have now had 2 coats of high build primer (flattened to get rid of some of the pot marks) then a layer of black undercoat. 2pk Limestone white has been ordered today. Tires, tubes and new wheel nuts ordered (6.00 r16) to fit the original 5" rims (paddock spares) and I ordered some new nuts for the diff casing, bolts for the swivel oil seal retaining ring and a complete polybush kit for the chassis and suspension.
 

Attachments

  • IMG_8726.JPG
    IMG_8726.JPG
    214 KB · Views: 142
  • IMG_8727.JPG
    IMG_8727.JPG
    343.8 KB · Views: 140
  • IMG_8725.JPG
    IMG_8725.JPG
    316 KB · Views: 133
Oh forgot to mention that the engine has gone to a local specialist to have the block cleaned, honed and the crank polished; the head will be cleaned with new valve guides, new valve seats and the valves polished and lapped in.
Jobs for tomorrow finish building the front hubs and axle, maybe top coat the chassis ! and give the garage a good clean, as it bloody stinks of oily cow s**t.
 
Looks great. There's nothing so satisfying as getting a coat of paint on. Your wheels have come up a damn sight better than mine did.
 
Right then, progress today involves black paint, yes I painted the chassis! and all of the bits that went to glav (spring suspension bits and brackets) the garage floor had a covering of paint and my hair ! that bit was unavoidable really as I haven't had a hair cut for about 4 months so it was bound to end up in the pot!.
I used my lads skate board to wheel it outside to give the undercoated chassis a good clean with soapy water, rinsed I allowed it to dry in the sun. I hauled it back into the garage and gave it 2 thick coats of 2 pk top coat. Once touch dry I scatted it back out to the afternoon sun. Wow I am mega pleased with the result, after un making the rear end to reveal the shiny galv I decided to bolt on the rear bumpers.
 

Attachments

  • IMG_8736.JPG
    IMG_8736.JPG
    562.8 KB · Views: 130
  • IMG_8741.JPG
    IMG_8741.JPG
    684.9 KB · Views: 136
  • IMG_8742.JPG
    IMG_8742.JPG
    645.2 KB · Views: 134
Thought I would celebrate this mile stone with a Guinness! bugger me I though the chassis color reminded me of something !
 

Attachments

  • IMG_8744.JPG
    IMG_8744.JPG
    296.4 KB · Views: 124
Jobs for tomorrow (day 23 since I started) , take apart clean and prime the steering components (track rod arms, steering transfer and relay) take a look at the suspension shackle plates to see if any of them are re usable as I intend to re use as many original parts as possible (not because I am a tight a*r*se I just believe in keeping as much of the vehicle original as possible) I think this is what characterizes the old girl.
 
Looks great. There's nothing so satisfying as getting a coat of paint on. Your wheels have come up a damn sight better than mine did.
Hi Resurgam,
The secret is high build 2pk primer, wet and dry in-between coats don't be tempted to use stopper or filler as it may crack; at the end of the day they are wheels and will no doubt will take some punishment.
 
Back
Top