You are using an out of date browser. It may not display this or other websites correctly.
You should upgrade or use an alternative browser.
You should upgrade or use an alternative browser.
Series 3 SWB Nut and Bolt rebuild
- Thread starter UpandOver
- Start date
This site contains affiliate links for which LandyZone may be compensated if you make a purchase.

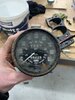
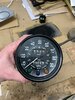
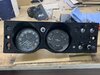
Spent a few hours in the garage last night, thought I would start restoring the dash.....after searching the net I found a few 'restored' clocks available which got me thinking, there must be a way of opening these things up (unlike the clocks on a CX500 that I done a few years ago that were pressed and sealed) here a photo of the clock before, and after some careful screwdriver prizing, wet and dry, cotton buds, and some satin black paint. Not bad effort if I do say so myself.
Attachments
Dash all back together now with the switches all cleaned and tested, however I did notice that the push button switch for the wiper washer water squirter (hey apologies for not getting the technical jargon right, I am a sparky at then of the day not a heavy!) anyhow I managed to find one on ebay a momentray Castelco Push button for a tenner just hope it fits.
Attachments
Top tip here, always take a photo of the drawing that you make ..... found out the hard way once when wiring up some ceiling spot lights I have noted down all the measurements of where the cables were in relation to the holes that I had to drill but stupid (thats me) had only made a sketch on the stud wall forgetting that the plasterer was due the following morning ...... I deviate ..... Oh BTW I have changed my avitar pic to a landrover that was for sale at Williams Classics (hey some free advertising just there! hint hint ....) this is what I'm aiming for ..... the name is Bond........ Brook Bond !
Attachments

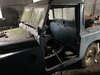
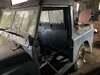
Right then Day 4 ..... in the barn .....managed to get the bulk head off on day 3 so the plan for today is to remove the rear tub and attack the front end which I am dreading for some reason.. maybe because the night before I went around every bolt I could find with WD40
Attachments
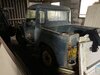
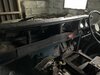
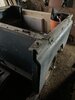
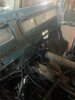
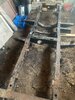
Tub is off ! after some light spannering, medium hammering and home full on grinding ! jesus how many bloody bolts are there on the back ? I had planned to buy a new galv chassis, however after close inspection the original one is in very good condition, a few outriggers have been changed in the past with some dodgy welding (more like seagull guano!) so I recon I should salvage the old girls undercarriage .... hey that sounds wrong... bloody hope the Mrs. doesn't start reading these posts otherwise she may think I'm hiding something.
Attachments

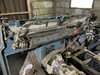
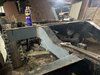
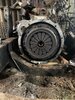
Gear box is off!....... I wish I wasn't covid shielding as I could have done with a hand today (hey no its not that I'm an old bugger its because I am Clinically vulnerable, saying that I wish I was back at work) .... these things are bloody heavy! even after a quick google 80-90kg doesn't seem a lot (2 bags of cement ! in old money)
Attachments
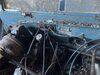
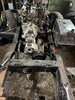
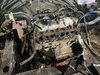
Finally got to the heart of the beast! well that was until I took the head off, two center bores scored a bit of rust in one , loads of marks on the top of the center pistons ! this thing has died and been resurrected at some point in its life, head seems spot on....... oh hang on this thing is a 3 bearing ! Spoke to the previous owner who conformed that the original 5 bearing went bang, it was sent to scrap and a second hand 3 bearing put in its place.... bugger now the dilemma.. Do I A): Rebuild the 3 bearing... hone / rebore new everything B): drop in a 200 N/A which after some googleing seems straight forward but does detract from standard, C): Drop in a 2.5 diesel but this again involves some fettling of battery tray left mount, or as my gut tells me D): get hold of a 5 bearing 2.25 diesel as I want this old girl as per origional ....
Attachments
day 5 ... day off from the barn today done some trawling last night on ebay, google, phone and I'm finding it very hard to find a bloody engine! Had a lead on one near by who was swapping it out for a petrol but only because it had no anti freeze and frozen. The search continues ..... anyone out there with a 5 bearing engine ?? Correct me if I'm wrong and I am certainty no expert (but google never lies ! lol) could I get a 5 bearing block, crank, end covers (excuse my ignorance) fly wheel and transplant the head, fuel pump etc from the 3 bearing ?
flat
Well-Known Member
- Posts
- 9,075
- Location
- Far away from you!!
Great project thread. Complete vehicle to bits in the first few posts, top work 
if the rest of the vehicle is complete then I would try and find a 5mb engine and keep it as standard
if the rest of the vehicle is complete then I would try and find a 5mb engine and keep it as standard
Flat.. hey first reply (thanks) will try and keep the momentum going both here on the forum and in the garage..... Yes the vehicle is complete bar a few bits (handbrake for some reason!) and a few items that are not refurbishable. I agree that a 5 main bearing engine is the way to go but proving difficult to find at the moment.... anyone out there that could help?
What a great project! Loving the write-up too! I’d stick with the petrol engine as they’re getting harder to find and they are the most reliable engines I’ve ever had. Other than the oil and filter change and occasional points and plugs, they last forever. Good move keeping the chassis, it looks in good condition. Just treat the surface rust and get it properly painted and it will go on for years. Keep the updates coming!
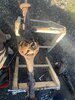
Right then where was I .......? Ah yes day 7 today but have day 6 to update you all on. Well day 6 was spent at the barn, flask and buttie box at hand along with another tin if WD40 (for the landy not for the packed lunch! even thought the sandwiches does taste of the stuff lol ) the plan for day 6 was to get the engine out which considering I was by myself with no engine hoist was going to be a challenge. Right then first thing was get the axles and spring off, after a considerable time hammering **** out of the bolts that hold the springs to the two dog bone plates I gave up and concentrated on the front. Right then, front spring mount bolts off then started on the back, again hammering seven shades off encrusted cow **** out of the bolts they don't wat to budge, I got the bar on the bolt end and gave it a turn! bugger me the plates are tapped ! they are threaded ! duh! wish I had brought that Haynes manual with me instead of the WD40!
Right so that's both axles off. I did take a photo but the camera on my phone had a greasy finger print on it ! grrr
Right so that's both axles off. I did take a photo but the camera on my phone had a greasy finger print on it ! grrr
Attachments
Last edited:
Day 7 today .... jobs for today, finish stripping every rusty nut and bolt of the chassis with the help of the grinder and strip the axles ready for taking to the shot blasters.
First things first.... a brew......
Drained the oil out of the diffs and then googled a few YouTube vids to find out how to strip the rear axle. Drums away...... but only after some serious lump hammering, screw drivering and wiggling. Back plates off and shafts out. Think that its for the rear axle .. piece of cake ..... No not the mechanicals, I'm talking about lunch ! . While sitting having a bite to eat I consider taping up the end spigots bits (hey technical jargon alert) with loads of gorilla tape to protect them from the blast.
Rear somewhat the same, however couldn't undo one of the tapered flat head screws that holds the brake drum to the hub, even after some heat, hammering, chiseling the bloody things solid..... grinder it is then.
Apologies again for the quality of the photo, I forgot to clean the camera lens on the phone..... right I've just cleaned it so there is no excuse for tomorrow's update.... just glad that the photos were not blurred was I was taking the dash and all the cables apart !
Attachments
Engine update !!! made a few phone calls today to some local suspects but nothing... decided to google landrover breakers a few phone calls and there's three very helpful guys who said they would call me back tomorrow either that or they were just trying to get rid of me off the phone. As soon as I mentioned that I was putting a 5 bearing into a series 3 I could hear them trying not to laugh! Hey what can I say I am a purist .... this is how it came out of Solihull.
Similar threads
- Replies
- 274
- Views
- 43K
- Replies
- 7
- Views
- 2K
- Replies
- 19
- Views
- 3K
- Replies
- 36
- Views
- 5K
- Replies
- 6
- Views
- 3K