flat
Well-Known Member
- Posts
- 9,075
- Location
- Far away from you!!
Good work 
Cheers Flat!
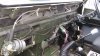
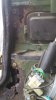
Went up to use Landy today and found two DRY foot wells even after some heavy rain! its getting there!
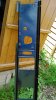
Thanks Steve - That's exactly what I need for the windscreen.!!
I have to ask.....what heck was the brown floral number you were wearing in post 121.?!
Cheers mate
That was Mrs Smiley on the inside of the screen...honest Thanks Steve - That's exactly what I need for the windscreen.!!
I have to ask.....what heck was the brown floral number you were wearing in post 121.?!
Cheers mate
Great thread Steve.. Keep it up
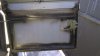
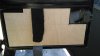
Would be interested in seeing the door cards, I have been thinking if making something similar out of 3 or 4 mm ply and fixing with bolts and threads inserts
Welcome To LandyZone, the Land Rover Forums!
Here at LandyZone we have plenty of very knowledgable members so if you have any questions about your Land Rover or just want to connect with other Landy owners, you're in the right place.
Registering is free and easy just click here, we hope to see you on the forums soon!