Smileys 110 Rejuvenation Thread

This site contains affiliate links for which LandyZone may be compensated if you make a purchase.
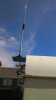
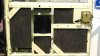
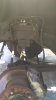
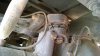
Made and fitted a plate for the magmount ariel and rand the cable to the CB.
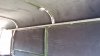
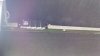
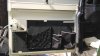
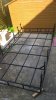
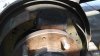
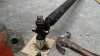
Mounted at the rear of the 110 and ran the cable through a grommet.
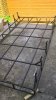
We also finished the carpeting on the load space sides...maybe add some more yet down onto the rear boxes, but will see how much quieter it is first :)
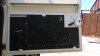
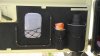
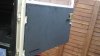
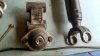
Finished the wiring too by adding in the 12v socket unit near the rear door.
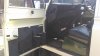
 

Attachments

  • DSC_0150.JPG
    DSC_0150.JPG
    160.9 KB · Views: 128
  • DSC_0149.JPG
    DSC_0149.JPG
    146.2 KB · Views: 110
  • DSC_0148.JPG
    DSC_0148.JPG
    92.4 KB · Views: 104
Yep, fell for that one when first fitting soundproofing under the bonnet!.

Used Evostick Timebond from a tin, seems great stuff as paint it onto each surface as normal but you get a brief chance to re-peel and align if needed.
This stuff seems to work ok......if it fails will post and let ya know :)
Didnt glue in footwell sections as may need to remove later. :)

the chap next to our unit is a vehicle upholsterer & he has recommended the brushable stuff, these guys sell.

Glues and Adhesives For Auto / Car Usage - Buy Online
 
What a transformation. Those door cards are absolutely excellent. How have you fixed them in place?

They fit under the upper lip of the door with stiff foam between panel and cards, then fixed with some little plates :D
 

Attachments

  • DSC_0151.JPG
    DSC_0151.JPG
    112.7 KB · Views: 127
  • DSC_0152.JPG
    DSC_0152.JPG
    174 KB · Views: 119
  • DSC_0160.JPG
    DSC_0160.JPG
    121.5 KB · Views: 146
Had some thick foam left over that was glued inside part of the load space, so cut this up and fitted it into the rear door under its door card.
Started her up and wow! what a difference!!
Also added some more carpet over the rear wheel cover boxes in the load space.
Other pics are of the new 12v supplies for accessories fitted near the rear door.
Can switch supply on and off via a 10A breaker switch I fitted with a little red LED so we know its on. :)
 

Attachments

  • DSC_0155.JPG
    DSC_0155.JPG
    134.8 KB · Views: 100
  • DSC_0154.JPG
    DSC_0154.JPG
    128 KB · Views: 118
  • DSC_0153.JPG
    DSC_0153.JPG
    165.5 KB · Views: 155
Pics of my new purchases!

Picked the full size Brownchurch roof rack up from fleabay for £50! it had a dent and needed painting, but a bargain.
Beat the dent out, cleaned it up and added hamerite and it looks damn good for the money :D
 

Attachments

  • DSC_0159.JPG
    DSC_0159.JPG
    556.2 KB · Views: 105
  • DSC_0156.JPG
    DSC_0156.JPG
    668.5 KB · Views: 120
AND...my other fab purchase, 5 brand new Event AT tyres on 5 black steel modulars fitted, balanced and delivered for £545 from Tyresdirect UK, bargain I reckon as not remoulds.
They got a good write up and TBH was fed up with weeks researching!
Anyways will let you know how they get on.
 

Attachments

  • DSC_0157.JPG
    DSC_0157.JPG
    317.7 KB · Views: 118
  • DSC_0158.JPG
    DSC_0158.JPG
    145 KB · Views: 96
Heres the reason for added pockets on the door cards, have to admit my wife did a better job than I had planned!
Flask & Hobnobs vital for any trip :)
 

Attachments

  • DSC_0162.JPG
    DSC_0162.JPG
    123.7 KB · Views: 114
  • DSC_0163.JPG
    DSC_0163.JPG
    114.6 KB · Views: 118
Planned to do suspension today, piggin nuts on the shocks just wouldnt give.
Read a great thread on here that used big wrench to grip the shock body while the nuts undone, but couldnt find my stilsens anywhere.
So did it by hacksawing halfway through the nut, then held the body with my oil filter chain strap and presto nut spun off easy.
Once the top mount was removed with the shock attached, did the same and nut came off easy.
 

Attachments

  • DSC_0169.JPG
    DSC_0169.JPG
    93.6 KB · Views: 93
  • DSC_0168.JPG
    DSC_0168.JPG
    484.8 KB · Views: 116
  • DSC_0167.JPG
    DSC_0167.JPG
    477.7 KB · Views: 95
  • DSC_0166.JPG
    DSC_0166.JPG
    310.6 KB · Views: 95
Noticed that the new tyres are a tad wider than the old ones but not as tall, guess I gain a bit of suspension clearance and movement but lose a bit of ground clearance.
Reckon the road ride will be loads better though :).
Tomorrow I will do the other side and if time drop the props as know I need to replace one UJ .
 
Mrs Smiley not happy with the old rear door card (TBH it was scrappy) so stripped the vinyl off and found the hardboard totally knacked and broken.
Bought new hard board used old card as template and covered with more left over carpet from doing the inside.
She would of preferred to re-do it in Vinyl but we had the carpet and it looks fine, again a bit more sound proofing so alls good!
 

Attachments

  • DSC_0172.JPG
    DSC_0172.JPG
    167 KB · Views: 99
A while ago I did the offside rear wheel bearing and noticed that one brake adjuster wasnt quite working, so replaced it and found it still lacking.
So thought would change it and sort it out when I changed the shoes, so stripped both hub covers off and removed the brake shoes.
Bit dirty inside so needed the service.
Shoes not that worn but looked a bit contaminated.
 

Attachments

  • DSC_0170.JPG
    DSC_0170.JPG
    210.6 KB · Views: 90
  • DSC_0174.JPG
    DSC_0174.JPG
    279.7 KB · Views: 89
Got the new shoes in on one side, moved them in against the slave cylinder and heard a squirt...doh! I had caught the boot getting the old shoes out, but main prob is fluid shouldnt even get behind the dust covers, so in a way glad its found now.
Checked the other side and although not leaking they feel notchy, so replacing both cylinders, seal kits cheap but so are complete units so at least all parts will be same age. Note the fluid showing on second pic.
 

Attachments

  • DSC_0175.JPG
    DSC_0175.JPG
    506.3 KB · Views: 103
  • DSC_0176.JPG
    DSC_0176.JPG
    425 KB · Views: 116
So with brakes abandoned for now thought I would tackle that rear A frame ball joint.
Haynes manual says remove upper link arms too, but I managed by supporting axle on stands then just jacking the body via the chassis a tad just to get the bolts out from the ball joint mount / link arms.
This saved more trauma!
 

Attachments

  • DSC_0179.JPG
    DSC_0179.JPG
    332.5 KB · Views: 132
  • DSC_0178.JPG
    DSC_0178.JPG
    146.1 KB · Views: 86
  • DSC_0177.JPG
    DSC_0177.JPG
    237.7 KB · Views: 88
Now the 110 passed the MOT as although the boot was split it didnt have play on the joint and dirt hadnt ingressed .......however that was in March, now look at the state of the boot!
 
And now with pics, comparing new to old.
My ball splitter tools just wouldnt quite fit so luckily a drift and hammer worked to get the units separated quite easily.
Then to get the joint out the arm without a press I used hefty spare vice against a block of stone and a lump hammer after spraying it all with WD40 (my answer to all stuck stuff) :)
Sadly I failed to get the new joint in so will have to ask a local garage to press it in for me....man I hate to fail but sometimes you just need the right tools and at least managed to get it all apart at least!.
 

Attachments

  • DSC_0180.JPG
    DSC_0180.JPG
    227.1 KB · Views: 115
  • DSC_0181.JPG
    DSC_0181.JPG
    248.7 KB · Views: 125
Suprised at how much play that old joint now had! so although a few months ago it was deemed ok in reality it was starting to fail.
The next saga was to replace a worn UJ and now decided to replace all 4 as although there was only play initially in one of them, they all are likely to be the same age.
So if a props off why only replace one? the rear prop was complete and utter B*****d to get apart but swearing louder seemed to sort it coupled with a BIG screw driver locking the shaft (plus handbrake) while I swung on a socket that just about tapped on to get things moving, then over to the spanners. :D

Pics to follow when parts turn up :)
 
Managed to get the local garage where I get my MOT's done to press the "A" frame ball joint in for the cost of a beer, so pleased with that!
Pic shows joint in place next to front propshaft that has been stripped.
Middle pic shows how I removed the UJ's, so now have both Propshafts fully stripped, cleaned and painted, awaiting the new UJ's ordered at the weekend :)
Final pic shows joint back in place, went together quite easily, just a limited bit of swearing while I aligned the bolt holes! :D
 

Attachments

  • DSC_0182.JPG
    DSC_0182.JPG
    199.4 KB · Views: 110
  • DSC_0183.JPG
    DSC_0183.JPG
    304.3 KB · Views: 89
  • DSC_0184.JPG
    DSC_0184.JPG
    145.1 KB · Views: 83
Good and bad day... UJ's turned up and managed to break the first one by failing to notice that a needle roller had slipped DOH!
Anyways at least that was the first one so made sure all the others were fitted ok.
The new brake slave cylinders also turned up so thats the rear brakes fitted with new shoes, new adjuster one side, all cleaned up adjusted and bled.
Brake pedal now feeling like it should!
Onto the the front end tomorrow, new track rod ends and drop arm joint :)
And hopefully get the UJ so I can fit front prop! rear one all sorted.
 

Attachments

  • DSC_0185.JPG
    DSC_0185.JPG
    148.9 KB · Views: 90
Back
Top