Smileys 110 Rejuvenation Thread

This site contains affiliate links for which LandyZone may be compensated if you make a purchase.
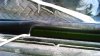
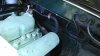
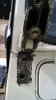
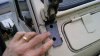
Next offer the screen up and get it aligned as besy you can, vital to have that second person to pull the cords while you apply pressure to the screen.
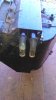
Make sure the outer beading doesnt curl under as the inner beading is pulled over the edges.
I hadnt noticed that it had done this on our first attempt so had to pull the screen out and start again.
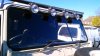
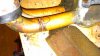
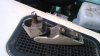
Its simple once you get going, add more squeegy lube as you go makes it much easier!
Take your time, bottom part first the each side in even amounts
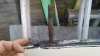
 :D
 

Attachments

  • DSC_0030.jpg
    DSC_0030.jpg
    139.4 KB · Views: 146
  • DSC_0032.jpg
    DSC_0032.jpg
    244.9 KB · Views: 156
  • DSC_0033.jpg
    DSC_0033.jpg
    284.2 KB · Views: 155
All sorted! :D
First attempt at this so we were pleased it went ok. albeit two attempts! :D

New seal looks good and hopefully has fixed the leak, will also replace both vent seals.
The finger pic is Mrs Smiley wanting sympathy for the sore blister from pulling the cords...:D
 

Attachments

  • DSC_0034.jpg
    DSC_0034.jpg
    401.2 KB · Views: 183
  • DSC_0036.jpg
    DSC_0036.jpg
    164 KB · Views: 162
  • DSC_0035.jpg
    DSC_0035.jpg
    119.1 KB · Views: 144
Good job I have a seal and am going to do mine in the spring as my seal is in a similar condition to yours. Doesn't look to hard!

Hi Flat, its not hard at all, just take ya time and needs 2 people :D

Nest is the vent seals, but have now spotted where another leak is which is the screen hinge bolts and the doors need adjusting as have new seals on these but doors dont pull against the top seal.

Its a challenge but will get the Landy rain tight!! :D:D
 
Got around to doing the front hub bearings on both sides and replacing the front brake pads.
Wanted to sort the suspension too as bits awaiting in the shed, but alas, time, and weather (and enthusiasm) brought play to an end :D

First pic shows bent disc guard that had bit of metal wedged in it, that explains the recent squeal when steering hard over! second pic shows hub about to be removed, oil had started seeping a bit.
 

Attachments

  • DSC_0044.jpg
    DSC_0044.jpg
    325.1 KB · Views: 136
  • DSC_0043.jpg
    DSC_0043.jpg
    401.5 KB · Views: 102
Removed the nearside hub, took some serious persuasion to get the drive hub separated from the main hub, reckon its been on there for quite a few years!
Note the brake calliper out the way, I chose to remove king pin bolts rather than undo the brake pipes, this led to loss of swivel joint oil but less hassle than brake re-bleed?
Can also see pads down below half of new, and wanted to make sure all was freed up.
Next pic shows new bearing race tapped in, I carefully tapped old ones out with hammer and punch as dont have a press.
Used old race to set new ones in with big socket on top, then again carefully tapped them into place. :D
 

Attachments

  • DSC_0045.jpg
    DSC_0045.jpg
    272.9 KB · Views: 109
  • DSC_0046.jpg
    DSC_0046.jpg
    368.2 KB · Views: 126
  • DSC_0047.jpg
    DSC_0047.jpg
    154 KB · Views: 96
Hub back on and float checked, always tad confused with this, as on past old motors just adjust until zero play but dont over tighten bearings.

Anyways I do it my way and aim for not stressed yet not rocking either.
Also removed old pads, these have the compression retainers on them held by split pins, new ones are different but still fit minus the retainer plates.
I kept the plates for future use.
 

Attachments

  • DSC_0048.jpg
    DSC_0048.jpg
    304.3 KB · Views: 108
  • DSC_0049.jpg
    DSC_0049.jpg
    700.2 KB · Views: 99
Also meant to add in last post, cleaned the brake pistons using WD40, great for getting crap off and any surface light rust.
These had crud but seem quite new and after cleaning pressed home quite smoothly.
 
Drivers side hub off same method as other side, second pic shows new pads in place.
Again cleaned pistons and added copper grease to rear of pads prior to fitting.
Took for test drive, and pads need bedding in as they work but not as sharply as the old ones, however road noise greatly reduced with the new bearings so well chuffed on this front!
ALso remembered to top up the swivel joints and diff housings with new oil.
Happy days....but noticed the heater leaking...and so it continues....but hey its a landy and I love it :D:D
 

Attachments

  • DSC_0050.jpg
    DSC_0050.jpg
    756.9 KB · Views: 97
  • DSC_0051.jpg
    DSC_0051.jpg
    250.9 KB · Views: 136
Cool, what do you do for the float? It confuses me to lol

Used same shims Flat, though one side is possibly tad tight, though the spring clip still fitted ok.
On the wheel bearing just set a tiny bit of float as when the lock washer and second nut is added and tightened it seems to take up the play without stressing the bearings.
Shaft end float is tiny amount and not sure what difference it really makes :D
 
Well had a bit of spare time today so thought I would pull out the leaking heater.
These things dont get better and need the 110 for some trips this week so didnt like the idea of water leaks.
Getting it out wasnt too bad, well easier than a modern car thats for sure!
As I knew I wouldnt get it stripped and back in before I need to use the motor I simply linked the pipes. see pics
 

Attachments

  • heater removed.jpg
    heater removed.jpg
    200.3 KB · Views: 93
  • heater.jpg
    heater.jpg
    567.7 KB · Views: 124
Drilled out the rivets and removed the matrix (first pic) then found where I thought the leak was (second pic)
The foam that the matrix is packed in within the housing had disintegrated allowing the matrix to vibrate about.
The engine constantly vibrating ensures the connecting hoses can wobble the matrix that made the copper inlet wear against the steel casing.
 

Attachments

  • stripped heater.jpg
    stripped heater.jpg
    524.8 KB · Views: 83
  • leaky pipe.jpg
    leaky pipe.jpg
    291.4 KB · Views: 85
I cleaned up the pipes and poured some water in and straight away saw water seep from the groove that was worn into the pipe.
Cleaned it up with wire brush and some wet & dry, added some flux and used a hot air gun and my soldering iron fitted with a large tip to solder up the damage.
Took a couple of attempts as re-cleaned as I went to ensure a good flow and seal.
 

Attachments

  • repaired.jpg
    repaired.jpg
    521.4 KB · Views: 102
Finally re-packed some foam I had to seat the matrix in and as I didnt have any suitable rivets to hand, I tapped the holes and fitted st/st M4 X6 screws to hold the unit back together.
The matrix was a nice snug fit now, but added heat shrink over the pipes and used two bits of 20mm plastic pipe which I split, and fitted over the pipes for added prtection.
Just warmed the plastic pipes with hot air gun to soften them enough to get over the pipes.
Belt and braces but at least they can get abraded by the housing now.
 

Attachments

  • heater repaired.jpg
    heater repaired.jpg
    453.3 KB · Views: 87
Checked out the resistor on the motor feed as only works in flat out mode, resistor measured 36 ohms but wont run motor when connected in.
Found a speed controller module that I had kicking around and tried this and works a treat, gives variable speed rather switched speed, so will add this in soon and post how I did it.
 
Well good weather and the new window seals arrived as well as the new windscreen hinge seals.
Trouble getting near side door uppers off, these hadnt been moved in years! the seals had been leaking badly as really hardened and cracked.
Got the door upper off using WD40 and leaving the nut at the end of the thread posts tapped upwards with a hammer, then gently levered up until it came free.
Pic shows how water ingress into the bolt tubes corrodes the bolt shafts!
Other side came free easily :D
 

Attachments

  • DSC_0078.jpg
    DSC_0078.jpg
    66.1 KB · Views: 87
  • Door seal2.jpg
    Door seal2.jpg
    90.5 KB · Views: 112
  • Door seal1.jpg
    Door seal1.jpg
    60.4 KB · Views: 96
We cleaned up the bolts, and both surfaces of the doors so that the new seals would sit correctly.
I had to re-cut the thread on one of the bolts which is M10 X 1.5.
Added copper ease to the bolts and threads prior to fitting.
The new seal needs holes cut for the bolts and some channels to let the water drain from the window slides.
Once all done the tops were bolted on and the excess lengths trimmed.
Doors seem to shut tighter against the frame seals less rattly! :D

Next will be the hinge seals..
 

Attachments

  • Door seal3.jpg
    Door seal3.jpg
    60.2 KB · Views: 83
Screen hinges hadnt been moved in a while!
As I have worked through sealing stuff its getting easier to find where the water comes from, and as you can see in the pic there wasnt any gasket fitted! water ran through the bolt holes even though some one had added loads of gunk.
Had to drill out both of the hinges upper bolts as these are poxy pozi drives and you have zero chance of shifting them even with an impact driver.
 

Attachments

  • DSC_0041.jpg
    DSC_0041.jpg
    346.1 KB · Views: 104
  • DSC_0042.jpg
    DSC_0042.jpg
    427.1 KB · Views: 110
Once the heads were drilled off the brackets came off easy, then just clamped what remained of the bolts in the vice and they unscrewed ok.
Threads in the hinge casings are Heli-coiled so quite tough.
I bought new bolts and cut them down to size, same length as the lower socket cap bolts.
All threads had copper ease added prior to putting back together, simple job and gaskets cheap so dont skimp on just adding sealant it still leaks in the end.
Next will be the bonnet rear rubber and both vent seals but looking to paint her again so will paint first. :D:D
Am determined to get this 110 water tight...ish!!
 

Attachments

  • Hinge1.jpg
    Hinge1.jpg
    79.4 KB · Views: 94
  • Hinge2.jpg
    Hinge2.jpg
    78.2 KB · Views: 85
Back
Top