Smileys 110 Rejuvenation Thread

This site contains affiliate links for which LandyZone may be compensated if you make a purchase.
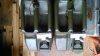
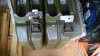
Good day today, engine oil, transfer box, gearbox and both axles all had fluid changed.
New air, oil and fuel filters done ready for the trip.
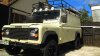
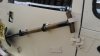
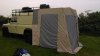
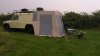
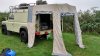
Mrs smiley did a brief tent fitting over the rear frame and starting to look really good, so pics will follow once its finished.
Only downside was that I had to buy 2 litres of gear oil from Halfrauds as bought Wilikinsons entire stock and still needed 2 more litres.
Wilkinsons = £3.50 per litre, Halfrauds = £8.49 per litre for the SAME brand..grrrr ah well got the job done :)
 
Nearly ready now.
As stated all fully serviced, roof boards fitted back onto the rack, just awaiting tent completion.
Note on full view pic the little bracket above the front number plate, there is a rubber pad next to and thats where I bolt on the farm jack, keeps it securely in place with additional strap (pic will follow)

Also mad new straps for the shovel as old ones were rotted.
Lastly fitted new 12V socket next to reversing light above the ladder.
This can be turned on and off from inside but will be useful for the tent lights I made up that are fitted in the top tent rail.
Also handy for powering a remote light etc if needed when changing rear wheels.
 

Attachments

  • DSC_0224.JPG
    DSC_0224.JPG
    188.1 KB · Views: 122
  • DSC_0223.JPG
    DSC_0223.JPG
    108.8 KB · Views: 105
  • DSC_0222.JPG
    DSC_0222.JPG
    92.6 KB · Views: 122
After searching the net, couldnt find any off the shelf locks for my jerry cans.
Most cages have a way to lock the cans but as I custom made my fixtures I decided to use some stainless steel hinges I had kicking about and some aluminium plate.
Just had to drill a couple of holes through the jerry can handle extrusion to mount the assembly which is simple and easy to use.
The cans will be locked to the rack to deter thievin gits and the fitted hinge locks will prevent any siphoning as well as keeps the lids securely in place :)
 

Attachments

  • DSC_0225.JPG
    DSC_0225.JPG
    177.9 KB · Views: 103
  • DSC_0226.JPG
    DSC_0226.JPG
    153.4 KB · Views: 117
Added a couple of 30A terminals to the side of the battery box, this makes it easy to clamp on the compressor croc leads instead of having to remove the seat and cover.

Also did a test run of camping and setting up the finished tent (pics to follow)
Made a bracket that holds the farm jack securely on top of the bumper (keeps the weight low) and with the strap at the other end doesnt rattle or move at all.
It normally lives inside the van but would be in the way of the bed :)
 
And pics of the tent made by Mrs Smiley, works great! and is quick to put over the home made slide out rails.
Nicely extends the camping space of the 110 :D
 

Attachments

  • DSC_0231.JPG
    DSC_0231.JPG
    133.8 KB · Views: 125
  • DSC_0234.JPG
    DSC_0234.JPG
    167.7 KB · Views: 102
  • DSC_0232.JPG
    DSC_0232.JPG
    271.6 KB · Views: 97
Sorry for quality of these pics but they show the light rail fitted with home made sliding LED units, the red is relaxing and good for not upsetting night vision while the whites are bright enough to read by.
Can turn on or off from inside back of the van as well as from outside.
 

Attachments

  • DSC_0235.JPG
    DSC_0235.JPG
    64.9 KB · Views: 119
  • DSC_0239.JPG
    DSC_0239.JPG
    69.8 KB · Views: 86
  • DSC_0240.JPG
    DSC_0240.JPG
    67.9 KB · Views: 79
Back
Top