Plat for tomorrow, (day 8) make some plywood end covers for the front axle (so the blast doesn't enter the casing) Fill a few chassis holes to stop blast entering the chassis. Not sure how but I'm thinking of threaded bar, nuts and washers, may need to drill a few extra 6mm holes opposite the large holes in the chassis where the cables fun through.
You are using an out of date browser. It may not display this or other websites correctly.
You should upgrade or use an alternative browser.
You should upgrade or use an alternative browser.
Series 3 SWB Nut and Bolt rebuild
- Thread starter UpandOver
- Start date
This site contains affiliate links for which LandyZone may be compensated if you make a purchase.
LincolnSteve
Well-Known Member
- Posts
- 1,224
- Location
- Lincoln
Great thread and really quick progress. Good luck with it. Watching with interest.
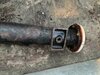
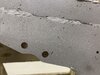
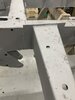
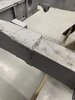
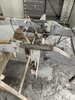
Day 8, spent the day getting the chassis and axles ready for the blasters. Decided to fill in the holes in the engine cross member and boxed outriggers with some large washers and threaded bar to stop the blast grit from entering otherwise it would be a pig to try and get out. Got the front chassis bushes out by drilling the rubber center out with a 2x5mm drill, hammering the center out then cut a slot with a hacksaw in the outer steel bush then knock it out with a small chisel.
Axles ends were sealed with plywood discs to prevent unwanted grit inside the axle casings, however I will take them all apart to de grease, replace diff bearing and oil seals before putting them back together. Right here's a question, when putting the axles back to together do I a") bolt the diff cover to the axle then paint ? or b paint the diff casing and axles separate then bolt them up ? hmm option a, would provide a good layer of protection for the nuts and stub of threads but option b: well the nuts would chip the paint when tightening up, plus it wouldn't be long before they were rusted? seems that I have answered my own question .... option a) it is me thinks.
bolt the diff cover to the axle then paint ? or b paint the diff casing and axles separate then bolt them up ? hmm option a, would provide a good layer of protection for the nuts and stub of threads but option b: well the nuts would chip the paint when tightening up, plus it wouldn't be long before they were rusted? seems that I have answered my own question .... option a) it is me thinks.
Will be paining all the black bits on the landy with 2 pk marine grade International primer, then 2 cotes of 2 pk satin black again marine grade top coat. This stuff is suppose to be good for 25 yrs in a marine environment so should be ok on the landy!
Axles ends were sealed with plywood discs to prevent unwanted grit inside the axle casings, however I will take them all apart to de grease, replace diff bearing and oil seals before putting them back together. Right here's a question, when putting the axles back to together do I a
bolt the diff cover to the axle then paint ? or b paint the diff casing and axles separate then bolt them up ? hmm option a, would provide a good layer of protection for the nuts and stub of threads but option b: well the nuts would chip the paint when tightening up, plus it wouldn't be long before they were rusted? seems that I have answered my own question .... option a) it is me thinks.Will be paining all the black bits on the landy with 2 pk marine grade International primer, then 2 cotes of 2 pk satin black again marine grade top coat. This stuff is suppose to be good for 25 yrs in a marine environment so should be ok on the landy!
Attachments
Jobs for tomorrow, take apart the front and rear hubs, make a pile for the blast cabinet and start de greasing everything. Then make a list of bits that I need to order (hey first order of new parts for the landy) getting excited!
Anyone know of any discount codes for any suppliers for parts ? First order will be axle items (bearings, seals, bolts, brake d)rums and shoes) axle mounting bits U bolts, shocks, springs, straps, rubber stops etc oh and tyres
Any advise on the items just mentioned?
Springs? standards or parabolic?
Shocks?
Tires and tubes (equivalent size that was standard when new)
Poly or nylon bush kit for the suspension ? have seen a Britpart kit for £65 are they any good?
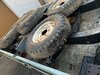
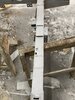
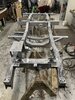
Had a call from the guys blasting that the chassis, axles and other bits were done! bugger me that didn't take long! (2 1/2 hrs) Well I am pleasantly surprised, yes there's been a few historic repairs, bodged outrigger welds and a new rear end stuffed on but overall the chassis is in brilliant condition. I have a few small patches to fix, bits to grind off and re weld but other than that It'll be ready for galvanizers on Monday and hopefully back on Wednesday. Think I better get my finger out and get the axles ready. Had a slight dilemma with the wheels, rims. The 5 wheels that I removed seemed to be a mix of 1 x LWB, 1 x ? same as LWB but had studs sticking out of the centre for what I can only assume were hub caps, then there were 3 (military 1 ton).. contacted the previous owner who conformed that the original wheels were fitted to an old cattle trailer that was parked up in the field.... a quick measure up and conformed that they were the original 5" swb rims ... all five of them ! great! Will get them off to the blasters next week.
Attachments
Last edited:
- Posts
- 6,505
- Location
- North Perthshire
Def paint it. Too obvious a target otherwise
ps can I ask how much the sandblasting was?
Ta
ps can I ask how much the sandblasting was?
Ta
Beneagles, thanks you for the reply, do you mind clicking on the poll to keep record of your thoughts, as whatever the majority decide that's what I'm going to do. I prefer Galv, my old fella would rather paint black as per original ….
As far as the blasting, haven't had the bill yet but its likely to cost cans and bottles if you get my drift !
As far as the blasting, haven't had the bill yet but its likely to cost cans and bottles if you get my drift !
- Posts
- 6,505
- Location
- North Perthshire
yes @UpandOver I voted before posting above.
auld duffer
Well-Known Member
- Posts
- 577
- Location
- scotland
Beneagles, try Tayside powder coating for your blasting, they are based in the docks at Dundee, Ask for Keith.
If you fancu galvanising try Forfar Galvanisers, They have the facilities to do a full chassis , apparently its nt as expensive as you might think . I didnt get it done, neither did I get the chassis blasted as mine really didnt need it .. I did get a hfew things blasted theough ..
Up and Over, why not have the axle casings galvanised as well ?
PS I voted for paint Galv is good on its own but what harm can an additional layer of protection give, I would even waxoil it ..and give it a lifetime guarantee belt and braces with a spare pair of underpants
If you fancu galvanising try Forfar Galvanisers, They have the facilities to do a full chassis , apparently its nt as expensive as you might think . I didnt get it done, neither did I get the chassis blasted as mine really didnt need it .. I did get a hfew things blasted theough ..
Up and Over, why not have the axle casings galvanised as well ?
PS I voted for paint
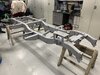
Galv is good on its own but what harm can an additional layer of protection give, I would even waxoil it ..and give it a lifetime guarantee belt and braces with a spare pair of underpantsQuick update.. Day 10 on the old girl. Got the chassis in the garage and set to work, re welding some of the outriggers, few patches on the chassis where it had gone thin, remake the engine cross member as it was bashed in and remove all of the weld splatter marks ! and believe me there's loads! recon I have saved 10 kg lol
Some before pics
Some before pics
Attachments
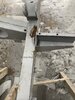

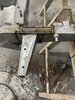
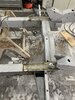
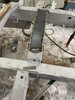
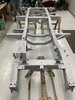
All the welding is now complete, splatter removed and all new and old welds dressed. Looking good, some honest repairs will be visible but the are a hell of a lot neater that they were and much stronger plus it adds to the character of the vehicle. Going to fill the chassis and suspension bush mounts with m8 threaded bar tomorrow to stop the glav getting into the holes. Oh and give the garage a good tidy up. Chassis off to galv Monday morning returning on Wednesday, cant wait to see it done!
Attachments
Marmaduke
Well-Known Member
- Posts
- 9,773
- Location
- Near the land of 'Me Duck'
Not aimed at yours but the previous bird**** holding the crossmember on
Similar threads
- Replies
- 274
- Views
- 46K
- Replies
- 7
- Views
- 2K
- Replies
- 19
- Views
- 4K
- Replies
- 36
- Views
- 6K
- Replies
- 6
- Views
- 3K