You are using an out of date browser. It may not display this or other websites correctly.
You should upgrade or use an alternative browser.
You should upgrade or use an alternative browser.
Series 3 SWB Nut and Bolt rebuild
- Thread starter UpandOver
- Start date
This site contains affiliate links for which LandyZone may be compensated if you make a purchase.
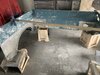
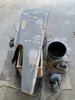
Stripped the rear tub and sanded it all down, taking the inner arches and floor to a local fabricator to make some new ones out of 2mm ali.
Rear quarters ordered from JC.
Rear quarters ordered from JC.
Attachments
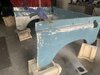
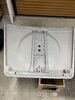
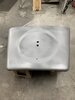
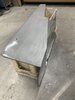
First coat of 2pk zink primer, looks pretty good have found two small dents in the wheel well, wet and dry in the morning a little metal filler and another coat of primer and it should be ready for some blue.
Attachments
adrianhartopp
Active Member
- Posts
- 93
- Location
- Rugby, UK
Mark sent me to video footage of first engine startup and first drive in and out of the garage.
Have to say, it sounds and looks brilliant. Can't wait to see the complete build, it's going to be stunning!!!
Have to say, it sounds and looks brilliant. Can't wait to see the complete build, it's going to be stunning!!!
Thank you for the feedback Adrian, another few months of metal bashing, sanding and spraying and it should look more landroverishMark sent me to video footage of first engine startup and first drive in and out of the garage.
Have to say, it sounds and looks brilliant. Can't wait to see the complete build, it's going to be stunning!!!
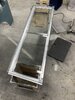
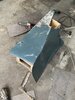
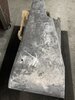
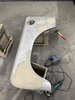
Started on the wings ! Thought they were is better condition that first thought  Never mind will strip the paint off firstly, weld in some patches order some new skins and front sections.
Never mind will strip the paint off firstly, weld in some patches order some new skins and front sections.Attachments
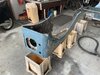
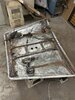
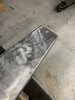
RH wing stripped with a twist knot 75mm cup wire brush on the grinder, internal ribs removed from the inside as not to disturb the spot weld marks on top. Wing top flattened using a piece of plywood and the head off a lump hammer from the inside. Ribs welded back in from the inside, two new pieces welded in where the top bolt fixing and inner bottom fixing go. Next job is to carry on with some light panel beating then apply some metal filler just to platten the suface. I’ll give it a good thick coat of 2pk zink primer in and out prior to attaching the front section using the two rivet holes and some car body seam adhesive. This way all the original spot weld marks will still be intact.
Attachments
steve2286w
Well-Known Member
- Posts
- 5,229
- Location
- monkeyangerland
Well I wouldn’t worry about small dents as they can be filled , I can’t ally weld so hats off to you for that , but I decided to change my rear door skin as the folded edge was very corroded.
My replacement ally skin was very shiny and folded over nicely and a good fit but was softer than the original birmabright so scratches a lot easier , I think original is 5256 spec
My replacement ally skin was very shiny and folded over nicely and a good fit but was softer than the original birmabright so scratches a lot easier , I think original is 5256 spec
Another day another 20 sheets of sand paper ! thinking about it I should start using my left arm with the wet and dry? It no better a job but it does take away any suspicions that mrs Hughes has of what I’m doing in the garage
Attachments
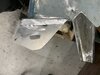
It’s always better to start with the worst isn’t it ! As the next is a piece of p!ss
O/S wing assembly took a week to get to primer the N/S two days !
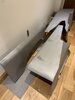
Bare metal respray ! Whoo suit you sir! Staring to get the hang of this ally, heat to stretch! Cold cloth to shrink ! Just hope mrs H doesnt read this post
O/S wing assembly took a week to get to primer the N/S two days !
Bare metal respray ! Whoo suit you sir! Staring to get the hang of this ally, heat to stretch! Cold cloth to shrink ! Just hope mrs H doesnt read this post
Attachments
Bit of wet and dry tomorrow morning on the N/s wing and it should be sorted ready for some blue, quick 80grit and some primer and the n/s should be done ! Wings ready for blue … next step the doors ! Decided to use the original door frames as their far more superior to the new replacements, will order some new skins. Any suggestions as to where / who to get some from ?
steve2286w
Well-Known Member
- Posts
- 5,229
- Location
- monkeyangerland
80 GRIT!!!  Get a better finish with half a brick
i git my rear door skin from https://www.sp-4x4.com/
It was £20 3 year ago came well packed and fitted well
Get a better finish with half a bricki git my rear door skin from https://www.sp-4x4.com/
It was £20 3 year ago came well packed and fitted well
steve2286w
Well-Known Member
- Posts
- 5,229
- Location
- monkeyangerland
Phew had me worried
steve2286w
Well-Known Member
- Posts
- 5,229
- Location
- monkeyangerland
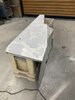
That must be the etch primer , I just been getting an orbital sander , have you a preference for a brand of discs , just had some makita ones I think that came apart as I pulled it off with the cloth part stuck to toolJust brought the wings into the house to harden off
Steve, I use Abranet sanding discs, 80 grit to strip old paint and key the surface for filler. I use the 80 shape filler, then 240 grit to finish off and prep surface for 2pk aluminium primer. Then 500 or 600 wet and dry between coats of primer which may be between 2 or 5 coats. The paint shop that I use then give the panels a quick over coat of undercoat primer to provide a key for the top coat.
Attachments

Similar threads
- Replies
- 274
- Views
- 48K
- Replies
- 7
- Views
- 2K
- Replies
- 19
- Views
- 4K
- Replies
- 36
- Views
- 6K
- Replies
- 6
- Views
- 4K