border
Well-Known Member
- Posts
- 3,517
- Location
- North East. UK
Been held up on my rebuild on a few bits, but still plenty to be getting on with.
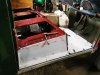
Just about ready to fit seats, this is what it looks like at the minute. in pic.
Only got one lid for the seat box but just gonna cut some Checker plate to make the other 2.
Now what do others do ? should I be putting some kind of Carpeting or something around and on top of the seat box before fitting the seats, or just bolt them on as it is.?