Smileys 110 Rejuvenation Thread

This site contains affiliate links for which LandyZone may be compensated if you make a purchase.
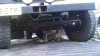
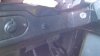
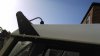
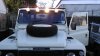
Last pic shows the sound deadening under the bonnet, this was re-glued and has stayed in place for several hundred miles.
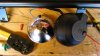
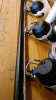
Need to strip the dash out and do some work and then carry on the sound proofing.

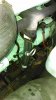
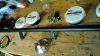
Also have a new brake master cylinder to fit and need to take off the servo unit and put a new gasket on to cure the oil leak. :)
 
Few more jobs sorted ready for the winter.
Noticed exhaust down pipe was perferated so bought a whole new system, but gave so far only fitted the down pipe as once I got to grips with it the rest of the system doesnt look bad.

Bolts came undone quite easily after squirt of WD40.
Just added sealing compound to joint to ensure no gass leaks
 

Attachments

  • 024.jpg
    024.jpg
    41.1 KB · Views: 159
  • 029.jpg
    029.jpg
    425 KB · Views: 163
Pipe re-fitted ok but position ended up slightly different from before as noticed the top bolt was almost touching the sump!
This could of worn through after time so as it was far too long I cut it down, easier than undoing all the bolts and re-fitting again.
Second pic shows hi clearance (standard suspension) makes easy under vehicle access...Suburu owners eat ya heart out :D
 

Attachments

  • 036.jpg
    036.jpg
    384.8 KB · Views: 155
  • 052.jpg
    052.jpg
    34.2 KB · Views: 167
Also got around to fixing ALL the engine oil leaks and fitted a 110Ah heavy duty battery as the one that was in it although new wasnt going to cut it on frosty cold start mornings.
Plan is to fit the smaller 90Ah one under drivers seat for use as an auxillery supply.
Also changed oil and filters, replaced leaking gasket on rocker, and reset all valves.
Removed vacuum unit that had bad leaking gasket, stripped it cleaned it and replaced seals and gaskets.
Finally replaced the rocker oil cap seal too, spent less than £2 on gaskets and probably saving a fivers worth of oil a month!:D
 

Attachments

  • 025.jpg
    025.jpg
    47.3 KB · Views: 183

Cheers Flat! :)

Lots of stuff on my list but pretty busy and the ol Landy is daily transport when required too so that does slow down some of the jobs.
Main thing is she is working and getting sorted :D

Quite a few more jobs to sort before our big Pyrenees trip next year!
 
The list of tasks never really gets finishes as more get added along the way.
One such task has been a blown headlamp bulb forced me into upgrading both headlights, mostly due to the MOT coming up in a couple of months and both lights had corrosion in them.
First pic although not that clear is of the old unit, both were in pretty poor shape.
The new ones were lest than £30 the pair including bulbs ffrom Paddocks.
 

Attachments

  • 019.jpg
    019.jpg
    181.6 KB · Views: 157
  • 018.jpg
    018.jpg
    168.9 KB · Views: 120
  • 017.jpg
    017.jpg
    181.8 KB · Views: 137
Next job is to ditch the cheap crap spotlamps that were a false economy as they came without bulbs and literally break as soon as you try and get them open to fit the bulbs.
Hence they serve no purpose other than fill the holes I drilled in the bumper!
Plans are to fit a pair of decent 100W ones.
Also waiting for dry run of weather to replace the windscreen seal, vent seals and the brake master cylinder and rear brake adjuster sets.
Also am going to strip the dash out, add a CB bracket and finish the soundproofing off. :)
 
Ok I stated that I was going to get some better lights and couldnt resist getting a light bar set.
Reckons this wasnt bad value, £75 ish with 4 spots.
Weathers crap so decided to connect it all up nicely in the shed.
First pic is the kit, next pic shows how the lamps are connected.
Its not rocket science I know, but always use good crimps and a decent crimp tool.
 

Attachments

  • 017.jpg
    017.jpg
    186 KB · Views: 139
  • 018.jpg
    018.jpg
    193.3 KB · Views: 121
Last edited:
The cable I used looks thin but its 16AWG Type 44, and each lamp has its own pair to prevent voltage drop.
Note the sleeve is slid over the live cable and secured with a Tiewrap.
Stops any nasty shorts later.
A small hole is made in the bung so its a tight fit on each cable to keep water out.
 

Attachments

  • 019.jpg
    019.jpg
    160.1 KB · Views: 119
Once the spots are all wired (I marked the earths) the cables were protected using a spiral-band covering.
I drilled each bracket and secured with a P clip which keeps all the cabling in place with enough bite of cable to be able to adjust the lamps later.
I am running the earths as well as the lives right back to the battery and not relying on a local earth on the roof.
Just need to add a few big black cable ties to finally secure the wiring when fitted.
 

Attachments

  • 020.jpg
    020.jpg
    401.6 KB · Views: 133
  • 021.jpg
    021.jpg
    472.4 KB · Views: 120
  • 022.jpg
    022.jpg
    151.3 KB · Views: 115
No pic but have secured the cables with another P clip to side bracket and threaded on a gland that will be fitted through the roof to ensure a good water tight cable run.
I am going to use a 3 way switch & relay set up on the final wiring.
Centre position will be spots off, first position will light the spots with the full beam switch so they dip as well, third position will be spots on regardless of ignition/ light switches in case I just need light to do stuff.
Will post up a circuit and more pics once I fit the set up onto the roof, maybe tomorrow if it aint p****g down!
 
Thanks Flat!
Heres the final result, need to set up so the beams are in the right place but all works as planned.
The unclear pic shows the little 3 way switch, centre is off, up is they work with full beam and down is they are on as utility lights.
 
Last edited:
Sorry didnt load pics here they are :D
 

Attachments

  • DSC_0023.jpg
    DSC_0023.jpg
    140 KB · Views: 117
  • DSC_0019.jpg
    DSC_0019.jpg
    209.7 KB · Views: 116
  • DSC_0018.jpg
    DSC_0018.jpg
    443.2 KB · Views: 117
The gland entry through the roof although a bit big is better than just clagging up a hole with silicon and is easily removed, plus may add the CB radio ariel lead through it.
 

Attachments

  • DSC_0021.jpg
    DSC_0021.jpg
    137 KB · Views: 162
  • DSC_0020.jpg
    DSC_0020.jpg
    100.4 KB · Views: 110
  • DSC_0022.jpg
    DSC_0022.jpg
    176.8 KB · Views: 121
  • DSC_0024.jpg
    DSC_0024.jpg
    188.2 KB · Views: 119
Back
Top