Smileys 110 Rejuvenation Thread

This site contains affiliate links for which LandyZone may be compensated if you make a purchase.
Onto the body..
Paint was showing signs of age and looking like the dark sand coat over the green had been done ok but maybe on a Monday morning / Friday afternoon perhaps...
Found some crazing in places and this was tested with a stanley blade, basically if the blade lifted the paint it wasnt sound.
Here sets in some tedious hours of sanding, then re-testing with the blade, overall good to do this as what seemed ok sometimes ended up with sheets of paint coming off.
Its just about there now and will be hand painted with care using a not cheap paint from stationary engine parts again.
My wife is a stippler to preperation so its taking longer than planned and probably tad OTT for whats still an old Landy but she is right, at least I hope so..
 
Heres the pics on body prep so far, not many motors that can take someone on the roof...:D
 

Attachments

  • paint strip-1.JPG
    paint strip-1.JPG
    308.1 KB · Views: 318
  • piant strip-2.JPG
    piant strip-2.JPG
    334.4 KB · Views: 320
  • paint strip-3.jpg
    paint strip-3.jpg
    165.7 KB · Views: 287
Make sure you put some security features in, it would be a shame to loose after all you work.

LandyWatch - Keeping an eye on your Land Rover

Landywatch is a good place to start.

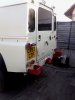
Can't wait to see the paint job. What are you going to do inside?

Cheers, at the moment I store it in a locked compound out of site with steering lock and a motorcycle cable lock through the steering, but once on the street they are vulnerable!
Will fit my own security stuff, but appreciate the link will join it.

Plans for the inside are simple big tidy up and re-paint, pics will follow, and a few mod cons that dont detract from its good basic character.
Definitely starting with sound deadening kit and carpets! :D:D
 
Few days off so making use of the fine weather, typically I dont want it sunny (yeh I know nuts!) but pretty much finished all the prep but to apply paint to a hot surface isnt good.
used to hand paint cars years ago with excellent results so hoping for similar this time.
using satin finish paint as easy to touch in when it gets scratched etc and as we are planning some green laning it will get marked.
Anyways heres the prep pics
 

Attachments

  • Photo0033.jpg
    Photo0033.jpg
    177.7 KB · Views: 252
  • Photo0037.jpg
    Photo0037.jpg
    227.1 KB · Views: 241
  • Photo0036.jpg
    Photo0036.jpg
    188.1 KB · Views: 270
  • Photo0035.jpg
    Photo0035.jpg
    152.7 KB · Views: 263
A lot of the paint was tediously removed with stanley blades, as was a bit poor in places so came off in sheets.
Didnt use paint stripper as some not good on alloy and it gets in the nooks andf joins and makes ya new paint peel later.
Finish off with wet & dry, wash down then clean with white spirit, its taken some time and probbaly tad overboard but my wife is happy to do a lot of the fiddle prep so not arguing!
Front grill and light surrounds have been cleaned and sprayed with plasticote, will supply pics later.
Back to the cleaning off...
 
Bit of a battle with the weather but finally got the 110 painted!
Applied 2 coats overall and looks pretty good, though a third coat would be anal but smart...sticking with the 2 for now as we are pleased with the result.
Ran out of time today but will fit all new door rubbers tomorrow, pack her up and off to the Bristol & West Landy show...happy days :D:D

Lots more jobs to do but hoping to pick up some bits at the show.
Still need to clean & paint the front bumper and rear light protectors, then its onto the inside, will again take lots of before and after pics :)
Thanks to all those who have been viewing so far :D:D
 

Attachments

  • New paint-4.JPG
    New paint-4.JPG
    294.6 KB · Views: 329
  • New paint-3.JPG
    New paint-3.JPG
    358.9 KB · Views: 303
  • New paint-2.JPG
    New paint-2.JPG
    325.4 KB · Views: 333
  • New paint-1.JPG
    New paint-1.JPG
    248.8 KB · Views: 356
Just fitted all new door rubbers around £12 each, looks tidier and less rattles!
Went to the B & W Landy show and got some more bits, some for the inside so will be doing this over the next week or so.
Still need sound deadening kit and mats, time for research :)
 
Bumper cleaned & painted and wheel arches re-blacked.
Still need to sort the rear light protectors, and add back on the spare wheel then thats the engine, body & chassis sorted.
Started the inside and fitted new lockable centre console and started adding in some more wiring.
Will be fitting inside lighting and rigging the new high power reversing light (added last weekend) to be independantly switched as well as working off reverse switch.
All coming along, though dont think any landys ever get truley finished! :D:D
 

Attachments

  • Photo0042.jpg
    Photo0042.jpg
    182.3 KB · Views: 272
  • Photo0043.jpg
    Photo0043.jpg
    172.7 KB · Views: 263
Cheers Charles! am happy with the paint as it can be touched in so easily without showing.
Will post pics of the inside as it progresses, used it to sleep in at the Landy show last weekend using simple double bed set up inside and worked well.
:) :)
 
Rear light guards sorted and reverse light wired ....so it doesnt pop the leaft hand side light fuse! that was a wierd fault but easy fix :D
Light fitted high on left hand side, will add switch so can be used while parked when camping etc.
Have fitted front mud guards and have rear ones but will need to source or make brackets.
Inside is coming on so pics will follow.....still stuff to do...
 

Attachments

  • Photo0045.jpg
    Photo0045.jpg
    118.1 KB · Views: 264
  • Photo0044.jpg
    Photo0044.jpg
    117 KB · Views: 220
Back
Top