You are using an out of date browser. It may not display this or other websites correctly.
You should upgrade or use an alternative browser.
You should upgrade or use an alternative browser.
P38A Project P38
- Thread starter monkfish24
- Start date
This site contains affiliate links for which LandyZone may be compensated if you make a purchase.
monkfish24
Well-Known Member
- Posts
- 1,296
- Location
- Cornwall
I'll pray to the RR Gods for you!")
Be careful it's possible/guaranteed considering the level of squish, that you've squished the HG far too much, rendering it useless.
Possibly, they aren't expensive so it's always worth checking a new one in.
Henry_b
Think outside, no box required.
- Posts
- 15,601
- Location
- somewhere else
Possibly, they aren't expensive so it's always worth checking a new one in.
Yep if it were me. i'd throw a new HG in + some new bolts
I find Victor Reinz gaskets to be the best, but personal preference and all that
monkfish24
Well-Known Member
- Posts
- 1,296
- Location
- Cornwall
Hi.. whoops....as above....bolts in sequence to 20 Nm...then in sequence turn 90 deg. Hope not too much damage done.
Kind regards
Yeah, I did the first head fine, did the second today and wasn't obviously paying full attention.
monkfish24
Well-Known Member
- Posts
- 1,296
- Location
- Cornwall
I'll pray to the RR Gods for you!
Be careful it's possible/guaranteed considering the level of squish, that you've squished the HG far too much, rendering it useless.
Should be ok, it's not like I used a 3ft breaker bar to tighten it
mozz smith
Well-Known Member
- Posts
- 1,700
- Location
- tameside manchester
Hi Monkfish , your thread is excellent all step by step , its great that you done this it gives much hope to other P38 owners , following from start really pleased for you the way its all going well done mate ,,continue with the gusto you show & you Will be rewarded when you get to drive your rangie once again !!!!! watching this thread is a pleasure , also entertaining in some parts ,that's the landyzone humour ….once again well done . regards Mozz
monkfish24
Well-Known Member
- Posts
- 1,296
- Location
- Cornwall
Hi Monkfish , your thread is excellent all step by step , its great that you done this it gives much hope to other P38 owners , following from start really pleased for you the way its all going well done mate ,,continue with the gusto you show & you Will be rewarded when you get to drive your rangie once again !!!!! watching this thread is a pleasure , also entertaining in some parts ,that's the landyzone humour ….once again well done . regards Mozz
Mozz, thank you! I love playing with Land Rovers and enjoy the general banter on here. I also have always been the class clown so glad to here I'm coming across as entertaining
I love keeping old cheap cars going, they aren't bad cars, they just don't have the love shown to them they deserve.I'm very much looking forward to getting her going again!
ukadamwest
Well-Known Member
- Posts
- 2,990
- Location
- Surrey
I'm very much looking forward to getting her going again!
and the P38 too ?
monkfish24
Well-Known Member
- Posts
- 1,296
- Location
- Cornwall
Managed to pick up a nanocom and eas kicker today from OXO. May well come in handy when I turn the electrics back on.
Hopefully the engine will be back in life tomorrow!
The heads have been refaced, how vital is it that the rockers are reshimmed?
Cleaned a load of gunk and rubbish out of the intake manifold, the engine is coming together nicely.
The exhaust looks beautiful wrapped rather than heat shields. Looking forward to turning the key tomorrow!
Henry_b
Think outside, no box required.
- Posts
- 15,601
- Location
- somewhere else
It's quite important to check tappet pre-load as there have been so many variants of the Rover engine components, you can't really "assume" anything, So if you want to be sure of how your engine will end up. don't forget this important issue. Tappet pre-load is the distance between the pushrod seat in the lifter and the circlip, when the lifter is on the heel of the cam and the valve is closed. Not setting the lifter pre-load, will cause premature wear, noisy valve gear, and it's possible the engine will fall on its face Or if your lucky "initial complete loss of compression as the valve will not be able to close fully,
The following information assumes that the following components are in good condition - rockers, pushrods, valve guides and valve stems. a clearance of .020" to a maximum of 0.60" must exist between the spring loaded pushrod seat in the top of the lifter, and the underside of the retaining circlip. This check should be made with the valve gear fully assembled, and the lifter empty of oil, positioned on the lowest point, on the back of the camshaft. The simplest way to measure the gap is by using round wire. Use a piece .020" for the low clearance check, and a piece of .060" for the high clearance check. Check all 16 lifters in turn.
There are various ways to adjust the pre-load on the Rover V8. normally a decrease off pre load is required and this is achieved by using a "rocker pedestal shim kit" if the opposite applies the it would be achieved by machining the rocker pedestals.
Or if your lucky "initial complete loss of compression as the valve will not be able to close fully,The following information assumes that the following components are in good condition - rockers, pushrods, valve guides and valve stems. a clearance of .020" to a maximum of 0.60" must exist between the spring loaded pushrod seat in the top of the lifter, and the underside of the retaining circlip. This check should be made with the valve gear fully assembled, and the lifter empty of oil, positioned on the lowest point, on the back of the camshaft. The simplest way to measure the gap is by using round wire. Use a piece .020" for the low clearance check, and a piece of .060" for the high clearance check. Check all 16 lifters in turn.
There are various ways to adjust the pre-load on the Rover V8. normally a decrease off pre load is required and this is achieved by using a "rocker pedestal shim kit" if the opposite applies the it would be achieved by machining the rocker pedestals.
Last edited:
monkfish24
Well-Known Member
- Posts
- 1,296
- Location
- Cornwall
It's quite important to check tappet pre-load as there have been so many variants of the Rover engine components, you can't really "assume" anything, So if you want to be sure of how your engine will end up. don't forget this important issue. Tappet pre-load is the distance between the pushrod seat in the lifter and the circlip, when the lifter is on the heel of the cam and the valve is closed. Not setting the lifter pre-load, will cause premature wear, noisy valve gear, and it's possible the engine will fall on its face
The following information assumes that the following components are in good condition - rockers, pushrods, valve guides and valve stems. a clearance of .020" to a maximum of 0.60" must exist between the spring loaded pushrod seat in the top of the lifter, and the underside of the retaining circlip. This check should be made with the valve gear fully assembled, and the lifter empty of oil, positioned on the lowest point, on the back of the camshaft. The simplest way to measure the gap is by using round wire. Use a piece .020" for the low clearance check, and a piece of .060" for the high clearance check. Check all 16 lifters in turn.
There are various ways to adjust the pre-load on the Rover V8. normally a decrease off pre load is required and this is achieved by using the "rocker pedestal shim kit" if the opposite applies the it would be achieved by machining the rocker pedestals.
Ok, so your basically pushing the wire under the bottom of the push rod?
I've read on RAVE what it recommends and for some reason I'm just struggling to picture it
Henry_b
Think outside, no box required.
- Posts
- 15,601
- Location
- somewhere else
Ok, so your basically pushing the wire under the bottom of the push rod?
I've read on RAVE what it recommends and for some reason I'm just struggling to picture it
Just borrowed this pic and it perfectly shows were to stick ya thingy right inbetween the piston and circlip
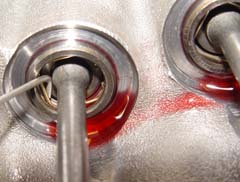
Stick ya .020 and .060 "low and high clearance" in the spot where the pick is on the picture.
ideally the cam should be 104-108 Degrees off it's lobe.
monkfish24
Well-Known Member
- Posts
- 1,296
- Location
- Cornwall
Ah ha! Thank you, that makes more sense......Just borrowed this pic and it perfectly shows were to stick ya thingy
Stick ya .020 and .060 "low and high clearance" in the spot where the pick is on the picture.
ideally the cam should be 104-108 Degrees off it's lobe.
Slight problem, I only read this part after fitting the intake manifold...... AAARGH
Should stick to inline engines!
Soooooo, my next question, what's the probability that it's ok?
I have done loads of valve adjustments on diesels and never really thought of it til tonight.... Doh!
RangeRoller dt
Well-Sprung Member
- Posts
- 14,830
- Location
- Trapped inside my head @ LZ asylum
Manifolds turned out real nice. You've done a lot for the few weeks you've had it fairplay, true inspiration
Henry_b
Think outside, no box required.
- Posts
- 15,601
- Location
- somewhere else
Ah ha! Thank you, that makes more sense......
Slight problem, I only read this part after fitting the intake manifold...... AAARGH
Should stick to inline engines!
Soooooo, my next question, what's the probability that it's ok?
I have done loads of valve adjustments on diesels and never really thought of it til tonight.... Doh!
Can't really give you a concrete 100% yes it's fine!
If in doubt take the mani off and have a quick look..
Last edited:
monkfish24
Well-Known Member
- Posts
- 1,296
- Location
- Cornwall
It's ALIVE!!!!!
Started up with a few little hiccups, the engine disable kept cutting in, the HEVAC LCD is acting a little odd. I had a small issue with a badly seated injector, the clip hadn't fully engaged and obviously popped off when I primed the engine.
But, I idled it up to warm and it ran really nicely, kept an eye on the top of the radiator and could feel the heat build up then settle down as the thermostat opened.
However, the top hose went rock hard, I thought I had bled it properly. I did feel in the footwell and felt some dampness, I would have expected it to push coolant out, not draw air in.....
However, very happy, I will leave it idling tomorrow and see if it overheats. I do have new ones rings to fit on the heater matrix so will sort that tomorrow.
Henry_b
Think outside, no box required.
- Posts
- 15,601
- Location
- somewhere else
Good news about her running.
Did you re-use the squished HG?
Did you re-use the squished HG?
monkfish24
Well-Known Member
- Posts
- 1,296
- Location
- Cornwall
Good news about her running.
Did you re-use the squished HG?
Yeah, under advice from my mechanic friend, he didn't think it would be too much of an issue. There isn't any CO2 in the coolant and the exhaust doesn't have the sweet smell it did before.
Henry_b
Think outside, no box required.
- Posts
- 15,601
- Location
- somewhere else
Yeah, under advice from my mechanic friend, he didn't think it would be too much of an issue. There isn't any CO2 in the coolant and the exhaust doesn't have the sweet smell it did before.
The top hose shouldn't be concrete hard.
Headgasket considering it was squished way past what its designed too that's a possibility..
.
Could also be an airlock in the system..
Take the cap off the header and rapidly squeeze and release the Top hose this should expel any excess air.
When removing the cap when hot does it try to launch coolant out?
Henry_b
Think outside, no box required.
- Posts
- 15,601
- Location
- somewhere else
Oh and when bleeding her make sure the heater is on HOT and Fans on.
This'll get coolant around the Heater Matrix, eliminating any locks in there too,.
This'll get coolant around the Heater Matrix, eliminating any locks in there too,.
Similar threads
- Replies
- 57
- Views
- 3K