S3 109 Safari project......

This site contains affiliate links for which LandyZone may be compensated if you make a purchase.
Next up, I cleaned up and painted the front propshaft, and sourced some new nylon nuts to fit it. Once greased, it was ready to fit…
 

Attachments

  • IMG_8259.jpeg
    IMG_8259.jpeg
    530 KB · Views: 38
The new front wing support brackets arrived from eBay, but unfortunately they don’t come with the securing brackets so I made some. I had some galvanised steel plate, so I cut a couple of plates to size, drilled holes to match the original centres and welded some m6 bolts in. Gave it a coat of zinc rich paint and gave them a try along with some new nuts, bolts and washers. Seem to work okay, so we’ll go with them 😊
 

Attachments

  • IMG_8254.jpeg
    IMG_8254.jpeg
    341.5 KB · Views: 42
  • IMG_8255.jpeg
    IMG_8255.jpeg
    305.9 KB · Views: 38
  • IMG_8257.jpeg
    IMG_8257.jpeg
    379.8 KB · Views: 36
  • IMG_8258.jpeg
    IMG_8258.jpeg
    267.6 KB · Views: 38
Did some catch up on some of the unfinished jobs today. The parts for the handbrake linkage arrived from Blanchard, so I cracked on with that, fitting a new clevis, spring, relay pivot pin washer and spring retainer. I greased up the moving parts and put it all together and adjusted it. One more job ticked off the list 😀
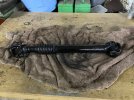
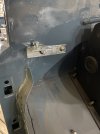
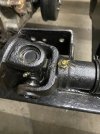
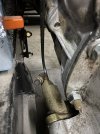
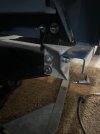
Good work as always and your timing is perfect. My handbrake return spring is missing and I’ve been wondering where it should go. Now you’ve just shown me so thanks.
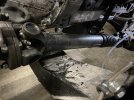
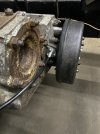
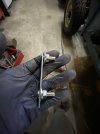
 
Made a bit more progress today with another couple of jobs done. Before fitting the front propshaft, I noticed that the sliding yoke never had a grease nipple on it. It was blanked off with a bolt. Not sure why that would be, but I had a search around in my spares and found a new grease nipple, fitted it a greased it up. I then cleaned all the original propshaft flange securing bolts, fitted the propshaft with new nyloc nuts. One job done 👍
 

Attachments

  • IMG_8283.jpeg
    IMG_8283.jpeg
    327.9 KB · Views: 37
  • IMG_8286.jpeg
    IMG_8286.jpeg
    365 KB · Views: 34
Next up, I thought it would be a good idea to complete the clutch pipe installation. The last part of the puzzle was the rigid pipe between the top flexi and the slave cylinder. Time to get some fluids into the clutch system for the first time 😀. After checking all the connections, I bled the system through, which was easier said than done single handed! Anyway, I managed to get a decent pedal with no leaks so that’s a success.😂
 

Attachments

  • IMG_8285.jpeg
    IMG_8285.jpeg
    269.4 KB · Views: 27
  • IMG_8284.jpeg
    IMG_8284.jpeg
    315.1 KB · Views: 27
Not so much done due to other commitments this weekend 🙁
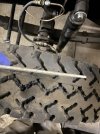
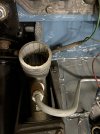
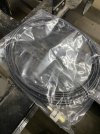
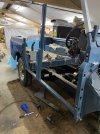
. Ordered the screws, washers and speedo cable. Once they arrived and after a bit of faffing around, I got the gearbox end fitted. Looking for some feedback on the routing of the cable. If any of you have any idea of how it goes I would appreciate it!
 

Attachments

  • IMG_8287.jpeg
    IMG_8287.jpeg
    333.8 KB · Views: 30
  • IMG_8321.jpeg
    IMG_8321.jpeg
    314.7 KB · Views: 31
  • IMG_8322.jpeg
    IMG_8322.jpeg
    379.5 KB · Views: 28
I could take pics tomorrow. Replaced mine a couple of years ago and have a fastening on one of the gearbox bolts the cable goes through, then up round bulkhead.Then In through bulkhead to binnacle.
 
Mine is the same with the p-clip on the back of the gearbox. It's on the PTO cover plate. Then mine loops to a clip on top of the chassis rail, passenger side about in the middle of the door gap. Then in a big loop under the bulkhead. Don't know after that until it goes back through the bulkhead.
 
Ok, see what you think of this. Starts here.
658530E4-AAB6-433E-AE1B-4A545E34BBB8.jpeg
P clip is under that other clip. I have no idea what that’s for. Here’s a better look.
CA49006A-6D61-46C8-8BD9-04BCF75AB176.jpeg
Then it’s off down the chassis rail.
6B577775-E513-4C5E-ACF2-2E86E4CBFB88.jpeg
4CCA50BA-DFB3-4040-925F-1DDFF5CFCC95.jpeg
It’s clipped in another p clip that’s welded to the chassis just under the front edge of the seatbox.
396FD88B-469C-4B06-A02A-949020B1B871.jpeg
Or at least that’s how it was when I took it to bits.
 
Ah, that’s fantastic. Much appreciated! The clip looks the same as the one on the drivers side on my gearbox, so I’ll move it to the rear and check for the chassis clip too.
That will allow me to get another bit done 😀. Thanks again.
 
Been fairly busy on the Landy today. I’ve got a deadline to get it finished now as I’m losing my garage in August. Not ideal, but that’s life.
I decided to focus on the sills and b post assembly today. After, lining the assembly up, I used some screw pins to hold it together. As I am using 110 door seals, I decided to use countersunk pop rivets after countersinking both sides to try and get them as flush as possible. A bit of a trick here is to cut the tail of the rivet and plainish hit as flat as possible as it needs to be flat to take the 110 one piece door seal. once they were installed, I put the remaining rear panel rivets in too.
 

Attachments

  • IMG_8507.jpeg
    IMG_8507.jpeg
    247.5 KB · Views: 34
  • IMG_8508.jpeg
    IMG_8508.jpeg
    232 KB · Views: 26
  • IMG_8506.jpeg
    IMG_8506.jpeg
    252.3 KB · Views: 35
  • IMG_8505.jpeg
    IMG_8505.jpeg
    219.5 KB · Views: 29
Once the rivets were in, I fitted the rear sill brackets, them the front sill captive plate and nuts to the bulkhead, which was a bit of a faff, but got there 😄
 

Attachments

  • IMG_8509.jpeg
    IMG_8509.jpeg
    226.1 KB · Views: 24
  • IMG_8512.jpeg
    IMG_8512.jpeg
    185.5 KB · Views: 21
  • IMG_8510.jpeg
    IMG_8510.jpeg
    385 KB · Views: 31
  • IMG_8516.jpeg
    IMG_8516.jpeg
    371.9 KB · Views: 29
The next job is to prepare the floor panels and bulkhead for paint which sits between the first and second row seats. The reason for this is to tie both b pillars together. Once this is done I can move onto the seat box and rear upper body sides. My plan is to use a standard rear tub crossmember and lengthen it to replicate the factory original. Should be easy enough 😀
 

Attachments

  • IMG_8513.jpeg
    IMG_8513.jpeg
    380 KB · Views: 30
  • IMG_8514.jpeg
    IMG_8514.jpeg
    496.1 KB · Views: 27
  • IMG_8515.jpeg
    IMG_8515.jpeg
    460.4 KB · Views: 26
Sorry to hear your loosing your garage. There's nothing to motivate like a deadline 👍
3 months restoring the chassis on my 300 TDI upside down in the wind and the rain,because my garage is too low to get any Landy in, which has me really appreciating working inside or at a better time of the year. But it had the MOT a couple of weeks ago so there was no choice but to get it done. Passed with no advisories and being a solid workhorse in my woods since ☺️
My 1974 S3 is under a big cover and I take her for a drive every few weeks, have a few jobs which can wait for better weather.
Good luck with getting the roof on 🤞
 
Definitely, not got time to hang about and moan about it 🙂
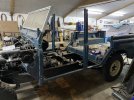
. I’m keeping the Landrover but will be selling my Triumph, Jaguar and MGB project. I want to put MOT’s on them to give the new buyers confidence that they are mechanically sound . I need to crack on with bodywork now to make some useful progress. Nice to hear you are getting good use out of your Landys!
 
Stripped down the ‘b’ post bulkhead and stripped off all the underseal which was a nightmare as it was like solid tar! I also stripped the corroded cross member from the second row floor to reveal that the top hat sections were also holed 😩
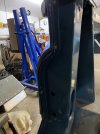
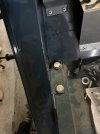
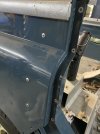
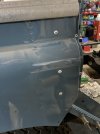
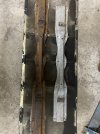
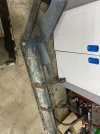
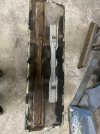
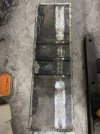
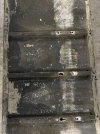
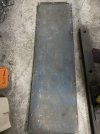
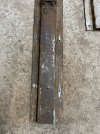
. I’ve ordered the top hat repair section from YRM and will just cut it down to length and rivet it to the floor In the original position. Once this is done I will extend one of my spare crossmembers by welding on extensions to replicate the original rusty one - or thats the plan! 😀
 

Attachments

  • IMG_8513.jpeg
    IMG_8513.jpeg
    380 KB · Views: 24
  • IMG_8514.jpeg
    IMG_8514.jpeg
    496.1 KB · Views: 22
  • IMG_8515.jpeg
    IMG_8515.jpeg
    460.4 KB · Views: 24
  • IMG_8518.jpeg
    IMG_8518.jpeg
    443.7 KB · Views: 20
  • IMG_8519.jpeg
    IMG_8519.jpeg
    444 KB · Views: 20
  • IMG_8520.jpeg
    IMG_8520.jpeg
    399 KB · Views: 29
  • IMG_8521.jpeg
    IMG_8521.jpeg
    634 KB · Views: 27
Back
Top