S3 109 Safari project......

This site contains affiliate links for which LandyZone may be compensated if you make a purchase.
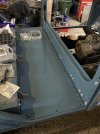
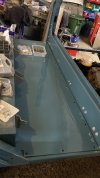
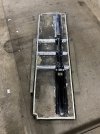
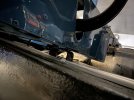
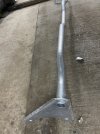
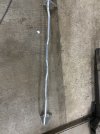
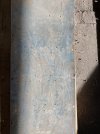
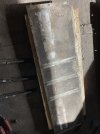
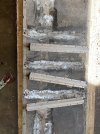
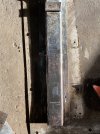
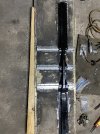
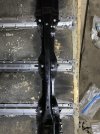
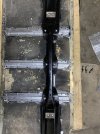
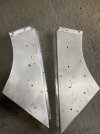
The top hat section was delivered today from YRM (great service as usual), which spurred me on to strip the second row floor down. I drilled out the rivets and spot welds holding the top hat ribs under the floor. Once it looked like Swiss cheese, I chiselled them off. I cut the new top hat sections to length, clamped them on and back drilled the holes through, securing with screw pins. After deburring and cleaning off the mating surfaces, the idea is to countersink the floor ready for csk rivets. Unfortunately I don’t have enough rivets, so will have to wait for them to arrive before completing.
 

Attachments

  • IMG_8529.jpeg
    IMG_8529.jpeg
    499 KB · Views: 29
  • IMG_8532.jpeg
    IMG_8532.jpeg
    461.8 KB · Views: 28
  • IMG_8533.jpeg
    IMG_8533.jpeg
    444.7 KB · Views: 28
  • IMG_8534.jpeg
    IMG_8534.jpeg
    515.2 KB · Views: 29
Moving onto the crossmember, I took the old rusty one and screw pinned it back to back with the new one. This gave me a cut line to ensure the extension pieces will fit exactly when welded. After cutting, I cleaned up both surfaces, pinned them to the floor and welded the extension pieces onto the ‘new’ crossmember. I noticed a hole when cleaning it all up and dealt with that by welding in a section of fresh steel plate. After grinding the welds down flush, I gave it another rub down and painted it with Ku-Rust then galvanising primer. Looks fairly decent in my opinion. 😊 Better using what I have than spending a fortune on new bits….
I‘ll give it a couple of coats of black gloss paint once it all dries. So much work on something than will never be seen!!
 

Attachments

  • IMG_8525.jpeg
    IMG_8525.jpeg
    633.3 KB · Views: 28
  • IMG_8528.jpeg
    IMG_8528.jpeg
    638.1 KB · Views: 28
  • IMG_8535.jpeg
    IMG_8535.jpeg
    446.2 KB · Views: 28
After dealing with rust it was nice to fit a painted panel! Ive had the tunnel reinforcement for ages, so I ordered some new screws and washers, installed the dum dum on the back and screwed it on. Very satisfying!
 

Attachments

  • IMG_8490.jpeg
    IMG_8490.jpeg
    354.6 KB · Views: 34
  • IMG_8530.jpeg
    IMG_8530.jpeg
    381.6 KB · Views: 34
  • IMG_8581.jpeg
    IMG_8581.jpeg
    282.3 KB · Views: 27
Got back onto the second row floor today. I primed and painted the crossmember to get it ready for fitting to the floor. While that was drying, I countersunk the 3 strengtheners to fit countersunk rivets. Once I was happy with that, I put some purflex 40 onto all the mating surfaces to create a barrier and seal between the two different materials. A few pop rivets and 15 minutes later they were fitted.
I did the same with the crossmember and riveted it on too. I refitted the rubber pads too and that was it pretty much done. Or it would be if I hadn’t run out of rivets 😕. Ordered some from Kay’s fasteners and they were delivered today, so top service as usual. Would thoroughly recommend them for stuff like that.
 

Attachments

  • IMG_8556.jpeg
    IMG_8556.jpeg
    406.2 KB · Views: 29
  • IMG_8558.jpeg
    IMG_8558.jpeg
    542.7 KB · Views: 33
  • IMG_8559.jpeg
    IMG_8559.jpeg
    479.6 KB · Views: 32
  • IMG_8560.jpeg
    IMG_8560.jpeg
    532.6 KB · Views: 27
  • IMG_8561.jpeg
    IMG_8561.jpeg
    476.4 KB · Views: 27
  • IMG_8562.jpeg
    IMG_8562.jpeg
    485.7 KB · Views: 30
Back on bodywork today and moved onto the rear sill quarter panels. I started by sanding the paint back and uncovered some corrosion and minor holes on the front face. Obviously that can’t be filled as is, so I used some alloy plate and bonded it onto the back, then riveted the front face to ensure it never moves. I made the countersink deep enough to fill the heads of the rivets so you can’t see them. The minor holes filled nicely too. I used aluminised filler as it is much stronger than standard filler. Think it looks quite good. I dry fitted them after the repair and they fitted fine. I also had to trim the retaining lip for the door seals as I’m fitting defender ones. Ready for paint now 🙂
 

Attachments

  • IMG_8582.jpeg
    IMG_8582.jpeg
    563.3 KB · Views: 25
  • IMG_8583.jpeg
    IMG_8583.jpeg
    596.4 KB · Views: 27
  • IMG_8584.jpeg
    IMG_8584.jpeg
    453.3 KB · Views: 26
Last edited:
I've tried Tig filling but there's too much absorbed junk, but I have found the aluminium repair rods that you use a propane plumbers gas torch to fill holes and do quite good repairs on the aluminium. I've even filled a hole in the gearbox bell housing with them,and the finished result was undetectable.
Moving along well for you.
I agree that filling with tig or gas would be better for this repair, but the situation I’m in with my garage means I don’t want to invest in new tools or materials and I’m time limited to get the Landy finished. I could buy new ones at over £80 each, but I’m not going to! 😀
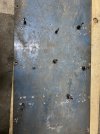
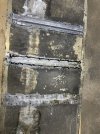
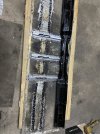
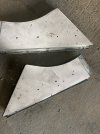
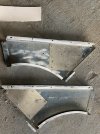
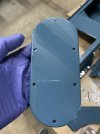
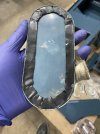
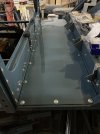
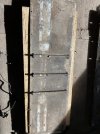
. This repair will be fine for now and arguably much stronger than original. It is using the same type of aluminium sheet as original and the rivets are aluminium so should not have any differential corrosion issues. It looks a bit Frankenstein from the back but it won’t be seen anyway ☺️.
 
Last edited:
Been busy in the background, doing the prep work on the second row floor, toe board, tunnel and miscellaneous bits….
Got the painted bits back started putting it all together 😊
 

Attachments

  • IMG_8735.jpeg
    IMG_8735.jpeg
    371.1 KB · Views: 25
  • IMG_8736.jpeg
    IMG_8736.jpeg
    318.2 KB · Views: 23
  • FA7152A0-1551-4F60-9E95-C84F6A282B81.jpeg
    FA7152A0-1551-4F60-9E95-C84F6A282B81.jpeg
    295.1 KB · Views: 31
  • 69DFF8B5-69C2-4B2A-8345-D0E2401CDE49.jpeg
    69DFF8B5-69C2-4B2A-8345-D0E2401CDE49.jpeg
    293.5 KB · Views: 33
  • IMG_8754.jpeg
    IMG_8754.jpeg
    204.3 KB · Views: 27
  • IMG_8755.jpeg
    IMG_8755.jpeg
    307.1 KB · Views: 22
  • IMG_8756.jpeg
    IMG_8756.jpeg
    538.3 KB · Views: 23
  • IMG_8757.jpeg
    IMG_8757.jpeg
    272.9 KB · Views: 24
  • IMG_8758.jpeg
    IMG_8758.jpeg
    294.1 KB · Views: 24
  • IMG_8759.jpeg
    IMG_8759.jpeg
    350.7 KB · Views: 27
Waiting on some floor fixings to fit the second row floor, but to do this I’ll need to drill the holes for the rear row of holes as the seat support panel doesn’t come with them. Must admit I’m not keen on drilling freshly painted panels but it has to be done 🙄
 
At least you are cracking on, mine is on hold at the end of the queue for available time, and money, at the moment :confused:
 
My 109 is waiting for me to finish the chassis and rebuild her. Although she was always intended as a retirement project, and I'm busy porting and polishing a new cylinder head for my 300 TDI pick-up after the head gasket started to go. However we're about to shopping in Gigi the 1974 S3, and she's always a joy to drive, and you will hopefully be driving aboot I na time at all
17097272570477608137064463602384.jpg
😊
 
Last edited:
My 109 is waiting for me to finish the chassis and rebuild her. Although she was always intended as a retirement project, and I'm busy porting and polishing a new cylinder head for my 300 TDI pick-up after the head gasket started to go. However we're about to shopping in Gigi the 1974 S3, and she's always a joy to drive, and you will hopefully be driving aboot I na time at all View attachment 312047😊
Yeah, I must admit I’m really looking forward to the first engine start, then the first drive, then getting the kids out in it. I have to have it done by August, so fingers crossed I don’t hit too many stumbling blocks along the way…. 😊
 
I'm sure you will be driving about in no time, assuming you can find where you put all the bits 😀. As you say it's the prep that takes most of the time, so hopefully it will be downhill from here on 👍
 
Okay, so a bit more progress with the second row floor. I finally sorted out some fixings which along with the dum dum sealant allowed me to get it fitted. Obviously I had to drill through the rear step lip as that’s new material and you fit speed clips on it. I used a couple of rows of sealant to make sure that the rear floor won’t leak 😀.
 

Attachments

  • IMG_8867.jpeg
    IMG_8867.jpeg
    463.7 KB · Views: 14
  • IMG_8868.jpeg
    IMG_8868.jpeg
    253.4 KB · Views: 18
Thought I would try the seat box in but it’s not sitting just right. Think it needs some fettling! Just wondering if anyone has had any similar issues? I see that the seatbox is sitting on the chassis - see photo. Is that correct? As I don’t remember if it did when I removed it, help would be appreciated!
 

Attachments

  • IMG_8870.jpeg
    IMG_8870.jpeg
    249.8 KB · Views: 20
  • IMG_8869.jpeg
    IMG_8869.jpeg
    336.7 KB · Views: 19
Finally, I was looking for some feedback on the finish of the second row grab handle! I had it galvanised, but the original colour is painted grey. Should I keep it galvanised finish or paint it?
 

Attachments

  • IMG_8874.jpeg
    IMG_8874.jpeg
    352 KB · Views: 14
  • IMG_8873.jpeg
    IMG_8873.jpeg
    474.7 KB · Views: 14
I would keep the galv finish, if it looks good. You can clear coat then make it flat.
Just going to get pics of my 88 sear box which I rebuilt recently.
17112106022395120989713750653625.jpg
17112106427873115789568034586321.jpg
17112106761684335353770807401024.jpg
17112107120694421576655557002543.jpg
17112108012097112712818157423197.jpg
 
Back
Top