S3 109 Safari project......

This site contains affiliate links for which LandyZone may be compensated if you make a purchase.
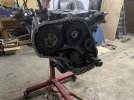
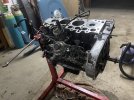
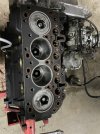
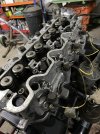
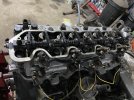
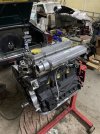
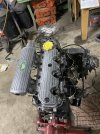
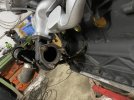
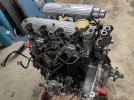
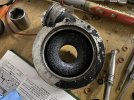
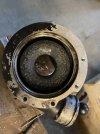
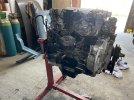
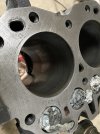
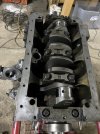
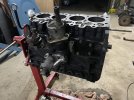
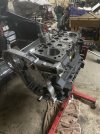
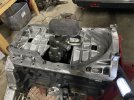
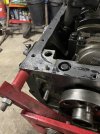
I gave the bores a good clean up with a bore hone and this gave a good surface (deglazed) for the new rings to bed in. I flipped over the block and cleaned the inside of any debris or dirty oil. I vacuumed and blew it all out to make sure it was as clean as possible. After that, I lubricated the main bearings and shells with clean engine oil to give a little protection on startup. After fitting the shells, I installed the new thrust washers, lubricated everything again and dropped in the crank. I fitted the bearing caps and torqued them down incrementally until full torque was applied. I kept spinning the crank at every stage and thankfully it was silky smooth all the way through to final torque. I then fitted the oil pump, vacuum pump and oil filter housing to complete today’s tasks 😀
 

Attachments

  • IMG_7461.jpeg
    IMG_7461.jpeg
    338.4 KB · Views: 66
  • IMG_7462.jpeg
    IMG_7462.jpeg
    354.7 KB · Views: 88
  • IMG_7463.jpeg
    IMG_7463.jpeg
    395.2 KB · Views: 86
  • IMG_7465.jpeg
    IMG_7465.jpeg
    325.6 KB · Views: 70
  • IMG_7447.jpeg
    IMG_7447.jpeg
    350.4 KB · Views: 93
So, moving on with the block, I cleaned, prepped and painted it with VHT although the block will never get that hot, it’s good protection for it. I also replaced all the core plugs, using the age old method of a hammer and old screwdriver. I put some Wurth sealant around the new core plug to make sure there is little chance of future leaks 🤞.
Looking good, is that the 5 bearing engine which would originally be red?
 
The block looks similar to the 2.25 82 petrol one. Maybe the 200 TDI was based on it?
Still pre-digital gremlins then 👍
Yes, you are right, the 200tdi is a direct descendant of the original 2.25. The later 2.5 n/a apparently uses the same crank as the 200tdi.. I think there are parts that fit across both.
 
Managed to make a bit more progress today. I cleaned all four pistons , removed the old rings, fitted new along with big end bearings. Torqued everything up and spun it all over. Seems to be nice and smooth….thankfully 😀. Fitted new oil seals and gaskets to the timing belt cover and fitted that too. Seem to be making headroads now. Still got the cylinder head to do, but I can build up the bottom end first to the sump pan level first.
 

Attachments

  • IMG_7465.jpeg
    IMG_7465.jpeg
    325.6 KB · Views: 70
  • IMG_7487.jpeg
    IMG_7487.jpeg
    352.1 KB · Views: 64
  • IMG_7486.jpeg
    IMG_7486.jpeg
    374.2 KB · Views: 80
Hi, all, it’s been good to get moving on the engine again. I finished off the bottom end by installing the alloy sump frame using the same gasket sealer as there doesn’t appear to be a gasket for it. Unfortunately , one of the long bolts snapped going back in so the whole lot had to come back off again 🙁
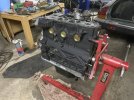
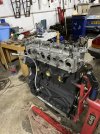
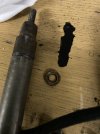
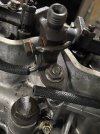
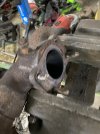
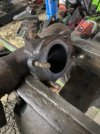
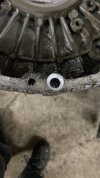
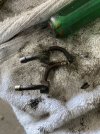
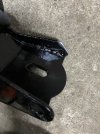
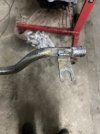
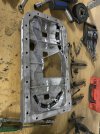
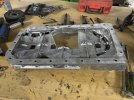
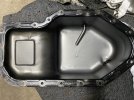
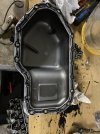
. After cleaning all the sealer back off and removing the broken bolt, I refitted the sump frame again.I also cleaned up the sump, sealed it up and torqued the bolts. I ordered two new long bolts to replace both just in case.
 

Attachments

  • IMG_7504.jpeg
    IMG_7504.jpeg
    475.1 KB · Views: 55
  • IMG_7525.jpeg
    IMG_7525.jpeg
    431.9 KB · Views: 74
  • IMG_7526.jpeg
    IMG_7526.jpeg
    399 KB · Views: 58
  • IMG_7527.jpeg
    IMG_7527.jpeg
    375.1 KB · Views: 58
  • IMG_7528.jpeg
    IMG_7528.jpeg
    444.4 KB · Views: 60
  • IMG_7529.jpeg
    IMG_7529.jpeg
    343.9 KB · Views: 83
  • IMG_7536.jpeg
    IMG_7536.jpeg
    348.4 KB · Views: 88
Once the sump was on, I installed the injection pump and bracket. Fairly easy to fit, but thought it was worthwhile fitting the sprocket and timing belt while the going was good 😊
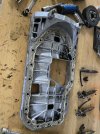
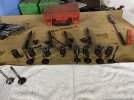
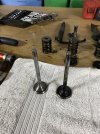
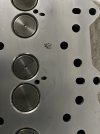
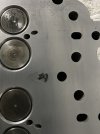
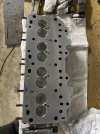
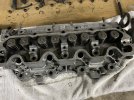
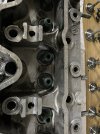
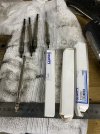
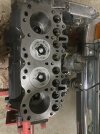
. Next time I’ll focus on the head and try and get the valves removed, valve stem seals done and valves lapped back in, head surfaced then refitted. I have a choice of gaskets so should have the correct thickness.
 

Attachments

  • IMG_7537.jpeg
    IMG_7537.jpeg
    366.3 KB · Views: 55
  • IMG_7538.jpeg
    IMG_7538.jpeg
    362.1 KB · Views: 84
  • IMG_7539.jpeg
    IMG_7539.jpeg
    397.3 KB · Views: 62
On to the cylinder head now…. I gave the head a good scrub up to get rid of the oily grime off as far as possible. After the clean up I stripped out the valves, springs etc, cleaned them up on my pillar drill with emery cloth to get rid of the carbon and oily mess. See before and after 🙂
 

Attachments

  • IMG_7557.jpeg
    IMG_7557.jpeg
    488.4 KB · Views: 55
  • IMG_7556.jpeg
    IMG_7556.jpeg
    431.4 KB · Views: 73
Once the valves were clean, I removed the old valve stem oil seals which were pretty hard and cracked, so probably were allowing oil through…. I lapped in all the valves then fitted new valve stem oil seals, which I lubricated with fresh engine oil so they are not dry on first start up.
I cleaned up the head face with a block and grit paper to take off the old gasket residue and minor imperfections. I noticed however that the face had a couple of areas with rust spots from the cooling system chamber in the head gasket. I couldn’t feel any damage on the surface with my nail, so I’ll leave it alone as it won’t need a skim. Could not see any cracks, and after sitting a steel rule edge to edge across the face no warping either, so all good 👍.
 

Attachments

  • IMG_7562.jpeg
    IMG_7562.jpeg
    223.2 KB · Views: 72
  • IMG_7561.jpeg
    IMG_7561.jpeg
    237.9 KB · Views: 66
  • IMG_7560.jpeg
    IMG_7560.jpeg
    351.8 KB · Views: 50
  • IMG_7559.jpeg
    IMG_7559.jpeg
    460.7 KB · Views: 61
  • IMG_7558.jpeg
    IMG_7558.jpeg
    334.6 KB · Views: 53
I bought an Elring make head gasket (3 hole) which matches the original and fitted new steel dowels. I sat the head on carefully and cleaned up the head bolts and fitted them. Dug out an angle torque gauge to do the angle torque, so fingers crossed that’s a done deal. I checked the valve stem caps and found one had disintegrated so something else to buy before I can put the rocker shaft back on. On the subject of buying I checked all four glow plugs and not one worked! I also need to buy injector seals as I thought that they came with the head set. No such luck🙁. Talking about injectors I’m going to clean these ones up and take a chance that they will be okay. The engine wasn’t particularly smoky before when I tested it, so should be fine. If not I can always pull them out when the engine is back in…
I have bought new leak back piping as it completely disintegrated when I removed the injectors. More stuff to buy…
 

Attachments

  • IMG_7563.jpeg
    IMG_7563.jpeg
    375.3 KB · Views: 64
  • IMG_7564.jpeg
    IMG_7564.jpeg
    428.9 KB · Views: 66
  • IMG_7568.jpeg
    IMG_7568.jpeg
    264.2 KB · Views: 57
  • IMG_7567.jpeg
    IMG_7567.jpeg
    531.5 KB · Views: 54
Feeling as if I’m making some progress now with the engine build. 😊 The valve stem caps, heater plugs, leak off pipe and injector seals turned up, so I got cracking fitting them…..Noticed that the original injector seals looked to be the wrong way round, so that may have caused some problems. I also replaced the banjo connector copper washers as they came in the headset anyway.
 

Attachments

  • IMG_7602.jpeg
    IMG_7602.jpeg
    362.9 KB · Views: 61
  • IMG_7601.jpeg
    IMG_7601.jpeg
    448.3 KB · Views: 56
  • IMG_7603.jpeg
    IMG_7603.jpeg
    392 KB · Views: 64
  • B1B171A8-F5DC-4EB2-B99E-BE0C0C4D4678.jpeg
    B1B171A8-F5DC-4EB2-B99E-BE0C0C4D4678.jpeg
    257.9 KB · Views: 51
  • IMG_7606.jpeg
    IMG_7606.jpeg
    376.3 KB · Views: 53
One issue I did find was that one of the banjo connectors was damaged some time ago. I would be surprised if it allowed any flow back at all! Need to source another soon As I want to get this buttoned up soon. I cleaned up the rocker cover box and fitted a new seal. Unfortunately the set was missing the bolt seals, so yet another thing to buy! I fitted the rocker shaft and adjusted all the tappets. That takes me back! Rule of 9 and all that 😀….I couldn’t go any further with that, so I cleaned up the inlet manifold, fitted the gasket, then the manifold.
 

Attachments

  • IMG_7605.jpeg
    IMG_7605.jpeg
    312.7 KB · Views: 63
  • IMG_7611.jpeg
    IMG_7611.jpeg
    404.5 KB · Views: 57
  • IMG_7613.jpeg
    IMG_7613.jpeg
    446.9 KB · Views: 49
Moved onto the exhaust manifold, and I had to cut one of the studs holding the turbo off! What a nightmare….Anyway I managed to save the manifold. I heated up the remaining part and unscrewed it which was a relief. I replaced the stud with another one, wire brushed the manifold and hit it with some VHT paint. Looks a bit bling, but it’s freshened it up a bit 🙂.
 

Attachments

  • IMG_7607.jpeg
    IMG_7607.jpeg
    272.3 KB · Views: 72
  • IMG_7610.jpeg
    IMG_7610.jpeg
    277.4 KB · Views: 50
  • IMG_7609.jpeg
    IMG_7609.jpeg
    270 KB · Views: 57
  • IMG_7614.jpeg
    IMG_7614.jpeg
    607 KB · Views: 55
  • IMG_7615.jpeg
    IMG_7615.jpeg
    373.2 KB · Views: 66
  • IMG_7616.jpeg
    IMG_7616.jpeg
    386.6 KB · Views: 50
Made a bit more progress again tonight. I sorted out the studs holding the turbo on and swapped over studs from the old turbo that holds the down pipe down. I fitted new copper washers to the turbo oil feed pipe and fitted the return to the block. Also cleaned up and fitted the injector pipes and fitted new rocker cover seals.
 

Attachments

  • IMG_7660.jpeg
    IMG_7660.jpeg
    342.7 KB · Views: 46
  • IMG_7661.jpeg
    IMG_7661.jpeg
    337 KB · Views: 59
Happy with that progress, I thought I would put my blast cabinet to good use and blasted the timing belt cover. Once it was cleaned up I gave it a blast of silver paint to protect it a bit. Must admit though that it looks a bit blingy in comparison to the rest of the silver bits. Anyway, not to worry, I fitted new gaskets, seals , water pump etc. So not a bad night’s work if I say so myself 😂
 

Attachments

  • IMG_7663.jpeg
    IMG_7663.jpeg
    383.8 KB · Views: 66
  • IMG_7664.jpeg
    IMG_7664.jpeg
    376.1 KB · Views: 50
  • IMG_7665.jpeg
    IMG_7665.jpeg
    417.7 KB · Views: 65
A couple of jobs that I have been putting off for a while and thought needed doing now, finally I have got them done.
First on the list was to modify the bellhousing, installing the four countersunk bolts which secure the sump, then drill and tap three holes and fit studs which match the series 3 bellhousing pattern. That’s one of the jobs done!
 

Attachments

  • IMG_7734.jpeg
    IMG_7734.jpeg
    541.5 KB · Views: 65
  • BD1BCC6F-BD17-4715-A380-6849C9D89038.jpeg
    BD1BCC6F-BD17-4715-A380-6849C9D89038.jpeg
    400.9 KB · Views: 47
  • 8CF8DE78-81C9-4054-BE49-E441103AEF74.jpeg
    8CF8DE78-81C9-4054-BE49-E441103AEF74.jpeg
    341.3 KB · Views: 46
  • ED600EF1-F007-4AF9-A3E1-BA86831EF174.jpeg
    ED600EF1-F007-4AF9-A3E1-BA86831EF174.jpeg
    272.2 KB · Views: 62
Second on the list was clocking the turbo outlet round 90 degrees to move the outlet away from the inner wing and make it almost vertical. This will give some more space for the pipe to the intercooler and that clearance really is needed. Clocking entails removing the housing, drilling and tapping the wastegate actuator mounting bolts in the correct position then refitting. Sounds easy…….😀
To be honest, apart from fighting with the circlip securing the housing for around half an hour, it was fairly straightforward. Once installed, I rotated the vacuum fitting to face the actuator, and installed a new pipe to replace the original which was now too short. Another job ticked off the list! Time for a 🍺😀
 

Attachments

  • IMG_7735.jpeg
    IMG_7735.jpeg
    310.9 KB · Views: 56
  • IMG_7736.jpeg
    IMG_7736.jpeg
    401.9 KB · Views: 47
  • IMG_7738.jpeg
    IMG_7738.jpeg
    376.5 KB · Views: 57
  • IMG_7739.jpeg
    IMG_7739.jpeg
    356.8 KB · Views: 52
  • IMG_7740.jpeg
    IMG_7740.jpeg
    308.8 KB · Views: 50
  • IMG_7741.jpeg
    IMG_7741.jpeg
    350.9 KB · Views: 70
Next thing to do was fit the new second hand leak back pipe connector which I bought from flea bay. I fitted it with new washers and connected the new hose. Following that I fitted the right hand engine mounting. I’ve used the later defender type rubber mounting with a series 3 bracket. I’ve added some 5mm steel shims to lift the engine away from the chassis for clearance. Hopefully this will be enough 🤞…. Should find out soon. The plan is to fit the left hand mounting with shims, take the engine off the stand, fit the bellhousing and hopefully drop the engine into the chassis! Can’t wait to be honest as this has taken a fair amount of time to get it to this stage. 👍.
 

Attachments

  • IMG_7683.jpeg
    IMG_7683.jpeg
    431.6 KB · Views: 53
  • IMG_7688.jpeg
    IMG_7688.jpeg
    392.5 KB · Views: 51
Not much to report this week, but I did another couple of jobs to get the engine ready to come off the stand and ready for the chassis. I cleaned up the flywheel housing which took an age then fitted a new OEM crankshaft seal. After that, daughter cleaned up the n/s engine mount, then blasted it, primed and top coated in black gloss. Great to have one of the kids helping out again. Might get it done quicker! I had to clearance the engine mount as it sat too close to the turbo for my liking. Also, repaired the top steel water pipe, cleaned it and fitted. Next time I’ll take the engine off the stand and fit the flywheel housing, flywheel and starter. Cheers!
 

Attachments

  • IMG_7838.jpeg
    IMG_7838.jpeg
    397.4 KB · Views: 42
  • IMG_7837.jpeg
    IMG_7837.jpeg
    356.5 KB · Views: 47
  • IMG_7836.jpeg
    IMG_7836.jpeg
    237.2 KB · Views: 57
  • IMG_7840.jpeg
    IMG_7840.jpeg
    428.7 KB · Views: 56
Back
Top