My Defender 90 200tdi rebuild

This site contains affiliate links for which LandyZone may be compensated if you make a purchase.
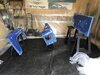
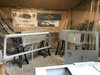
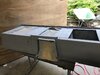
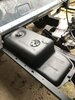
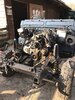
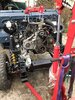
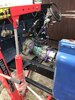
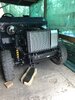
Managed to get the gearbox into place and fit the fuel tank. Axle breather pipes to be fitted next whist I still have easy access, oil into the axles and run fuel line before prep for dropping in the engine.

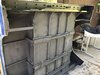
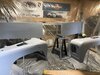
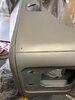
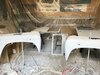
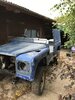
Biggest step is to get the quote for painting all the panels:-( Then strip off the tub etc .
 

Attachments

  • IMG_0892.JPG
    IMG_0892.JPG
    305.3 KB · Views: 128
Last edited:
Engine now in situ, never easy on your own. Scratched the front of the chassis and the Buzzweld chassis in one paint came off too easily, thus doesn’t bode well for the chassis in use, time will tell.
Been connecting the electrics and it is now that the copious photos come in to their own as my memory gap has increased from the dismantling days. The biggest issue is trying to remove / understand the rats nest of “supplementary wiring added by previous owners using the dreaded scotch lock connectors, replacing wiring with domestic Earth wire inside the loom .

I still have the lower nuts to do up on the front dampers, I tried using a ratchet strap to compress the springs but, this still leaves the lower bush to compress to get the nyloc nut on to the thread. The bush is bloody hard to compress so can’t get the nut on to the first thread. I’m going to try warming the rubber bush to see if that has any effect. Other comments welcome.

new radiator and intercooler fitted to the frame, set up on chassis to check, all ok, so back into storage until fitting.

Next step, Panel final prep to complete for painting then assembly.
 

Attachments

  • 698E1CFF-8D63-486A-AF43-B7F46ABE048B.jpeg
    698E1CFF-8D63-486A-AF43-B7F46ABE048B.jpeg
    643.9 KB · Views: 175
  • 10CA479E-35B7-47C5-AEDA-95F4C2DF68AB.jpeg
    10CA479E-35B7-47C5-AEDA-95F4C2DF68AB.jpeg
    257.1 KB · Views: 163
  • 68850637-38C5-45E6-9355-AC645AEAC1C7.jpeg
    68850637-38C5-45E6-9355-AC645AEAC1C7.jpeg
    216.3 KB · Views: 157
  • CC8D3731-9AA6-4CB3-81F3-F1D5BD9028A2.jpeg
    CC8D3731-9AA6-4CB3-81F3-F1D5BD9028A2.jpeg
    224.7 KB · Views: 177
Last edited:
Just read through your thread. Considering the lack of flat floor indoor work space, you're doing a cracking job. When I did my 110. My most important items as I was stripping down was zip bags, camera and tape measure. Even then the time between stripping and rebuilding caused endless searching on the photo files.
 
Just read through your thread. Considering the lack of flat floor indoor work space, you're doing a cracking job. When I did my 110. My most important items as I was stripping down was zip bags, camera and tape measure. Even then the time between stripping and rebuilding caused endless searching on the photo files.
Thanks Mick,
A friend of mine is trying to convince me to paint it too! Lots of zip locks and boxes of parts. The car is described by my wife as Triggers Broom, giving the volume of deliveries
 
Thanks Mick,
A friend of mine is trying to convince me to paint it too! Lots of zip locks and boxes of parts. The car is described by my wife as Triggers Broom, giving the volume of deliveries
Your wife's a bit more polite than mine when talking about my landy. I've just spnt Al day replacing the heating element in the base of my rx8 seats. That took a couple of hours, the rest of the day was spent trying to remember what wire did what and blowing fuses.
20220411_174541.jpg
20220411_174553.jpg
 
At least it's still a galvanised chassis under the paint. That's not great, though bashing a quarter ton engine against the paint is probably more extreme than it'll get in everyday use.

I'm a bit envious of your shiny new intercooler. I'm planning to keep my old one as it's not too bad, although definitely not shiny!

I think I've got the same dampers as you (Britpart SuperGaz?), and although it was some time ago I don't remember any problems bolting them in, and there should be enough length on the dampers to mean you don't have to compress the springs. Are the bushes seated correctly?
Finally got the nuts on the lower damper, I used a ratchet strap to compress the lower bushes. All seated correctly and tightened up.
I’ll repaint the chassis as I go , as you say at least it is galvanised underneath. I am thinking about Dinitrol or Waxoyl for the inside of the bulkhead and chassis before I add the panels.
The intercooler is an eBay special, time will tell if is is good or bad, I just couldn’t justify spending ‘000’s online with Allisport. Some day.
Big issue is despite labelling the wiring, one of two are Untagged, just going through the manual to I’d them.
 
Just had to mock up what I’m trying to build.
Off work for a couple of weeks with a target to get it at least into primer, maybe even top coat,!!!
 

Attachments

  • C02E8362-E365-4CCA-B96F-F0ADE1EAD246.jpeg
    C02E8362-E365-4CCA-B96F-F0ADE1EAD246.jpeg
    239 KB · Views: 110
All prepped for paint, decided to use stone guard on the inner wheel arches and base of the tub, with Buzzweld Galve in One on the repair panels.
It looks grey in the photos but it’s all black.
Just need to mask off the bottom of the tub when doing primer/ top coats hopefully making the job easier.

I need to plan the spraying so I maximise the “pop up” spray booth space so I’m not moving panels around too much. This is a real issue when the car is stripped down, never enough space.
 

Attachments

  • 6E9F66FA-4EE1-492B-BC3A-69FF528A32EF.jpeg
    6E9F66FA-4EE1-492B-BC3A-69FF528A32EF.jpeg
    201.3 KB · Views: 111
  • 281DFEAA-0B68-4284-9EF7-D3B0EB453569.jpeg
    281DFEAA-0B68-4284-9EF7-D3B0EB453569.jpeg
    185.7 KB · Views: 125
Big day today, started painting panels. A new skill for me, and I use the term “skill” loosely.

Despite hours of prep I have got some reaction to the previous paint, a metallic blue the previous owner sprayed in with a straw. This will need rubbed back and redone, along with my over enthusiastic runs.
It’s at this point you wish you had a huge workshop.
 

Attachments

  • 80F3C908-2CF8-432A-93E5-9C887901C947.jpeg
    80F3C908-2CF8-432A-93E5-9C887901C947.jpeg
    197.3 KB · Views: 90
  • 7BAACC00-53C2-42B8-9AF4-D11D6360AD0D.jpeg
    7BAACC00-53C2-42B8-9AF4-D11D6360AD0D.jpeg
    113.8 KB · Views: 98
  • CF1F3E4B-A8A6-4518-9678-3D1E73E13429.jpeg
    CF1F3E4B-A8A6-4518-9678-3D1E73E13429.jpeg
    124.3 KB · Views: 99
  • D00AB9B4-CBC2-4E22-926A-949539644684.jpeg
    D00AB9B4-CBC2-4E22-926A-949539644684.jpeg
    251.9 KB · Views: 98
Looks like you got what you wished for:)
I’ve used cans before , but light coats needed and not too close, good skill to learn
I’m using 2K, my first time using it.
Successfully Used cans and shutz before on the chassis and other parts but, a friend convinced me to do my own re spray rather than use a garage, which was the initial plan.

New compressor, spray gun, “Scene of Crime” overalls, mask etc but hopefully a successful outcome.
As said, mist coats to start with. Are you base coat then lacquered? If so, don't lave too long between top coat and lacquer.
 
Not using a lacquer, really not set up to take that approach.
Misting is correct approach I just got carried away
Bonnet and front doors, replacement sills, bonnet hinges all painted tonight.

As “ Mick the builder” advised I sprayed a mist coat first and things were easier. Top mark on the door is where the wind deflector was, I will add a new one, the line is showing through but is completely smooth before paint.
I am getting some patches of reaction to the previous paint on some panels so, will sand back and reapply until the issue is resolved.

2 coats done, large malt as a reward.
 

Attachments

  • 660A5633-1850-4754-BC84-08390D2080FD.jpeg
    660A5633-1850-4754-BC84-08390D2080FD.jpeg
    111.2 KB · Views: 80
  • D6C7A7E8-ECA2-49F1-AB13-8EE2B022B817.jpeg
    D6C7A7E8-ECA2-49F1-AB13-8EE2B022B817.jpeg
    156.4 KB · Views: 84
[/GALLERY][/GALLERY]Spent this weekend painting in primer all the body panels, with only the upper panels of the rear tub to be completed. I ran out of primer due to issues with the spray gun as had to throw out cupfuls of the mixed paint.
Painted the underside of the tub and seat box in ToughOx which is a tintable protective coating, looks promising to protect the underside, time will tell.
Previous exuberant efforts were rubbed down and a “dusting coat” added before a full coat ( thanks Mick), and success achieved.
The real challenge will be the top coat as there is no real second chance.
As I’ve said before, you need a lot of space to both work and store the painted panels so I’ve spent more time moving things back and forth.

time for a beer.
 

Attachments

  • 4E62BC3D-ACD5-463B-BFED-137F9A2F06FD.jpeg
    4E62BC3D-ACD5-463B-BFED-137F9A2F06FD.jpeg
    62.6 KB · Views: 85
  • 8080B0B2-36C7-4616-AA78-67CDA28AF119.jpeg
    8080B0B2-36C7-4616-AA78-67CDA28AF119.jpeg
    58.7 KB · Views: 103
  • B99338FC-23CD-418D-AB2C-9999231326C0.jpeg
    B99338FC-23CD-418D-AB2C-9999231326C0.jpeg
    314.9 KB · Views: 100
  • C889076D-9116-421E-8618-152D5F469CC1.jpeg
    C889076D-9116-421E-8618-152D5F469CC1.jpeg
    216.4 KB · Views: 86
  • 556C2819-983F-4C39-A85A-E950378955B1.jpeg
    556C2819-983F-4C39-A85A-E950378955B1.jpeg
    158.1 KB · Views: 88
Back
Top