My Defender 90 200tdi rebuild

This site contains affiliate links for which LandyZone may be compensated if you make a purchase.
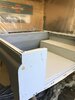
More painting, top coat this time and my first attempt. So far so good, although I need to revisit the lower sills.

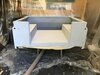
Managed to get the tub in place for its primer coat and then top coat. My real worry now is the change in weather, more rain and low temps.
 

Attachments

  • 3D6D8626-A1C4-4D9B-A685-946A74E08EDF.jpeg
    3D6D8626-A1C4-4D9B-A685-946A74E08EDF.jpeg
    163.5 KB · Views: 109
  • A2A144E2-4624-41BA-97EF-4BE25B85E6C7.jpeg
    A2A144E2-4624-41BA-97EF-4BE25B85E6C7.jpeg
    298.5 KB · Views: 107
  • B835531F-0870-42AC-BB5D-7CF6C179E543.jpeg
    B835531F-0870-42AC-BB5D-7CF6C179E543.jpeg
    228.2 KB · Views: 106
Zed,

I thought about it but, I only have a gas one and they put out too much moisture.

weather not too bad today and I have taken the day off to get some more done.
 
Pictures of the first coat on, managed a second coat and so far looking ok.
Will try and get more done this week.
 

Attachments

  • 174CED3D-714F-4AFB-9BDC-B2856BD35D9E.jpeg
    174CED3D-714F-4AFB-9BDC-B2856BD35D9E.jpeg
    39.3 KB · Views: 87
  • 04FA072C-08D8-426D-A279-130C35C01A80.jpeg
    04FA072C-08D8-426D-A279-130C35C01A80.jpeg
    192.3 KB · Views: 90
The Defender 200Tdi engine is a detuned version of the Discovery engine (introduced a year earlier) and it retained the old 2.5's high turbo position due to the restricted engine bay space. The old indirect injection diesel engines had a smoother sound than the Tdi thanks to their pre-combustion chambers.
 
the defender 200tdi exhaust downpipe pre-heats the passanger bulkhead & footwell as an added bonus:p

bloody fiddle to access the startermotor though.

Rich.
Definitely! I had to remove the gearbox crossmember to allow the downpipe to be removed to remove the starter.
 
Well I must have had the Green Oval gods on my side yesterday. I jacked up the front. Of the chassis with a farm jack and within 2 minutes I managed to manipulate the down pipe over the gearbox crossmember and up to the manifold. Result.
Now, due to my obvious delight at getting something to go my way those mischievous gods brought me back to earth with another issue

new brake master cylinder and new brake pipes were dry fitted, loosely. Now I thought I had nothing to do but tighten the fittings, add brake fluid and bleed the brakes. First issue is that the fittings have to be fully tightened on the master cylinder, I know this is incorrect and it still weeps. Should there be or could I fit a shorter male to female fitting to the master cylinder? It looks like the male fitting is too short or has no thread to tighten when flare when seated.
I have checked the part number and ordered a TRW part. I’ve added a pic of the original master cylinder and the offside brake hose which is also leaking.
There are other leaks but that could be down to the handheld flaring tool so, I will probably have to get a garage to make the ends for me.
Any constructive comments welcome.
 

Attachments

  • 7657D0FE-0A91-45E0-B8DF-C94C20DB7834.jpeg
    7657D0FE-0A91-45E0-B8DF-C94C20DB7834.jpeg
    121.3 KB · Views: 99
  • 08906AF0-7ACD-43A7-8BD8-2C44EB8F23D2.jpeg
    08906AF0-7ACD-43A7-8BD8-2C44EB8F23D2.jpeg
    130.3 KB · Views: 94
  • 760711AB-8733-4F27-A93B-2791C0BE26E0.jpeg
    760711AB-8733-4F27-A93B-2791C0BE26E0.jpeg
    53.1 KB · Views: 91
The front pipes were pre made and ordered by part number, that doesn’t mean they are correct. I might take you up on the offer, once I test negative for the dreaded COVID 19.
 
Some more progress, albeit slow. car still has an o/s front brake pipe leak and some weeping at the master cylinder so I think the “new” pipes are not good enough as many aftermarket parts are I will just have to make the pipes.
painted the bonnet, wings, rear upper body panels and doors. The doors have been rebuilt with new seals and glass guides, handles etc.
Tub finally in place permanently, seat box fitted, including seal to tub, rear body upper sides fitted with new seals and brackets.
I had my first successful attempt at fitting the rear quarter lights too.
Fitting replacement LED lights this weekend, not headlamps but stop/ tail and indicators.
 
Been cold and wet up here which has slowed progress but, managed to get some jobs done.

Replacement LED rear lights fitted and the wiring checked and tested before permanently making off the connections.

I also fitted the Gwyn Lewis rear wheel arch mud flaps to reduce the amount of road crap being retained in the chassis. A very simple fitment and looks as if out will do as it says on the tin. I still have the fronts to do when I refit the wings.
The exhaust is also fitted, albeit loosely as I needed to make sure before the mud flaps were fitted. As it's a Marsland chassis YRM supply a bracket to take the o/s rear silencer box bracket. I hope to add a DEMAND exhaust in the future so, saving pennies as best I can and until then the standard will have to do.
upload_2023-1-3_15-25-50.jpeg

upload_2023-1-3_15-26-17.jpeg

upload_2023-1-3_15-26-38.jpeg
 
Been cold and wet up here which has slowed progress but, managed to get some jobs done.

Replacement LED rear lights fitted and the wiring checked and tested before permanently making off the connections.

I also fitted the Gwyn Lewis rear wheel arch mud flaps to reduce the amount of road crap being retained in the chassis. A very simple fitment and looks as if out will do as it says on the tin. I still have the fronts to do when I refit the wings.
The exhaust is also fitted, albeit loosely as I needed to make sure before the mud flaps were fitted. As it's a Marsland chassis YRM supply a bracket to take the o/s rear silencer box bracket. I hope to add a DEMAND exhaust in the future so, saving pennies as best I can and until then the standard will have to do.
View attachment 280837
View attachment 280838
View attachment 280839
Tidy:cool:
 
The exhaust is not straightforward as the bracket on the downpipe is broken, new one bought and realignment and figment of the exhaust will recommence later.

I fitted a Wright Off-road acoustic mat, bloody heavy and you know you’ve been working after throwing that about. It need’s careful planning of the cuts as the witness marks may not fit your car. Anyway, took my time and very happy with the fit. Fitted the seats, I will prob regret that and have to remove them to do something later but anyway, makes me feel good.
The visible parts of the bulkhead have been prepped for paint as the shade is slightly different to to panels I painted. Hopefully, I can get that and the roof painted soon as that will allow me to get the land back under the temp carport and my other car back in the garage.

Brake fluid leaks sorted, new master cylinder fitted as I appear to have cross threaded one of the fittings. Might still have a dodgy fitting above the rear axle as I’m not sure if it’s residual fluid or another leak.
upload_2023-1-28_19-52-17.jpeg
 
Cracking job you are doing:).

1 thing. the upper seat belt point should it not be the other way round and fixed at the top?

J
 
Back
Top