My Defender 90 200tdi rebuild

This site contains affiliate links for which LandyZone may be compensated if you make a purchase.
Sorry, forgot a photo of the actual hole if that's of any use
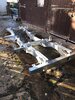
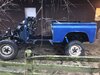
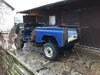
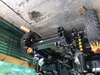
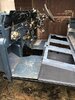
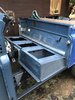
Thanks, I’ll look to source the parts so I can build up the wiper before paint. The car did have rear wash wipe as the switch was on the dashboard yet the door has not been drilled, the joys of Land Rover ownership
 
Well, after a few months of nothing I finally ordered my Marsland chassis as well as a few other items to start the rebuild in earnest.
I intend to paint it with Buzzweld Galv in One paint after degreasing, anyone here had any experience recently with it?
 
Well, after a few months of nothing I finally ordered my Marsland chassis as well as a few other items to start the rebuild in earnest.
I intend to paint it with Buzzweld Galv in One paint after degreasing, anyone here had any experience recently with it?

Not GIO, but I completely refurbished my chassis last year back to bare metal, then used Buzzweld Chassis Primer and Buzzweld 2K paint. Both are genuinely excellent products, easy to use and give a very tough finish. Finished up jet washing out the chassis inners, drying and a thorough treatment of Dinitrol.

Watch out for delivery times as sometimes they can be a little slow...they said the whole world was chassis refurb'ing last year due to covid/working from home o_O
 
Well, after a few months of nothing I finally ordered my Marsland chassis as well as a few other items to start the rebuild in earnest.
I intend to paint it with Buzzweld Galv in One paint after degreasing, anyone here had any experience recently with it?
My galvanised chassis is painted with GIO (following a good coating of T-Wash), but as the rebuild has temporarily :rolleyes: stalled it's not been subjected to any real-world conditions yet. However in the not very harsh conditions of a garage it's still firmly stuck on and seems to have withstood a few bangs and scrapes without any problems. However, my recent experiences with Buzzweld's High Temperature paint have left me doubting whether I will buy anything further from them.
 
My galvanised chassis is painted with GIO (following a good coating of T-Wash), but as the rebuild has temporarily :rolleyes: stalled it's not been subjected to any real-world conditions yet. However in the not very harsh conditions of a garage it's still firmly stuck on and seems to have withstood a few bangs and scrapes without any problems. However, my recent experiences with Buzzweld's High Temperature paint have left me doubting whether I will buy anything further from them.

Buzzweld say a degreasing, using their degreaser followed by scotchbrite pad, allow to dry and then apply. The trouble is the more you read on forums the more doubt you get.

Anyway, I also need to replace the radiator and intercooler so, off to the interweb and was mesmerised by Allisport’s sparkly offerings. Further reading brought me home to realise that the 200tdi is not the most tuneable lump. Decision taken, no Allisport shiney things this time and I bought a sleazybay one for £83. It might not last but my wife has now started to compare the landy to Triggers broom , the same one only had a few handles and heads!!!
Recore of the radiator is nearly £250, again a Paddocks special is £107.
 
It has finally arrived after 12 weeks when told 4 weeks!! Hopefully have it painted this weekend.
 

Attachments

  • image3.jpeg
    image3.jpeg
    80.3 KB · Views: 150
  • image2.jpeg
    image2.jpeg
    92.7 KB · Views: 156
Painting the chassis commences and the pressure is on to get it completed before the weather changes, as I’m doing this in a lean to work area with horticultural wind break for sides!!!
 

Attachments

  • ACAEC79D-12A2-4FE7-8F6A-9EC6FAB7F0AA.jpeg
    ACAEC79D-12A2-4FE7-8F6A-9EC6FAB7F0AA.jpeg
    70.3 KB · Views: 154
  • 2719AD8E-F98A-4D3B-806F-61937B9DEE13.jpeg
    2719AD8E-F98A-4D3B-806F-61937B9DEE13.jpeg
    215.5 KB · Views: 157
Really pleased I’ve got to rolling chassis over the weekend, need to remember to torque bolts etc once more weight is added. Feels great to be actually building now.
 

Attachments

  • D28E8387-BEDD-4A07-915E-E058337A05D5.jpeg
    D28E8387-BEDD-4A07-915E-E058337A05D5.jpeg
    60.8 KB · Views: 150
  • 6F1F53F8-F37B-482D-A4A5-4A0345566813.jpeg
    6F1F53F8-F37B-482D-A4A5-4A0345566813.jpeg
    445.1 KB · Views: 157
Finally some real progress, albeit difficult and awkward given I am working on my own with some of the larger lifts etc.
Bulkhead on, suspension fitted but not yet torqued up as I need more weight on the chassis, I don’t have a ratchet strap to close up the gap between chassis and axle, will complete some engine bay work and drop the engine back in to get that done.
New rear wiring loom to run through the chassis which will need some additional protection from any Galv spikes inside.
One question, how / where does the rear flex brake hose bracket fix to the chassis?
Does anyone have a pic of the brake lines and fuel lines routing? Been so long since dismantling and my own pictures of that dismantling are not clear.
 

Attachments

  • 09EC9845-530D-461C-8D45-234BB7D96C95.jpeg
    09EC9845-530D-461C-8D45-234BB7D96C95.jpeg
    59.7 KB · Views: 148
  • 058824A5-23F8-4EDE-A75F-CF8A813498D4.jpeg
    058824A5-23F8-4EDE-A75F-CF8A813498D4.jpeg
    81.3 KB · Views: 149
  • 17AAA4CA-5399-4D2C-8665-CE7FB30B63CF.jpeg
    17AAA4CA-5399-4D2C-8665-CE7FB30B63CF.jpeg
    72.5 KB · Views: 137
I know it’s a series so maybe not much use, flexi goes to brass Connector piece on top of rear diff and other end onto bracket on chassis and from there to wheel cylinder, my front to back brake line inner side of drivers chassis rail , need to secure with clips , holes might be there ready on yours
01E4C2AB-F4CD-48FB-82C8-047D3845EEBA.jpeg
28BF3702-7C27-44C3-AE18-19045A4BBE8D.jpeg
 
I know it’s a series so maybe not much use, flexi goes to brass Connector piece on top of rear diff and other end onto bracket on chassis and from there to wheel cylinder, my front to back brake line inner side of drivers chassis rail , need to secure with clips , holes might be there ready on yours View attachment 254703View attachment 254704
Thanks Steve, not dissimilar on the Defender, it looks like i just need to find a suitable point to mount the bracket onto the chassis and ensure the flex hose is free top move with the axle articulation.
 
Test fit of the rear tub. Still to check final alignment and drill the new panels for fixing sills and to rear cross member.
I’ll take it off and continue the build, it won’t go to paint until near the end once all other items are prepped.
 

Attachments

  • 3519A87D-6E7D-47AE-BDD6-1872DEC7100B.jpeg
    3519A87D-6E7D-47AE-BDD6-1872DEC7100B.jpeg
    382.2 KB · Views: 125
  • B9A3934E-D6E2-4F2E-A646-DD8BCDC7D68F.jpeg
    B9A3934E-D6E2-4F2E-A646-DD8BCDC7D68F.jpeg
    65.5 KB · Views: 146
The steering box and linkages now fitted into position. Not without issue as the new steering arm for the steering box was fitted yet the nut would not turn more than 1/2 to 1 turn. Not wanting to force it, I ended up buying pitch gauges to verify the nut and steering box shaft were indeed 7/8ths UNF before running a die down the threads.

Murphy’s law or Sod’s law would mean I would end up either refurbishing the steering box or replacing it at not an inconsiderable cost.
Once the threads were cleaned with the die all went well.

New chassis wiring loom was fitted too, took about an hour overall using fibre glass wiring rods.

New brake pipes are now in place and clipped into place.
The tub has been fitted to be aligned, just need to set the rear adjustable tangs on the rear cross member and then the bulkhead so the doors fit. Done some work on the tub so I hope that is ok.
 

Attachments

  • 7F73E68B-329D-4D2F-861D-46E6AC1461FE.jpeg
    7F73E68B-329D-4D2F-861D-46E6AC1461FE.jpeg
    226.5 KB · Views: 111
  • 4427E1C4-E3B9-40D8-9DA9-2E0046B66357.jpeg
    4427E1C4-E3B9-40D8-9DA9-2E0046B66357.jpeg
    73.3 KB · Views: 113
Finally took the step to drill the mounting holes in the tub. They say measure twice cut once well, I measured about fifty times and drilled once, all good so far. The Marsland chassis comes with an adjustable bar with the mounting tabs, once that is set it should be all ok, getting there brings doubt so I set it, and effectively build the tub, sills and measured door gaps, levels etc before drilling.
With the tub fixed at the rear I confirmed the sills were at 90degrees to the tub, and then adjusted the bulkhead to get the magical 34 3/4” door gaps bottom and middle of the door aperture, locked off the bulkhead to chassis brackets. Checked the seat belt mounting brackets on the crossmember to tub were in place and aligned.

I just had to add the seat box and floor panels to remind me on what I am doing

it all has to be disassembled for painting but, at least I know it will fit…….
 

Attachments

  • 487FE0E0-6669-4EE8-8EE5-137ED79B0D3A.jpeg
    487FE0E0-6669-4EE8-8EE5-137ED79B0D3A.jpeg
    71.2 KB · Views: 121
  • D6D269C2-439E-4089-BA74-A69695439E63.jpeg
    D6D269C2-439E-4089-BA74-A69695439E63.jpeg
    221.6 KB · Views: 114
  • 1432FFE9-7BBF-4A31-A727-3FE94E5E1323.jpeg
    1432FFE9-7BBF-4A31-A727-3FE94E5E1323.jpeg
    65.8 KB · Views: 120
It's all looking great there. Hoping to restart work on mine soon after far too long off, but you've definitely stolen a lead on me!

Did you run your chassis wiring inside anything to protect it in the end? That's one of my next jobs. I bought a fish wire to pull it through which has been great for other jobs in the past.


I just added some additional electrical tape to protect it from any rough edges inside the chassis. I will check each wire to earth to see if there is any interference or shorting before closing everything up.

It does help that you can see through the various holes in the chassis to see the loom, using a torch and move the loom at various points to try and understand if it is free or snagged.
 
Back
Top