My Defender 90 200tdi rebuild

This site contains affiliate links for which LandyZone may be compensated if you make a purchase.
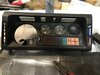
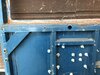
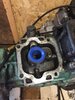
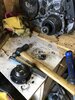
Weather too windy or wet to spray the fuel tank and other bits. The selection of a gear required the gear lever to travel more than I have during lockdown so, I decided to fit the Slick Shift kit and adjust the bias springs. A previous owner had tried to reduce the movement by adding a pot of grease to the selector housing, cleaned out and new kit assembled. What a difference, it's so much better although it will be a while until it's tested on the road it feels so short between gears.

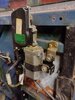
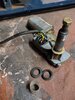
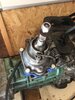
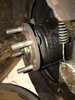
The screw up on this job is that I took off the reverse gear selection plunger assembly to free the plunger, and whist it was in the bench vice to remove a very stuck cap the body sheared one of the bolt lugs off. Typically it is another £50 or so to replace this assembly all due to not securing in the vice correctly.

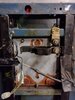
Still saving for the chassis but, in the meantime I have received planning permission from the boss to build a temporary addition to the garage so I can do some of the spray work, assembly etc out of the weather. It has to be temporary as a permanent structure would impact her horticultural expansion:-( I need a work areas as my other car is stored in the garage and I can't risk damaging that whilst working on the Defender. (first world problems)
 

Attachments

  • IMG_3374.JPG
    IMG_3374.JPG
    325.7 KB · Views: 240
  • IMG_3377.JPG
    IMG_3377.JPG
    335.6 KB · Views: 201
  • IMG_3375.JPG
    IMG_3375.JPG
    263.6 KB · Views: 219
I've taken a week off to try and get moving on more cleaning & refurb work. Got the valve clearances done, new gasket and retaining seals and reassembled some pipework / hoses on the engine. I've already changed the oil & filter so not much more planned for the engine until it is installed and back running.

The big move was the building of an extension to the garage by way of a car port, I was forbidden to make it permanent by the Financial Director as it would shadow some foliage:-(
Anyway, I do intend to use some green netting used on farms as a windbreak so I can work in "relative" comfort. The gas heater has a new cylinder so all warm in the workshop when working on small items.
My target is to get some painting done, fuel tank, prop shafts and the inner wings.

I am replacing the propshaft bolts as they have seen better days however, trying to release the flanges with the gearbox out of the vehicle appears to be impossible, am I wasting my time trying to do this on the bench?
 
I have to take off the output flanges on the transfer box to remove the old Prop shaft bolts and fit the new ones, then reassemble. The nut is at 135lB/ft according to the manual.
 
I have to take off the output flanges on the transfer box to remove the old Prop shaft bolts and fit the new ones, then reassemble. The nut is at 135lB/ft according to the manual.

Can you not just move the circlip enough to get each bolt out individually? I can’t remember taking them off mine to replace the bolts.
 
I've taken a week off to try and get moving on more cleaning & refurb work. Got the valve clearances done, new gasket and retaining seals and reassembled some pipework / hoses on the engine. I've already changed the oil & filter so not much more planned for the engine until it is installed and back running.

The big move was the building of an extension to the garage by way of a car port, I was forbidden to make it permanent by the Financial Director as it would shadow some foliage:-(
Anyway, I do intend to use some green netting used on farms as a windbreak so I can work in "relative" comfort. The gas heater has a new cylinder so all warm in the workshop when working on small items.
My target is to get some painting done, fuel tank, prop shafts and the inner wings.

I am replacing the propshaft bolts as they have seen better days however, trying to release the flanges with the gearbox out of the vehicle appears to be impossible, am I wasting my time trying to do this on the bench?
use a lever between the bolts
 
I’ve tried to release the circlip“in situ” but unable to get the pliers in to try, I might look at alternatives and try again.

I was using a long pry bar between the bolts and a 600mm breaker bar with the socket, this was bending. I’m not a wee bloke but, I might need to get another bod to hang on the pry bar as I try to undo the nut. I only have a battery impact driver, maybe a windy gun would have more torque.
 

Attachments

  • 6C336C6B-62CF-4EAD-8B9F-ADD1993BAEBF.jpeg
    6C336C6B-62CF-4EAD-8B9F-ADD1993BAEBF.jpeg
    383.5 KB · Views: 173
Done at last, I ended up using a blowtorch to heat the nut to release it, still needed a 36” breaker bar / pry bar to shift it. Might as well do the seals too.

Ant recommendations for the transfer box & gearbox oils? I know the viscosity just interested in the brands you use.
 

Attachments

  • 143AEC35-4F7F-49C7-B9A4-C16E48143D2C.jpeg
    143AEC35-4F7F-49C7-B9A4-C16E48143D2C.jpeg
    616.3 KB · Views: 176
Spent the day using Buzzwelds Plastic In One paint, totally restores the fascia panels, instrument cluster and door mirrors. I’ve even used it on the coolant reservoir in the engine bay to really refresh things.
The pictures here are of the instruments cluster, ignore the electrical tape, that was added by a previous owner as the front of the light panel has separated slightly and they are too expensive to replace.

I’ve just ordered PIO in a grey colour (RAL7006) for the door cards.
 

Attachments

  • E2477389-B57A-47AB-B9FB-11937133F39A.jpeg
    E2477389-B57A-47AB-B9FB-11937133F39A.jpeg
    53.9 KB · Views: 162
  • 117CDCD7-848F-4C25-B1BF-C7AC0D62DCDE.jpeg
    117CDCD7-848F-4C25-B1BF-C7AC0D62DCDE.jpeg
    55.9 KB · Views: 161
Spent the afternoon using the Plastics In One refurbishing the door cards. 2 aerosols covered 4 door cards and a rear door card. Really happy with the results. Coloured to match the seats colour code RAL7006.
The middle seat is a darker colour to the main passenger and drivers seat so might change that too.

I need to order more in black to finish off the remaining interior items.

I can’t recommend their products enough.
 

Attachments

  • D1253888-A72E-450C-92CB-977EE5ABD625.jpeg
    D1253888-A72E-450C-92CB-977EE5ABD625.jpeg
    204 KB · Views: 137
  • 04EBAAA1-60C6-4EE0-8374-73A3ADA432A4.jpeg
    04EBAAA1-60C6-4EE0-8374-73A3ADA432A4.jpeg
    255.2 KB · Views: 139
  • F30FB74C-A12E-40A6-9272-2A1A0D46137B.jpeg
    F30FB74C-A12E-40A6-9272-2A1A0D46137B.jpeg
    250.5 KB · Views: 137
Bought a replacement bonnet and spent time removing the residue the last owner left when removing the “Defender” lettering. Prepped the drivers door for paint but, needed the top two inner panels where the lock button is located as it is cracked and partly corroded, ordered from SP Panels so hopefully here this week.
Found a tin of Buzzweld PIO in black and painted some of the fascia parts. All in all a good bit of progress despite having summer & winter weather at the same time!

I also want to fit a rear wiper but the door has not been drilled through the outer panel, can someone tell me the diameter of the hole in the outer panel?
 

Attachments

  • D1D23544-9301-4571-B447-5471D6C04E78.jpeg
    D1D23544-9301-4571-B447-5471D6C04E78.jpeg
    66.8 KB · Views: 134
  • 80927555-156B-4C6C-9DED-4611133A3FC3.jpeg
    80927555-156B-4C6C-9DED-4611133A3FC3.jpeg
    251.3 KB · Views: 139
  • 76FD71C3-44B9-4B63-A918-C439AC126CE0.jpeg
    76FD71C3-44B9-4B63-A918-C439AC126CE0.jpeg
    248.7 KB · Views: 134
  • E0290EE8-61BE-4D1A-BED2-B46A7FF3AC51.jpeg
    E0290EE8-61BE-4D1A-BED2-B46A7FF3AC51.jpeg
    57 KB · Views: 158
Glad to see you're at the painting stage. Your doors are in a much better state than mine so it'll be a while before I get there! My rear door has a wiper so I'll have a look at the hole diameter next time I'm over at the garage. Might be a couple of days though.
 
Glad to see you're at the painting stage. Your doors are in a much better state than mine so it'll be a while before I get there! My rear door has a wiper so I'll have a look at the hole diameter next time I'm over at the garage. Might be a couple of days though.
Thanks, appreciate the help.
 
OK, turns out I was at a loose end this evening. A bit of dismantling later and the answer is 20mm. The two holes have a plastic sleeve between them of internal diameter 19mm and length 25mm that the shaft passes through, and there's a rubber grommet in each of the holes. If you need any more measurements let me know in the next hour or so. Cheers
 

Attachments

  • IMG_20210412_200508340_HDR.jpg
    IMG_20210412_200508340_HDR.jpg
    276.9 KB · Views: 126
  • IMG_20210412_201042073_HDR.jpg
    IMG_20210412_201042073_HDR.jpg
    329.7 KB · Views: 117
Sorry, forgot a photo of the actual hole if that's of any use
 

Attachments

  • IMG_20210412_201931430_HDR.jpg
    IMG_20210412_201931430_HDR.jpg
    278.9 KB · Views: 145
Back
Top