Bankz's 110 Double Cab

This site contains affiliate links for which LandyZone may be compensated if you make a purchase.
:rolleyes::rolleyes: nope :p:p

Of course! Got knocked moving around it.

Still got to refit the heater ducting, snorkel and give it a wash, covered in swarf.

Ill finally (18 months later!) fit my light bars! Going to buy some steel L section mount to beacons on the rear, same for the front.

Think ill go for the SD clamps for the rear bar, £25 a pop but quality. That or go for corner spots as there are brackets there!
 
Years in the making! Before i even bought the landy! Haha

Next one is having a few mates knock up a 4" snorkel similar to the AFN one but larger

10062.TATTCR.jpg
 
Looks good ay? Quite different to most.

Putting out some feelers today for a custom snorkel :D

Polished stainless?

To be fair, you can pick up 110mm brown PVC drainage in B&Q for not a lot of dough, they have nice push fit couplings in an array of bends to suit, thinking about your bank balance after the cost of that cage LOL :p:p:p
 
:):) Cheers hahaha

I've had plastic ones before they just crack and fall to bits! Currently looking for all the bits I need.

Need x2 4" 90 degree mandrel bends, one for the top, one for the wing (so it looks nice!), 1 45 degree bend to curve from the cage to the wing top and some 4" straight lengths. + Fabricate a wing top plate to mount the snorkel, some mesh for the intake bit stop birds being sucked in :p and a decent way to mount it!

Going to start uploading cage pics now :D
 
Roll cage build pics batch 1

First offering up of front wing brace.

20180214_115722_resized.jpg
20180214_115725_resized.jpg

This is the gusset that must be removed. The SD instructions do not show this well!

20180214_134428_resized.jpg

Showing the location of the spot welds on the gusset that must be drilled out.

20180214_134529_resized.jpg

Gusset removed. You also have to trim the curve down and the top area so the brace can sit flush inside the wing.

20180214_120200_resized.jpg

This part of the wing must be removed.

20180214_115730_resized.jpg

Front wing brace. The bottom of the wing needs to be cut out so the brace can clamp fully to the bracket.

20180214_120227_resized.jpg

Front outrigger bracket for the wing brace.

20180214_120726_resized.jpg

Big washer in here, don't knock it all the way though as you need to fit a bracket in the above picture there.

20180214_120856_resized.jpg

First marking out of the wing. Was suggested by a few people to start from the front and work back, which did work out well.

20180214_130957_resized.jpg


Front wing inner support, this is the reason you must cut square holes so the support can sit through it and make full contact with the rest of the cage. The inner support bolts onto the bulkhead using the existing hole but decent M8 J plugs.

20180214_131942_resized.jpg

Front wing on! Not very difficult to do, just a case of constant measuring and transferring markings from back to front. Also helps to have very bendy arms to get to all of the bolts holding the outer wing in place! Luckily mine came off and went back together pretty easily, the same cannot be said for the other side however!

20180214_173101_resized.jpg

Fitting the front wing support to gauge where the C hoop should fit. Garage door mounts came in handy!

20180214_181251_resized.jpg


First marking out for C hoop

20180214_183936_resized.jpg

C Pillar internal brace offered up

20180214_183958_resized.jpg

Quite heart breaking cutting these holes! All done buy marking out according to SDs instructions, offering up the cage section, checking its right, marking out again, then marking the holes using blank plates. Drill 4 12mm holes then cut between them.

20180214_184951_resized.jpg


Not ideal and my cutting could do with some improving! However the "feet" will cover it all.

20180214_191227_resized.jpg

C pillar internal supports bolt through existing holes in the C pillar, as you can see. Does not extend down to the chassis but wouldnt be hard to fabricate an extra bracket if you chose to.

The cage comes with a selection of steel spacers to make sure everything sites square and solid.
20180214_191256_resized.jpg


Offering up the rear section to the C hoop with the front wing bars connected. Trying to get the rear section in the right place as the measurements SD give are not exactly ideal...
20180214_200542_resized.jpg
 
Batch two!

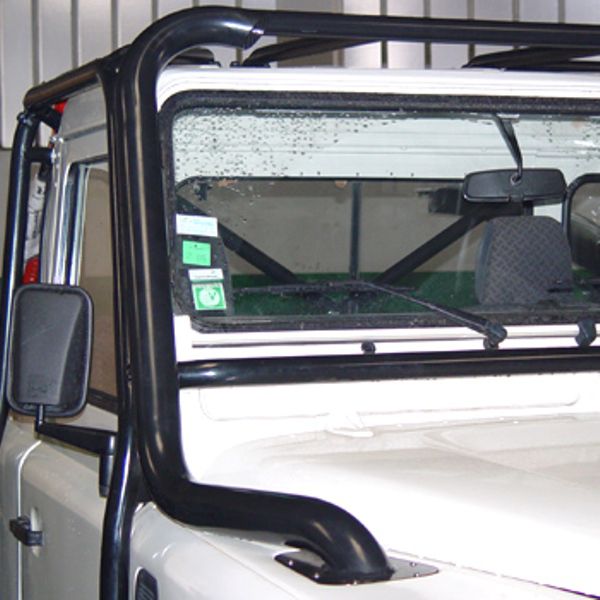
Right wing on! This was done later as originally I wanted to run twin Southdown snorkels which would have given ~32% better air flow than my current set up, but sadly not possible to do with a roll cage and a heater! So that idea has been abandoned. Instead I'm having a custom 4" snorkel made up which will run through the other sides wing intake with a 4" pipe to the air box.

This wing was also very hard to bolt in place due to the lack of side vent! Took a few hours and some crushed hand but eventually went on nice and straight.
20180215_122605_resized.jpg

Other side C pillar hole cut

20180215_130757_resized.jpg

Offering up the rear section, its a little off but the bolts pull it in to place. Just makes marking a little tough.

20180215_190227_resized.jpg

Ok my brain just stopped working here... Cut the wrong line :mad::mad: luckily realised just in time and luckier still the feet cover it.

20180215_191327_resized.jpg

Phew barely noticeable! :)

20180215_191616_resized.jpg

Internal supports for the rear cage section. Comes in where the rear light cluster cover is, which also has to be modified to accept the support brackets (no pics of that!). This was also an utter pain in the ass to fit, first side took me just shy of 4 hours as there is another bracket (no pics, ill add some tomorrow) that sits directly underneath and bolts into the cross member. Trying to line up those bolts isnt exactly easy, be simpler with two people but still a right pain. The other side took me 30 mins as I knew what to do!

20180215_193115_resized.jpg

Down to me not fitting the boot lid 100% square, I'll have to painstakingly adjust this :rolleyes::rolleyes::rolleyes:

20180216_104738_resized.jpg


I cut this side much better. Sealed any cuts with clear silicone after two coats of Buzzweld CIO

20180216_113342_resized.jpg

Found this odd, not sure why SD didnt just carry on with the saddle mounts, but instead used this slipper tube. Quite ugly imo and can't see why it was done this way. However makes a perfect place to fab up a bracket to mount the beacons.

20180216_165329_resized.jpg
20180216_165337_resized.jpg


And done! Started Wednesday at 11am finished Friday at 5pm. Working around 8 - 10 hours per day.

Not the easiest thing I've ever done, especially alone. I would strongly suggest working with someone if you can, makes it much easier. However it has been the most rewarding and satisfying job I've done, very happy with myself! :D:D

Final fitting was a case of following the SD instructions front to back, left to right effectively. Also swapping out all the hex bolts for socket heads one by one, tightening one by one, side by side. Takes a while.

Got a few bolts, washers and things left over, not sure where they go :eek::eek::eek:

20180216_172307_resized.jpg
20180216_172328_resized.jpg
20180216_172339_resized.jpg

Comes with light bar brackets! :D had these about 18 months, Phillips 7w Lumileds (triple row in the center). Bright AS THE SUN around 480watt per bar, some might say excessive :p

20180217_154722_resized.jpg

Annoyingly due to the "feet" design of the cage my MOD snorkel no long fits :confused: so I've had to re-route the sealed air intake to the KDX hi-force. Will do for now while my custom jobby is made up.

20180217_170302_resized.jpg


Hope you enjoy the read as much as I enjoyed the fitting.
 

Attachments

  • 20180215_122605_resized.jpg
    20180215_122605_resized.jpg
    133.4 KB · Views: 142
Looks good and a very nice job.....bet your derriere was puckering when you got that one cut line slightly off...:eek::eek:

I trust you are changing the Hex heads for suitable Cap head bolts of a similar spec.

Cheers
 
Oh, I see the hex head ones you used to bolt through the wings are 8.8's. Did SD supply those as well?

As long as the SS ones were supplied by SD, was just concerned they were not what should have been used or not up to spec.

Cheers
 
All from SD, i damaged a few hex heads but replaced like for like.

The hex heads are there for the constant fitting and unfitting, then when all is good you replace with socket heads one by one.
 
Yeah, thats or I guessed wrong as the instructions may aswell be Ikea chinglish haha

I was thinking of making a more in depth guide on how to fit, to use along side the SD instructions, any pointers?
 
Back
Top