You are using an out of date browser. It may not display this or other websites correctly.
You should upgrade or use an alternative browser.
You should upgrade or use an alternative browser.
1992 200tdi Discovery- gradually improving my daily driver
- Thread starter K2tnt
- Start date
This site contains affiliate links for which LandyZone may be compensated if you make a purchase.
- Posts
- 52
- Location
- Kent, Romney Marsh
It's been a good read, sad about the accident damage but you did a good job with fixing it .
Hope the new suspension sorts your wobble.
Looking forward to the next update
Hope the new suspension sorts your wobble.
Looking forward to the next update
- Posts
- 52
- Location
- Kent, Romney Marsh
I had no idea of timescale, I read from start to finish in one go lol.
I'm thinking keeping them original is a good idea, I'm getting mine on the road soon and have a winch bumper for it but I may stick with the standard one after a lick of paint.
I'm thinking keeping them original is a good idea, I'm getting mine on the road soon and have a winch bumper for it but I may stick with the standard one after a lick of paint.
K2tnt
Well-Known Member
- Posts
- 186
First annoyance- the spring retaining clamp bolts began to come out fine, but then the bolts sheared! Turned out a previous fixer had welded the nuts to the axle brackets...
Springs came off both sides fine, out came the grinder to get the remains of the nuts and bolts off the brackets.
Here’s the new springs compared to the old ones- weirdly enough new ones are a bit shorter? One is slightly longer for drivers side- found that out thanks to watching video on Britpart site.
New springs went into position OK, used new nuts and bolts to attach brackets to axles. Re-attached shock absorbers after lifting axle up a bit- see earlier in thread for when I fitted these.
Tried to get the upper arm link off the middle of the axle but even when I’d got the split pin out this bolt wasn’t playing ball... the only 30mm socket I have wouldn’t fit properly on the nut so going to find a lower profile/shouldered one.
So made a start on the lower arms- most bolts were easy to remove, but the bracket on the passenger side defeated me for today so going to get that off tomorrow.
Here’s the lower link from the drivers side removed...
And the new chassis mount compared to the removed one...
So going to get the passenger chassis mount off tomorrow and take the arms in somewhere to get the bushes pressed out. Might try and get a 30mm low profile socket so I can do the centre upper link as well. Fun!
- Posts
- 52
- Location
- Kent, Romney Marsh
I had to buy a 30mm ring spanner for the upper arm ball joint.
The new springs may be shorter but stiffer so will compress less.
The new springs may be shorter but stiffer so will compress less.
Ah right thanks, that makes sense about the springs. Ring spanner might be the way to go- thanks for advice!
You can get a stubby 30 on it mate - my 30s were impact so bought a stubby just for this job. The plus of it is you can get a 5ft scaff pole on it lol
K2tnt
Well-Known Member
- Posts
- 186
Didn’t have that much joy today annoyingly! Got the other lower arm bracket off the other side and managed to loosen the upper bolts holding the a-frame to the chassis, but then they got stuck...

Began grinding them out but wore down the last grinding disc- going to continue grinding the crap out of them tomorrow so I can get the A-frame off. Cleaned up and sprayed lower arms before getting bushes changed...

Began grinding them out but wore down the last grinding disc- going to continue grinding the crap out of them tomorrow so I can get the A-frame off. Cleaned up and sprayed lower arms before getting bushes changed...
Attachments

K2tnt
Well-Known Member
- Posts
- 186
Chassis bolts off now with grinder, just that central ball joint stuck! Ground nut off but the balljoint is well and truly stuck in the axle. Smacked it with a hammer, doesn’t seem to move at all! Going to try getting a bigger fork splitter
 to get it out...
Got the old lower arm bushes pressed out by a mate with a press so they’re ready to go back on.
Got the old lower arm bushes pressed out by a mate with a press so they’re ready to go back on.
K2tnt
Well-Known Member
- Posts
- 186
K2tnt
Well-Known Member
- Posts
- 186
Oh no! Sure there should be something there...

Ah, there it is...

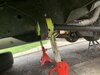
So anyway I totally failed to get the balljoint off, so off came the axle! It’s bloody heavy, especially with the A-frame still attached.
Putting a pair of Stilsons between the axle bracket and balljoint and ****ting it with a mallet was finally enough to get it out!

The remains of the balljoint...

Began cleaning rust off with wire brush on grinder, starting to look better.

Well surprisingly enough the bolts hold the arms to the fulcrum came out very easily, in a rare show of intelligence whoever had worked on it before had slathered them in oil. A frame is now stripped and primed ready for painting. Balljoint and bushes will need pushing out and replacing, going to give the axle a good going over and repaint it before refitting that too, along with replacing brake pipes. Fun!
Ah, there it is...
So anyway I totally failed to get the balljoint off, so off came the axle! It’s bloody heavy, especially with the A-frame still attached.
Putting a pair of Stilsons between the axle bracket and balljoint and ****ting it with a mallet was finally enough to get it out!
The remains of the balljoint...
Began cleaning rust off with wire brush on grinder, starting to look better.
Well surprisingly enough the bolts hold the arms to the fulcrum came out very easily, in a rare show of intelligence whoever had worked on it before had slathered them in oil. A frame is now stripped and primed ready for painting. Balljoint and bushes will need pushing out and replacing, going to give the axle a good going over and repaint it before refitting that too, along with replacing brake pipes. Fun!
- Posts
- 66,486
- Location
- The Wooly Witch
Oh no! Sure there should be something there...
View attachment 235685
Ah, there it is...
View attachment 235686
So anyway I totally failed to get the balljoint off, so off came the axle! It’s bloody heavy, especially with the A-frame still attached.
Putting a pair of Stilsons between the axle bracket and balljoint and ****ting it with a mallet was finally enough to get it out!
View attachment 235687
The remains of the balljoint...
View attachment 235688
Began cleaning rust off with wire brush on grinder, starting to look better.
View attachment 235690
Well surprisingly enough the bolts hold the arms to the fulcrum came out very easily, in a rare show of intelligence whoever had worked on it before had slathered them in oil. A frame is now stripped and primed ready for painting. Balljoint and bushes will need pushing out and replacing, going to give the axle a good going over and repaint it before refitting that too, along with replacing brake pipes. Fun!
Need a bump stop or two anorl ...

K2tnt
Well-Known Member
- Posts
- 186
Oh and weirdly enough there were wires going to the back axle with a connector, most of which were cut off! So I’m guessing maybe someone fitted an ABS axle at some point despite not having ABS?! There’s a connector under the boot floor which I had to disconnect before removing axle.
K2tnt
Well-Known Member
- Posts
- 186
Rear axle cleaned up and painted...

And rear chassis area wire brushed and painted too. Was pleasantly surprised how easy the remains of the bump stops were to get off! New ones bought from Paddocks, along with new flexi brake cable and fulcrum/balljoint.
 Looking loads cleaner now!
And rear chassis area wire brushed and painted too. Was pleasantly surprised how easy the remains of the bump stops were to get off! New ones bought from Paddocks, along with new flexi brake cable and fulcrum/balljoint.
Similar threads
- Replies
- 5
- Views
- 13K
- Replies
- 6
- Views
- 8K