Hi everyone, I have recently replaced my turbo following the guide here: https://www.landyzone.co.uk/land-rover/how-to-change-turbo-on-a-td4.221780
Well, sort of. Now I've decided to write myself a guide with actual putting it back as well, since that is where the bitch job for me.
If you do find some gramatical errors and what not ignore them, it's my 3rd language.
Also, apologies but I've nicked some photos online or from this forum's other guides to get a bit more accurate.
Prerequisites:
Pretty much everything in reverse order, but there are a few important things to look after.
Well, sort of. Now I've decided to write myself a guide with actual putting it back as well, since that is where the bitch job for me.
If you do find some gramatical errors and what not ignore them, it's my 3rd language.
Also, apologies but I've nicked some photos online or from this forum's other guides to get a bit more accurate.
Prerequisites:
- a decent set of tools, sockets mainly (I have halfords advanced 170 piece socket and ratchet spanner set)
- 2x axle stands (if you don't have a ramp or elevator, don't risk your life for a freelander!) might add some wheel stoppers as well
- Some extensions preferably 1/2 inch as where it's needed some force might be required, might get away with 3/8
- Turbo gasket kit in case the replacement doesn't come with or you are fitting an used one: https://www.ebay.co.uk/itm/153403369897
- A small syringe to put oil in turbo later
- air filter, oil, oil filter (if you get a refurbished one, they kind of require this, up to you)
- chinese endoscope, this saved me alot of time and effort for 7 quid, works with android: https://www.ebay.co.uk/itm/263891217519
- decent flashlight
- 3h first time (providing you are a nice disciplined person who knows where every tool is)
- 1h thereafter
- Lift the car and secure it, remove wheels to get more light around there and space for manoeuvres.
- Remove the undertray, if you have it.
- Drain the oil if you are changing it (optional, plenty guides on youtube for that)
- Remove engine cover, air filter cover and air filter itself, brief picture where to look at for screws. Air filter housing has allan key 5mm
- Unclip the MAF, unclip the two cables that are attached to the tube you can leave them hanging but you need to remove the tube completely. You can pull it out of the turbo just make sure you pull the small hose that goes into the tube as well
- Remove the turbo solenoid with housing, it's in the driver's side on the base of the newly removed tube. I personally find it more self to remove all hoses and etc, but you can tie them away.
- In that area, above the turbo there is a weird hose (pn PNH101811) that has jubilee clips, that needs to be removed. You can get away with only removing one side (the turbo side) however is going to be inconvenient to fit the turbo back after. Best you remove it altogether.
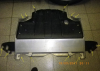
- From under the car, looking on the engine right side you will see a hose with a banjo bolt (well looks like a regular bolt initially) that goes from the turbo there. You can unscrew that, but some oil will drip so better have some pan below or whatever you seem suitable to make as little as possible mess. Nicked picture of an engine to point the location:
- The exhaust side of the turbo has two nuts. You will have to remove it either through the passenger side where the steering rod goes through, or if you are tall enough you can bend over and do it from the vacuum part. Both cases need extensions. These nuts can be quite stubborn depending on how much they went through.
Easy to see with a flashlight and there is a picture further down below with the turbo and nuts removed. - Tie the exhaust away as you need to do some work in that area after. If is not flexible enough you can remove completely from the catalyst side, only three rusty screws.
- From under the car, on top of the IRD, there are three things to unscrew. A 6mm jubilee clip (blue) and two 13 mm bolts (green) never mind the missing screw (red) in the picture I've removed that initially to realise later this way is easier to fit back. You will have to go by the feel on the 6mm jubilee one and perhaps on the other two, it's not that hard.
- Go back up on the air filter housing. If you look down near the MAF area you will see three rubber caps, remove those and then remove that heat protection by pushing it down and slide it towards the windscreen.
- You now have access to three 12 mm bolts, but bear in mind you need a 12mm and 12point socket for this if you have original bolts. Don't use a normal one as you risk of rounding them up.
- At this point is a very good idea to have somebody perhaps unscrew these while you are holding the turbo from below. Pretty optional to be honest not much can happen. Added a picture although is pretty easy:
- From below the car, you can now remove the turbo. You will have to play a bit with it to get out, mid you it's quite heavy and hard to put both hands in there.
Pretty much everything in reverse order, but there are a few important things to look after.
- On the replacement turbo, make sure you put that metal bracket on the oil return pipe exactly in the position as the old one, otherwise the two screw wholes won't match. I guess you can leave a little bit unscrewed the 3rd screw to be able to move it but I found very difficult to get to it once turbo is in place
- You should replace all washers, a small chip especially on feed banjo bolt will cause alot of oil to leak, these are like 70p each genuine
- When refitting initially you will have to get the oil return into the hose, this can be a bit difficult because turbo is heavy and you need one hand for the feel. Should push it as much as possible in.
- After this, I find quite mandatory for somebody to screw in those 3 bolts from above, while you guide it from below and put the gasket as well. Can be done as one person I guess by either keeping it to those screws on oil return bracket or put some rags under to keep it in place until you go up.
- Put oil in the turbo this is very important. Although turbo does get oil from that banjo bolt, there is a delay when you start it 1st time which depending on your luck may or may not be catastrophic. This needs to be done with a serine or a very small pump with a very small hose through the oil feed on that banjo bolted hose.
Attachments
Last edited:
")