Bias plate repair.

This site contains affiliate links for which LandyZone may be compensated if you make a purchase.

Steviecops

Active Member
Full Member
Posts
802
Location
Colchester
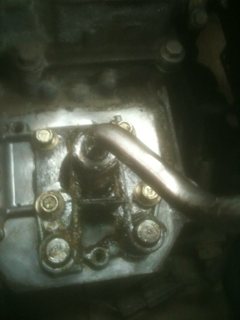
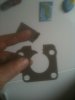
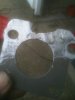
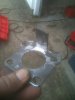
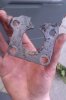
After reading many old threads, I'm pretty certain my bias plate has had it. Can these usually be welded up, or is it best to just replace it? I know they are cheap but I'm thinking of time rather than money. If they can normally be repaired I can do it tomorrow, but if not I'll have to order one and wait for it to arrive.
 
dude its easy i did mine last week and the part i took off was the same as the one i put on no damage at all, mine was like string a big bowl of stew i had to guess where the gears were i fitted the new one adjusted it so it sat below 3rd and now is all good 2nd is still abit of a **** but still a massive improvement, you might get away with just setting it correctly loosen adjust and put bk

have fun with the pop rivets
 

Attachments

  • landy 3 004.JPG
    landy 3 004.JPG
    252.4 KB · Views: 1,089
oh and you might have to bend the top of the gear box tunnel to get the plate i have in my hand out, also watch when you take the springs out get the colorful language ready :)
 
dude its easy i did mine last week and the part i took off was the same as the one i put on no damage at all, mine was like string a big bowl of stew i had to guess where the gears were i fitted the new one adjusted it so it sat below 3rd and now is all good 2nd is still abit of a **** but still a massive improvement, you might get away with just setting it correctly loosen adjust and put bk

have fun with the pop rivets

Thanks for that. I've read what a pain the pop rivets are, but to be honest I think the connectors for the Window and seat switches in the centre consul are what's going to give me a headache. Mine's an ES and it has a lot of them! Think I'll have to label them. The springs look like they'll be fun, .......not! :what:
 
you just slide switch panel under cubby box no need to disconnect switches ,just be careful with hand brake lever after removing cable pin the rod to button in the lever doesnt take a lot to bend it ,you can weld plate up ,plate has slotted holes so you can adust so lever falls to 3rd 4th alignment do this with stick fitted back on as its weight can alter position,drill rivets with 4.5mm drill bit
 
you just slide switch panel under cubby box no need to disconnect switches ,just be careful with hand brake lever after removing cable pin the rod to button in the lever doesnt take a lot to bend it ,you can weld plate up ,plate has slotted holes so you can adust so lever falls to 3rd 4th alignment do this with stick fitted back on as its weight can alter position,drill rivets with 4.5mm drill bit

Ah, great stuff. Thanks for the tips.
 
Can I gain access to the reverse light switch while I'm in there? My reverse lights only work intermittently, so I want to have a look at the wiring and switch.
 
Still haven't got round to doing the repair yet, going to do it tomorrow now. Just checked and I'm a bit limited with what rivets I've got in my box. Can anyone tell me what size rivets I'll need to replace the drilled out ones? Don't want to start it and then have to go looking for rivets half way through to finish it.
 
Still haven't got round to doing the repair yet, going to do it tomorrow now. Just checked and I'm a bit limited with what rivets I've got in my box. Can anyone tell me what size rivets I'll need to replace the drilled out ones? Don't want to start it and then have to go looking for rivets half way through to finish it.
4.8mm x10
 
Job done! :)

etybu6ub.jpg
 

Attachments

  • ImageUploadedByTapatalk1359906717.298159.jpg
    ImageUploadedByTapatalk1359906717.298159.jpg
    45.1 KB · Views: 486
  • ImageUploadedByTapatalk1359906738.572988.jpg
    ImageUploadedByTapatalk1359906738.572988.jpg
    49.3 KB · Views: 444
  • ImageUploadedByTapatalk1359906761.585999.jpg
    ImageUploadedByTapatalk1359906761.585999.jpg
    29.5 KB · Views: 555
  • ImageUploadedByTapatalk1359906795.485932.jpg
    ImageUploadedByTapatalk1359906795.485932.jpg
    29.5 KB · Views: 422
Last edited:
Weld up the broken one,dont replace it.The way they are made means they are doomed to fail - a decent mig weld will ensure it lasts for the life of the car.
 
Weld up the broken one,dont replace it.The way they are made means they are doomed to fail - a decent mig weld will ensure it lasts for the life of the car.

That's what I did. I'm rubbish at welding, but managed to make good solid welds on both sides. Ended up with loads of extra metal so just as we'll I'm better with a grinder and a file than I am with a mig welder! :D.
 
you just slide switch panel under cubby box no need to disconnect switches ,just be careful with hand brake lever after removing cable pin the rod to button in the lever doesnt take a lot to bend it ,you can weld plate up ,plate has slotted holes so you can adust so lever falls to 3rd 4th alignment do this with stick fitted back on as its weight can alter position,drill rivets with 4.5mm drill bit

An old thread I know but in case people with no mechanical skills like me are searching I just want to second this point about the hand brake lever.

I am a complete novice. I bought my Land Rover with this problem (broken bias plate/spring), I wasn't aware how smooth the gear changes could be once there's no bits of broken metal in the way :pound: .

Looks like someone had already had a go at this before I bought the car and obviously failed because it was a right mess and rivets had been replaced with screws.

Definitely a job the novice can do but it took me 2.5 hours to figure out wtf I did with the handbrake. Everyone was in the firing line it was very frustrating!

The rod can be bent back still in the lever. Lift the lever vertical and you can pop the mechanism back so the button pops out again. When you press the button in (still vertical) you can see where it binds on the lever. Some "gentle persuasion" with a screw driver will bend the rod straight. You can then see the mechanism move free. I replaced the pin before I moved the lever down then removed it when it was in position to re-attach the hand brake cable. I'm not sure if this would prevent the mechanism popping out in the first place but I will put the pin back in next time I remove the hand brake cable/centre console and hope it does. Maybe someone can help regarding that ?

Job satisfaction is high though, was a joy to drive this morning. :)
 

Attachments

  • IMAG0689.jpg
    IMAG0689.jpg
    495.7 KB · Views: 356
Still haven't got round to doing the repair yet, going to do it tomorrow now. Just checked and I'm a bit limited with what rivets I've got in my box. Can anyone tell me what size rivets I'll need to replace the drilled out ones? Don't want to start it and then have to go looking for rivets half way through to finish it.

4mm rivets.
 
Back
Top