What have you done to your Freelander today

This site contains affiliate links for which LandyZone may be compensated if you make a purchase.
I fitted my rear window tints today.

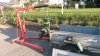
Started by removing the roof rails & roof
6aquma8e.jpg


Then I removed the pop open windows and used the kitchen table to fit the tints
yrejepys.jpg

The roof fits perfectly on the kitchen table but I needed help carrying it through the house!

Finally I did the rear window after refitting the roof.
This was an awful job to do because the window curves inwards so the tint bunches up.
The only way I managed it in the end was to use a hair dryer & a credit card to heat the tint & stretch it across the window.
va2yqy4y.jpg
 
nicely done. One my most often thoughts is to tint my back windows (x2 freelanders) but i often see people give it a go and it looks terrible
 
Tints look good.

Was rummaging in my garage today and found a load of tint off cuts...... Yup there is enough to do the hippo! So I am gonna have to do the same thing but the dinning table looks favorite as I haven't got a table in the kitchen..........
 
whats the best way to tint windows would love to do the Freelander

Remove anything of value from the immediate area, because choice words were spoken & things were thrown in frustration...mostly because I kept burning my hand with the hair dryer while trying to stretch out the bubbles!

Also make sure you have a friend on hand to help, window tint is very similar to Sellotape & cling film in that it loves to stick to itself which puts creases in it!!
 
Carried out the Turnip test again today. I've done the test twice this week. Both times the VCU was about 20°C above ambient temperature after my morning commute.
 
Datatek - was your question directed at me ??

If so - yes its doing good.

Had to change the clutch last year because i burnt it a bit in the woods - since then no problems at all.......
Also did the VCU with a Bell recon unit

My tyres are a bit noisy - at least i think its the tyres and not the IRD - time will tell

digby (John)
 
Used tyre paint on the writing on the tyres....

Removed roof (on my own)....

Followed Duncan's example and tinted :D

4BBB095E-2CE9-4FBC-BDB1-6DB1412DF611_zpsm6ovtxhw.jpg


Refitted roof (still on my own :eek:)

ACA37F58-EC35-4562-BC4C-F05921154B2B_zpsnngglbtr.jpg


Haven't done the back window yet as I ran out of daylight.
 
Datatek - was your question directed at me ??

If so - yes its doing good.

Had to change the clutch last year because i burnt it a bit in the woods - since then no problems at all.......
Also did the VCU with a Bell recon unit

My tyres are a bit noisy - at least i think its the tyres and not the IRD - time will tell

digby (John)
No it was aimed at Irishrover but interested in any responses especially about Freelander 2:)
 
Made it myself from some scrap and a bar that was on the front of a SJ with an exo-cage....

The clamps are basically angle iron cut down and bolted together , one is L shaped the other is flat so they sit around the flange Ll . If that makes sense.

the bar is a tube which is hammered flat at the ends to fold it round to the clamps. The tube has a slight bend but would work if it was straight. The light brackets are welded to the tube but you could drill and bolt if you wanted to.

I am gonna do a how to when I repaint the brackets and generally neaten it up this is a kinda prototype version.
 
Removed inlet manifold and cleaned. Tried to remove the egr, one bolt came out the exhaust manifold and one rounded the inside.swore loudly. Who the f thought Allen key bolts were a good idea on the exhaust manifold????
Contemplated getting an angle grinder in the chop off the bolt, get the egr out and easy out the bolt but the thought of it stressed me out with possible cock ups so I have saved for another day when I have more time. Refit all parts

I could take the exhaust manifold off and swap It with a spare one I have but I didn't enjoy getting the 3 nuts off the turbo last time
 
Loaded my engine crane into my trailer. Drove 25 miles to collect my Christmas present from my wife and kids.
Got to where Christmas present was waiting for me to lift it into my trailer using the engine crane. Took some pictures. Tied everything down securely and drove the 25 miles home. Carried out the turnip test. Took some more pictures. Unload trailer using the crane and studied my present.
You may be wondering what the Christmas present is? Well it's a 1947 Lister D type in running and complete condition!!
 

Attachments

  • 20131130_153127.jpg
    20131130_153127.jpg
    250.4 KB · Views: 243
  • 20131130_153120.jpg
    20131130_153120.jpg
    325.8 KB · Views: 276
  • 20131130_145114.jpg
    20131130_145114.jpg
    362.2 KB · Views: 157
  • 20131130_145119.jpg
    20131130_145119.jpg
    306.3 KB · Views: 177
  • 20131130_143517.jpg
    20131130_143517.jpg
    397.6 KB · Views: 226
Made it myself from some scrap and a bar that was on the front of a SJ with an exo-cage....

The clamps are basically angle iron cut down and bolted together , one is L shaped the other is flat so they sit around the flange Ll . If that makes sense.

the bar is a tube which is hammered flat at the ends to fold it round to the clamps. The tube has a slight bend but would work if it was straight. The light brackets are welded to the tube but you could drill and bolt if you wanted to.

I am gonna do a how to when I repaint the brackets and generally neaten it up this is a kinda prototype version.

How did you end up fixing the brackets to the roof channels? Got loads of people wanting me to make them a light bar, just still trying to work out the most secure way of fixing to the channel without punching a couple of holes in it as its a seam joint.
 
Last edited:
Back
Top