Steve's unexpected Series 3 rebuild.

This site contains affiliate links for which LandyZone may be compensated if you make a purchase.
Very little progress due to weather/darkness/cold/can't be arsed.
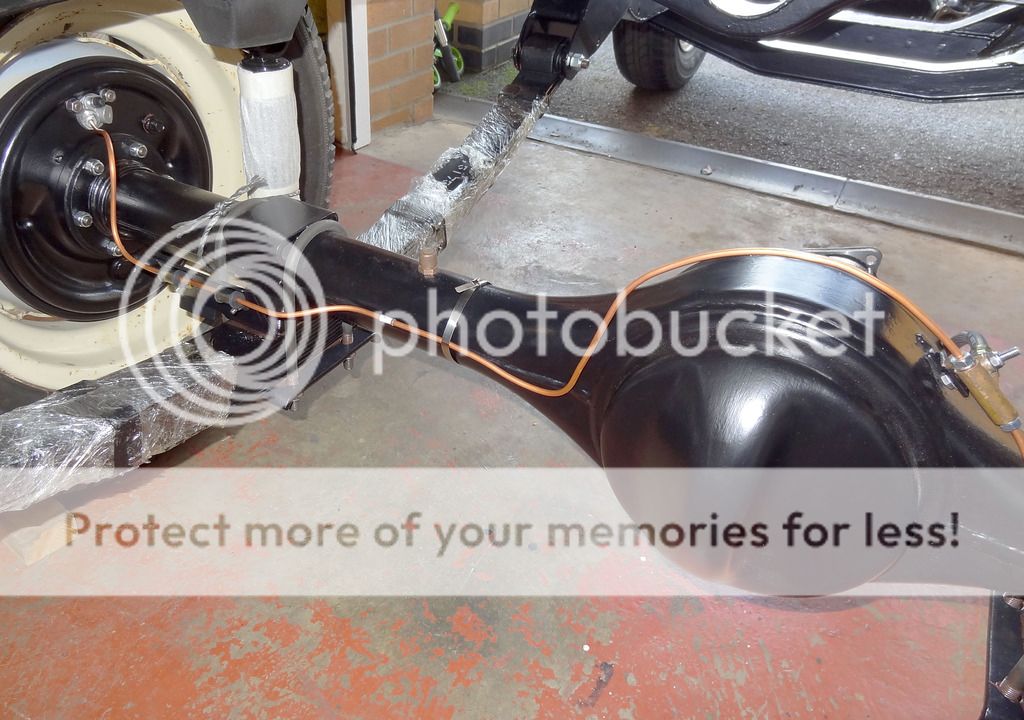
First of the brake pipes went on. It's a long time since I've done any of these but I think it went well. Just got to get the feel for how tight is right.

Next major bit will be the body tub. This was removed two years ago last October, stashed away and forgotten about. I started by removing the seal and retainers for the bottom of the back door.

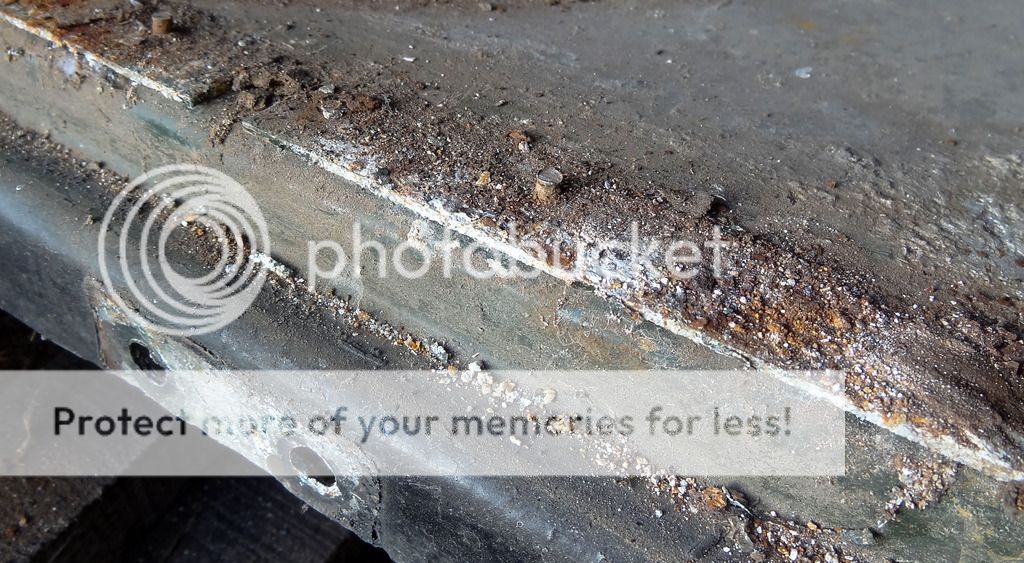
I'm starting to get very familiar with this horrible, white, powdery corrosion. No surprise that it's everywhere.

So it's all well and good saying i'm going to sort out the body tub but what do you do if you've run out of room to work on anything. Here is my solution.

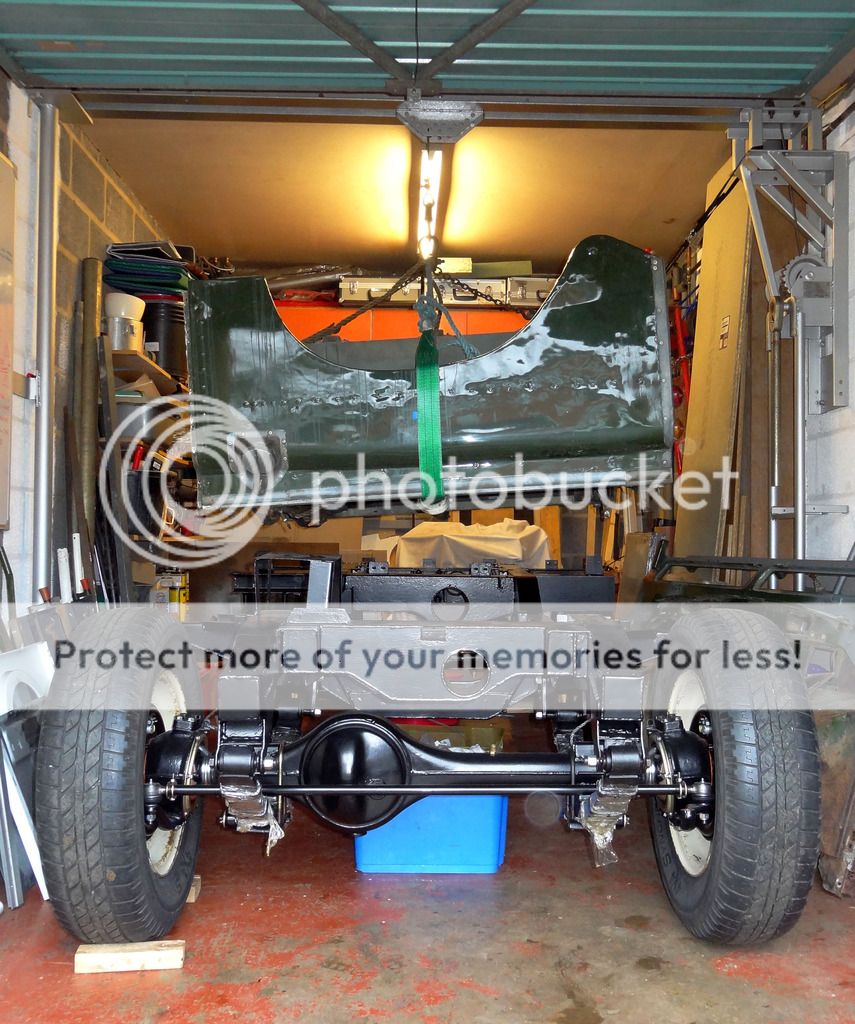
Dangle the tub off the engine hoist. Now I can work on it until I've had enough then I just lift it up, shove the chassis back in under it, shut the door, go in the house and ask myself why I didn't take up a sensible hobby like knitting.
I will make a frame to go under it when it's suspended and then it's less likely to twist when bits get removed to be refurbed. I wish I had more space.
 
Just read the thread from the start. The final shot on this post looks fantastic. I have a 2a sat in a barn somewhere that I have a hankering to get renovating. My Dad know's where it is, but I haven't been in a position to house it and work on it for a decade or so, so god knows what state it is in. This post is certainly fueling my desire to get cracking with it and see what delights it brings. I'll be following this thread with interest from here on.
 
Just read the thread from the start. The final shot on this post looks fantastic. I have a 2a sat in a barn somewhere that I have a hankering to get renovating. My Dad know's where it is, but I haven't been in a position to house it and work on it for a decade or so, so god knows what state it is in. This post is certainly fueling my desire to get cracking with it and see what delights it brings. I'll be following this thread with interest from here on.
Thanks for the comments. Just remember before you start the restoration that you need 3 times more cash than you think, 4 times the space you think and 5 times more time than you think. You can also end up with a lovely land rover which you then have to sell as part of the divorce settlement. Having said all that if I were you I would still just crack on regardless. :)
 
Thanks Aaron. I've improved things today with a frame to support the tub. Now it's supported without being squished by the ropes and straps. Photos to follow.
 
I cobbled this together at the weekend. Better support while dangling and mobile when on the floor.


It was a bit of a swine to get it to balance but I got it sussed in the end.
The underside doesn't look too bad but there are a couple of really corroded areas. The big mucky patch in the middle is where all the oil from the rear diff got to.
 
For a bit of light relief I thought I would have a crack at the grab handles. Not strictly needed at the moment but it makes a nice change to have a go at something small and easy. They had overspray on them from when some fool changed it to a nasty red colour years ago and then green overspray from when they changed it back again. There also seemed to be some concrete dust that had of course set rock hard.


Even the handles themselves seem to be a different type to most others I've seen.
I wanted them cleaned up a bit but not re-galvanised, smarter than they were but still showing their age. In the end I went lightly over them with the wire brush on the grinder. The galv had already gone through in places and the rust was starting. To keep them from deteriorating too much I sprayed them with matt finish clear lacquer and I really like how they've turned out.
 
This is the problem area of the tub. It's where the front end mounts to the chassis. If it were riveted together it would be nice and straight forward to fix but this area has more spot welds than I expected.

So the plan is to make aluminium plates for both sides. I'm then going to use chemical metal to fill in the pits and bond the plates in place with rivets as well to be sure. I'd rather replace all the corroded bits but with those spot welds I think it's going to beyond what I can do.
 
Love the progress you are making on this :)

What about gluing new bits of ali in? I've zero experience of this, but saw it being done on a car sos a while ago.... and I thought.... that could be useful to know !!
:)
 
Love the progress you are making on this :)

What about gluing new bits of ali in? I've zero experience of this, but saw it being done on a car sos a while ago.... and I thought.... that could be useful to know !!
:)
That's a good thought. No end of cars are bonded together these days. I remember that episode as well. The stuff was just like silicone sealer but super tough. If it's good enough for the likes of Aston Martin then it's good enough for me.
 
I cobbled this together at the weekend. Better support while dangling and mobile when on the floor.


It was a bit of a swine to get it to balance but I got it sussed in the end.
The underside doesn't look too bad but there are a couple of really corroded areas. The big mucky patch in the middle is where all the oil from the rear diff got to.
If you get stuck balancing things like this again don't forget about secondary school physics lessons with all of those complicated force equilibrium calculations and those pesky pulleys!

You don't have to do the mathematics - a simple give it a go approach will probably work wonders. Pulley or the cheaper D shackles will allow you to lengthen or shorten the (rope) sides of your supporting triangle a bit more easily.
 
Love the progress you are making on this :)

What about gluing new bits of ali in? I've zero experience of this, but saw it being done on a car sos a while ago.... and I thought.... that could be useful to know !!
:)
That's a good thought. No end of cars are bonded together these days. I remember that episode as well. The stuff was just like silicone sealer but super tough. If it's good enough for the likes of Aston Martin then it's good enough for me.

That glue is "wonderful" so long as the gaps are anally straight and the surfaces are anally clean. Check the specifications before using it because you might find the pitting is too deep for a strong bond.

I know it is a pain but I plan to be using rivets and Duralac to try and stop the corrosion from happening again. This means, however, my teenage pock marked Land Rover steel will have to be replaced...

2033307_l.jpg
 
...
So the plan is to make aluminium plates for both sides. I'm then going to use chemical metal to fill in the pits and bond the plates in place with rivets as well to be sure. I'd rather replace all the corroded bits but with those spot welds I think it's going to beyond what I can do.
Have you heard of plug welding before?

First hit on google gives this snazzy looking chap =>

 
...oh yeah (plug welding continued) if you're stick welding / arc welding then it can also be done this way as can gas welding and TIG (last two you need to be quick with the filler rod!)
 
It's getting hard to make progress at the moment. The dark, cold and rain really bugger things up don't they.
Anyway I have been making some headway.
I've had the shock absorbers for ages and at last I got round to fitting them. I read somewhere that if possible it's better to fit them to the spring mounting plate thingy off the car. The way you have to compress the bushes it must be a bit of a cow to do without a vice. I made a nice little gadget to let me get the split pin through.


It was then time to get the thing back on it's wheels. I had a week off work but the weather looked a bit rough so I improvised this cover to give me a bit of working room.

Quite cosy actually.
I had oiled the springs really well. They had been laid on a huge bit of cardboard on the garage floor and over a couple of evenings I dribbled oil onto the sides so it ran between the leaves. When they were good and soaked I wrapped them in cheap clingfilm to keep it in there.

Getting the springs/axles/chassis back together was heavy work. Father in law came to lend a hand. I think he's more enthusiastic about the job than me at the moment. I have had my tin of copper grease since I restored an MG 25 years ago. At the rate i'm going I will use it up in no time.

The chassis has led a hard life and as i'm putting new bits back on it's clear that some previous repairs are not great. Nothing is far out but it's not great either, everything needs a bit of persuasion to fit but it's all solid and strong. Having said all that when it finally came together it seems to sit nice and level. Now it's early days and the engine, gearbox and all the other weight needs to go on yet but all the droop that there used to be on the front drivers side seems to be gone. With all my doubts about the chassis this seems too go to be true, so it probably is. I will have to wait and see.

After a bit of paint this is where we are up to now.
I am amazed at how bouncy and compliant the new springs are. They seem great so far.

Man that chassis pic is a stunner, wish mine looked like that now! Looking awesome matey
 
...oh yeah (plug welding continued) if you're stick welding / arc welding then it can also be done this way as can gas welding and TIG (last two you need to be quick with the filler rod!)
That duralac looks like good stuff. I think whatever I do it will involve a chemical / bonding element and a physical fixing such as rivets. I would like to be able to weld it but with it being aluminium I don't think I can. I only have a mig welder and the only gas and wire I have is for mild steel. I have plug welded some of the plates on the chassis and it does work really well especially on the thicker steel. I have looked into mig aluminium welding but it sounds a bit of a nightmare. You need aluminium wire that tends to bunch up in the machine. You also have to make sure the tip of the gun is larger than the wire you are using to stop it jamming as it heats up and expands. Then I think you need pure argon instead of the argon CO2 mix that I have. All in all its a bit involved (assuming i've got my facts right). Of course an actual spot welder would be perfect but I couldn't justify it.
 
I have just been looking up how to spot weld aluminium. It looks very difficult without really heavy duty kit. That's a definite no no then.
 
I didn't realise you were talking about welding aluminium. I wonder, however, if Birmabright would cope with it though. It is a bit of an exception in the world of aluminium alloys. I've read that welding it isn't such a ball ache. I'm hoping that that is true (I have TIG) but I haven't tried it yet.

For the spot welds in the aluminium I'd see if it is possible to replace those spots with rivets. I'd expect that to be about as strong if not stronger. (But I guess the reason for the spot welded parts is probably for clearance issues which is why rivets weren't done in the first place)
I did wonder about rivets in place of spot welds but I didn't think they would be as strong. I'm sure with a TIG welder you will be fine. I was told by a local fabricator to watch out when welding aluminium because the heat can make it quite brittle after and prone to stress cracking.
 
I did wonder about rivets in place of spot welds but I didn't think they would be as strong. I'm sure with a TIG welder you will be fine. I was told by a local fabricator to watch out when welding aluminium because the heat can make it quite brittle after and prone to stress cracking.
Rivets and a bit of that wonder glue is most likely going to be stronger than spot welds (he says licking this thumb and sticking it in the air!)

I don't have an AC/DC TIG welding setup so I'm not meant to weld aluminium with it. The thing that I keep reading about Birmabright is that it behaves so differently from other aluminium alloys you can indeed get away with welding it with DC or gas. I haven't tried it myself yet so I can't say for sure that is correct. As for stress cracking: Well have a look at my series 2a and tell me that doesn't happen naturally! The green book advice of annealing should come into play to help the cause...
 
Back
Top