Freelander 2 (LR2) Replacing silver dashboard trim

This site contains affiliate links for which LandyZone may be compensated if you make a purchase.

HDWO55

Member
Posts
16
Hi all

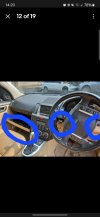
I'm looking to replace the silver trim on my RHD freelander 2 (glovebox finisher, light switch surround and bezel (latter two being on the lower dashboard below the steering wheel column)) and could use some pointers. They're essentially a bit scratched up and I've ordered some new ones off Ebay (any excuse to tinker with the car is a good excuse).

Glovebox seems easy enough, undo the screw on the right hand side of the finisher and then slide off the finisher to the left. The other two finishers seem a little more involved, potentially with the only option being to gently pry off the lower dashboard and then tackling various clips.

I've attached an example dashboard highlighted in blue, to illustrate which parts I'm on about.

Any guidance would be greatly appreciated.

Thanks

Harry
 

Attachments

  • Screenshot_20250627_142022_eBay.jpg
    Screenshot_20250627_142022_eBay.jpg
    428.8 KB · Views: 14
I would assume that if you remove the Driver side lower panel the trim would come off similar to that on the glovebox door.
But would it not be easier to try and refurb what's already on ?
 
I would assume that if you remove the Driver side lower panel the trim would come off similar to that on the glovebox door.
But would it not be easier to try and refurb what's already on ?
There aren't many useful guides online re changing the drivers side trim. If you know how to remove it, that'd be useful.

The old trim is tired, besides, the new trim is already ordered and should serve to freshen up the interior.
 
Well, it has been a good 10 years since I did one.
Pop the side panel off with door open and I think there is 2 small torx screws.
On the lower edge there is, I think four T30 torx screws. Accessible through the gap above the pedals just under the steering wheel there is another two screws.
Pretty sure the top edge just clips in, with a slightly upwards tug.
As I say it has been a while, so take your time, have a good look, and if it appears not to want to come off, have another look.
Beware there will be electrical connections for the light switch and the 'sniffer' to the left of the st'wheel.
An important point, can't recall if the Driver Knee Bolster *(airbag) is attached to that panel or lower down.
Either way, ensure ignition is off if you need to disconnect and do so carefully, the connections are fragile.
Advise battery disconnect.
Thanks Shedload, really appreciate this !
 
Back
Top