L322 Project Vanos and Timing Chain Guides Starts Today...

This site contains affiliate links for which LandyZone may be compensated if you make a purchase.
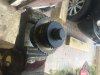
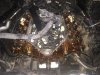
I recall the leak we had but can't remember if we traced it although the old girl uses about a 100 ml of coolant a year which could just be any final amounts of air leaving the system but when the valley pan is out we will know. I did have a lot of what looked like dry red coolant down the bell housing when i bought it which would make sense That's a good vid, although the guy is a little 'scrap the caddy clyde' I will certainly be trying to get the inlet manifold out complete with PCV. We did change the rear coolant manifold gaskets when we had the tranny out along with the pcv pipes but didn't change the pcv as I probably needed to eat or something that month:).
i am a bit of a pussy when i remove stuff as i need to know where it goes back and don't want to bust anything, hopefully tomorrow will see more results.
Thanks very much for the input, i need a lot of moral support, and financial, mechanical , psychological .....
 
Hows about a sponsored chain link, that could pull in some wonga for ya;)

I've an old half used tube o sealant, it's yours if you don't mind slitting the arris of it as the the nozzles probably bunged as solid as a 'cream cracker speed eater's'....erm, rhymes with pole o_O:eek::D
 
What the fudge were you searching for to find that ??
Very funny though, it looks like their drink laws are you can't drive unless you have been or are drinking :)
Right I am off dogging and then crack back on...
 
Last edited:
Well more progress today, had to make up a couple of tools, two made out of an old spark plug to make my heath robinson jig hold down tools and i had to modify the flywheel / crank locking pin which all took time but the vanos units and cam gears are all loose so i have gone past the point of no return.
The crank bolt which is unbelievably tight is undone using the holding tool and the 5 ft breaker bar only just did it, the cams are locked in place, top front covers are off so tomorrow will be remve the lower timing chain cover, replace the guides, chains, rebuild the cam chain tensioners and rebuild the vanos units and if i have time the stat mod....

But now it's shower time and Guinness o clock, stay tuned:)

IMG_6071.JPG IMG_6072.JPG IMG_6073.JPG IMG_6074.JPG IMG_6075.JPG IMG_6077.JPG IMG_6079.JPG IMG_6112.JPG
 
Well more progress today, had to make up a couple of tools, two made out of an old spark plug to make my heath robinson jig hold down tools and i had to modify the flywheel / crank locking pin which all took time but the vanos units and cam gears are all loose so i have gone past the point of no return.
The crank bolt which is unbelievably tight is undone using the holding tool and the 5 ft breaker bar only just did it, the cams are locked in place, top front covers are off so tomorrow will be remve the lower timing chain cover, replace the guides, chains, rebuild the cam chain tensioners and rebuild the vanos units and if i have time the stat mod....

But now it's shower time and Guinness o clock, stay tuned:)

View attachment 108164 View attachment 108165 View attachment 108166 View attachment 108167 View attachment 108168 View attachment 108169 View attachment 108170 View attachment 108171
 
Sorry finger trouble on post 27 cant work out how to delete it, meant to add I have a bonnet prop like that for use on some other cars I deal with now and then. Does`nt your bonnet have the service catches like the p38 to keep it vertical ?
 
Haha, that is the breaker bar you can see and yes it is in service mode.
It's slid over a 3/4 drive swivel bar, that's a small one where I come from ;)
When I post by mistake I go back and edit the post to show a pretty picture or something but I don't think you can delete it.
 
Well another 5 hours on it today, not including a spot of luncheon.
This job is Epic, nothing too difficult but to do it hopefully properly and for the first time it seems to take forever.
I rebuilt one of the vanos units today with the beisan kit and it went ok, the teflon ring was a bit fiddly but managed to get it in place without damaging it.
The press tool process worked really well but again i used the 5 ft breaker bar and 3/4 drive 27 mm socket the same as the crank bolt.
cam covers due back tomorrow night.
 

Attachments

  • IMG_6170.JPG
    IMG_6170.JPG
    226.2 KB · Views: 141
  • IMG_6172.JPG
    IMG_6172.JPG
    301.2 KB · Views: 172
I'm interested in this thread as I'm currently at 150k, BMWs seem to fail around the 180-200k region so I need to get mine sorted early next year
I have heard of them fail a lot sooner than that, my guides looked pretty good but I think it's a case of all is well and then boom.
My chains appear to be no different to the replacements but I would guess the timing chain plastic guides are brittle.

Keep going Andy, I am really impressed and pleased with your progress so far....yes it takes a while, but it is all nuts and bolts at the end of the day....be methodical, it'll bite you back otherwise!

Thanks Ant, I have so many boxes of bagged up bits it is amazing and I must have about 300 photos so far.and i will check, recheck and check the timing again before attempting to start it.
My spare oil filter housing turned up today and i have transferred over the internal oil feed pipe. I don't think mine ever had one all the time I have owned it.
Everything is really grotty and covered in oil soaked dirt so I am hoping to at least cure my oil leaks.
The small PCV valve pipe snapped off as soon as i lifted the inlet manifold but I have a new one to go back on so the tricky bit is how to connect the small pipe under the manifold. i may even extend the pipe a bit, it is a drain back pipe but it is so small I can't imagine it not getting blocked straight away.
Early start tomorrow hopefully ...:)
 
Better pic of my breaker bar, the 3/4 drive with 27 mm impact socket is really useful for both the crank bolt and the beisan systems press tool.
IMG_6069.JPG
 
Is that the micro drain pipe from the cyclonic separator? Complete curt to do in situ....i remember it well.
I'm sure my V8 turned scarlet given the positions I had to adopt to do the PCV...
Your such a wus taking all that sh!t off just to avoid straddling her vee!

Gary the goat says meh btw.:mad:
 
Last edited:
It's similar, it's the other micro drain pipe that joins that micro drain pipe, this one comes out of the far right hand side of the pcv valve and points straight forward under the manifold so impossible to see without removing either the inlet manifold or the valve.
I'll view your video when it's morning, currently awake with a raging sore throat courtesy of my youngest who has been off this week with a stinking cold , marvellous :(
Cheers mate
Edit, OK watched your video, very funny but I do prefer an amusing donkey clip if I am going to search youtube:)
 
Last edited:
Is it the little one that goes onto the PCV valve?

If so it is a fiddle to fit, mine was a bit difficult to fit...can be done with manifold in place just difficult....mine was also about an inch too short which made it harder!
 
Back
Top