Lift-kit Freelander 1

This site contains affiliate links for which LandyZone may be compensated if you make a purchase.
I'm not sure why anyone would raise their heads up and say the BMW TD4 was more reliable - they would get shot to pieces. The L Series (Di/TCIE) may not beat the TD4 on some things, but on reliability it has to be far better. The TD4 is a common rail engine, so far more tech to go wrong - and it does - the fact its "German" / "BMW" macht nichts. Adding all the tech, you would think it would be more efficient, but its not - it is cleaner and more refined though. Another reliability factor is that you have to be (more) careful with the fuel you put in a TD4 - you can put what ever c**p you have lying around, or the chip shop is throwing out, in the L Series.

As said though the L Series cars are older, so the other bits are more likely to go wrong. What else would you expect when one is 16 years old and the other only 15! Once again the L Series era cars are arguably more reliable from that perspective also because they also have fewer bits to go wrong, fewer leccy windy up windows, no arse warming devices etc.
 
Exacly....the Td4 is common rail,what it means 700€ on the that,and anouther 400€ for boot fuel pumps the car have.....and i have spend 3500€ in repairs on mine,so its normal a car whit 16 years old have some repairs to be made.....but if i really bye a Di,will be one the brokken engine,so i do'it all by my selt,and i end knowing what i have.
I can bye one for 1500€.....the Di is more affordable in everithing,the clutch is normal,the Td4 is Dual mass.
The Di use a normal and simple timming belt.....the Td4 uses timming chain.
And so on.....
 
Yep. Very reliable and virtually bomb proof. No auto option though. I think that making an auto L series is possible, but very expensive too.
I saw your comment about this the other day. You said that you might be able to find a Rover car that had both KV6 and L Series in auto spec - presumably so that you could use the Jacto adaptor plate - as a start anyway, presumably there would be electrical and other mechanical issues to iron out. I did have a look around and couldn't find a Rover with KV6 and L Series in Auto spec - I'm not even sure I could find any Rovers with the L Series that had an Auto option.

What I did find though is that the L Series powered MG ZS (in facelift spec) is faster (both in acceleration and top speed) than the 1.8 K Series Auto and very similar to 1.8 K Series Manual. The L Series pumps out considerably more power in a facelift ZS than a Freelander where it is quite a bit slower than the K Series.

Lots of questions.
First off. The Rover L series in the MG ZS is mapped differently to the L Freelander. As to why they didn't use the same mapping in the Freelander is a mystery.

The L series was never available with auto transmission, in any Rover vehicle, as far as I know.
However when the L series engine is used in the ZS/ R45, the gearbox adapter plate bolt pattern looks to be the same as the KV6. So the KV6 Jatco box could, in theory be mated to an L series, with the correct adapter plate.
The gearbox can be used with a stand alone TCM which are available, although are pricy.
The "parts bin special" way that Rover produced vehicles has made them very easy to pick different parts to suit a need.
So in theory it's possible to make an auto L series. However with the auto TD4 already available, I can't a real need for an auto box L.
 
Wasn't the first diesel on the FL an L-series?
Not an expert on the FL genealogy (L series means nothing to me) but I do know I wanted auto, TD4 and 3 door detachable roof so I went and found it; it came with a BMW engine apparently.
 
Not an expert on the FL genealogy (L series means nothing to me) but I do know I wanted auto, TD4 and 3 door detachable roof so I went and found it; it came with a BMW engine apparently.
Yes it's a BMW M47R , the R being the designation for Rover unit.
It was designed by BMW and was built in Steyr Austria. Is has 16 valves and is a common rail design

It's not a bad engine, but does have a few failings. The injectors can fail, but that is a problem for all common rail diesels these days. The high pressure pump can give problems, also shared by other common rail engines. The inlet can clog up with gunk from exhaust gas recirculation, also common with other diesels.
Otherwise it's not a bad engine for the Freelander.
 
I've had all those problems on my ZTT with the same M47R engine. To be honest, the K series had been far more reliable - especially when you figure in the MAF sensor that has the life expectancy of a mayfly. :(

Other than that: great ;):)
 
Does anyone know if the TD5 engine in the Discovery/Defender has the same issues and as frequently as the TD4?

That's essentially the 2.0L L Series with an extra cylinder, making it 2.5L and (Lucas I believe) Common Rail tech added.
 
I've had all those problems on my ZTT with the same M47R engine. To be honest, the K series had been far more reliable - especially when you figure in the MAF sensor that has the life expectancy of a mayfly. :(

Other than that: great ;):)
LOL, he said a K series was more reliable!

That's funny. :D


Mmmm, Once the head gaskets were sorted, I never had a problem with mine either. Will wait and see how the TD4's go, head gaskets for K series are a lot cheaper than injectors for TD4.o_O
 
I like the M47R, but injectors, seized glow plugs (head off once a garaged managed to shear one off), both fuel pumps, two MAFs... I mean, really?

Running beautifully now though.
 
Here's a question on the original lift-kit topic. With a 2"/50mm lift are there generally any issues with the steering arms fouling or with their angle?
I understand that an alignment would be in order, but is there anything else to be aware of? (I do have camber bolts)
 
Here's a question on the original lift-kit topic. With a 2"/50mm lift are there generally any issues with the steering arms fouling or with their angle?
I understand that an alignment would be in order, but is there anything else to be aware of? (I do have camber bolts)
Below taken from my build thread.


Here are my pearls of wisdom/stupidity/experience (delete as appropriate)
First if unless you really really need that extra 10mm then don't bother. Buy the 40mm kit instead and you will still need to cut some metal but not (so I'm told) the chassis rail.

Tools required
Long breaker bar
Hex socket set. (don't even think about doing it with a 12 point set)
Torque wrench
Big hammer, preferably ball pein.
Grinder
5mm Good quality allan key
Spanner set
Ball joint splitter

Spare parts required (probably)
Track rod ends
Drop links

1. Jack the car up and remove both front wheels
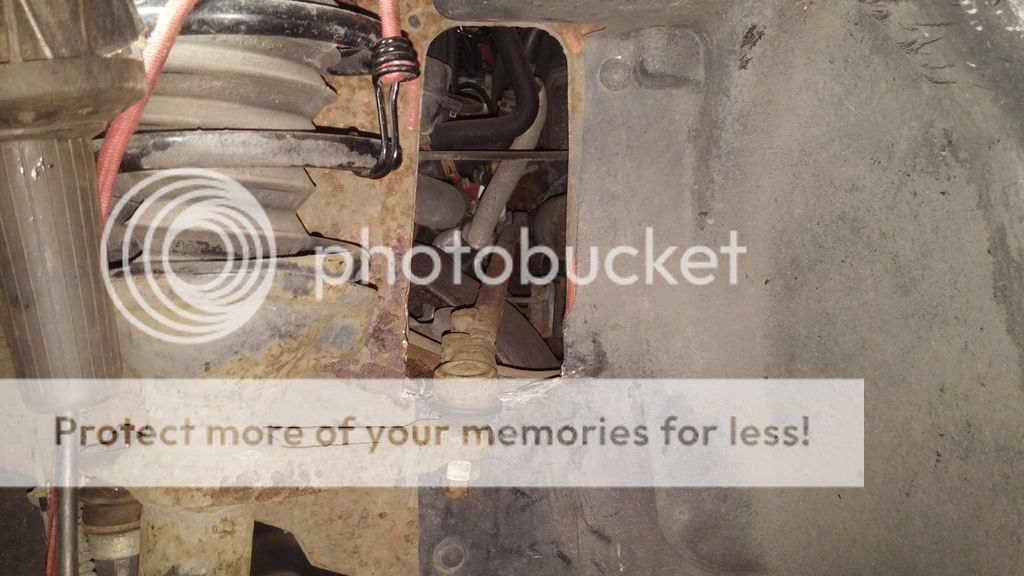
2. Turn the wheel full lock both ways and measure down 55mm from the track rod end bolts when at their lowest point then mark where you need to cut.
3. Sit back and stare in disbelief that you need to cut quite so much, think about it for a while then weep a little at your stupidity.
Passenger side.
4. Remove the clip holding the brake line to the strut and the abs cable.
5. Remove the track rod end nut and bash it out.
TOP TIP, Put a sledge hammer or similar heavy lump of metal on the arm beside the TRE so that when you bash the bolt you've half a chance of getting it out without damaging the TRE. It helps prevent the arm flexing every time you bash with the hammer, If you're very lucky you won't damage the TRE but as you'll probably need a ball joint splitter don't bet on it.
6. Remove one end of the drop link. (doesn't matter which)
7. Remove the two big bolts at the bottom of the strut which will free up the wheel hub.
8. Disconnect the battery.
9. Open the fuse box and remove the three nuts holding it and the bolt holding the electrical connection and pull the fuse box out of the way.
10. On the TD4 you have another bolt to remove as a sensor (or something) is in the way
11. Pull out the plastic clip holding the two fuel lines to the chassis arm and push them out of the way.
11. Remove the plastic cover and the three bolts on the turret strut then the strut should drop out fairly easily.
12. Bolt the new lift kit onto the strut and set it to one side.
13. Cut out the metal facing you that you marked earlier while trying not to cut too far across the chassis rail. Pay more attention to the forward edge as that is where the bolt on the TRE will catch when on full lock.
14. Take your big hammer and start bashing the chassis rail down to the new level. It needs to be fairly level from your new edge to at least half way across the width of the chassis rail.
15. Once you've bashed the Bejesus out of the chassis rail and are happy it is low enough, then refit the strut and the bottom bolt but not the top one and don't tighten up the TRE. A jack under the brake disk will help getting it in position.
16. Fit the new top camber bolt with the camber pushing the top of the strut in. I had to cut the tab off my camber bolt washer as it fouled the edge of the strut.
17. Push the TRE into it's hole with a gentle tap from a hammer then take the nut from the old bolt and and use it as a spacer on the TRE and screw the TRE nut on finger tight.
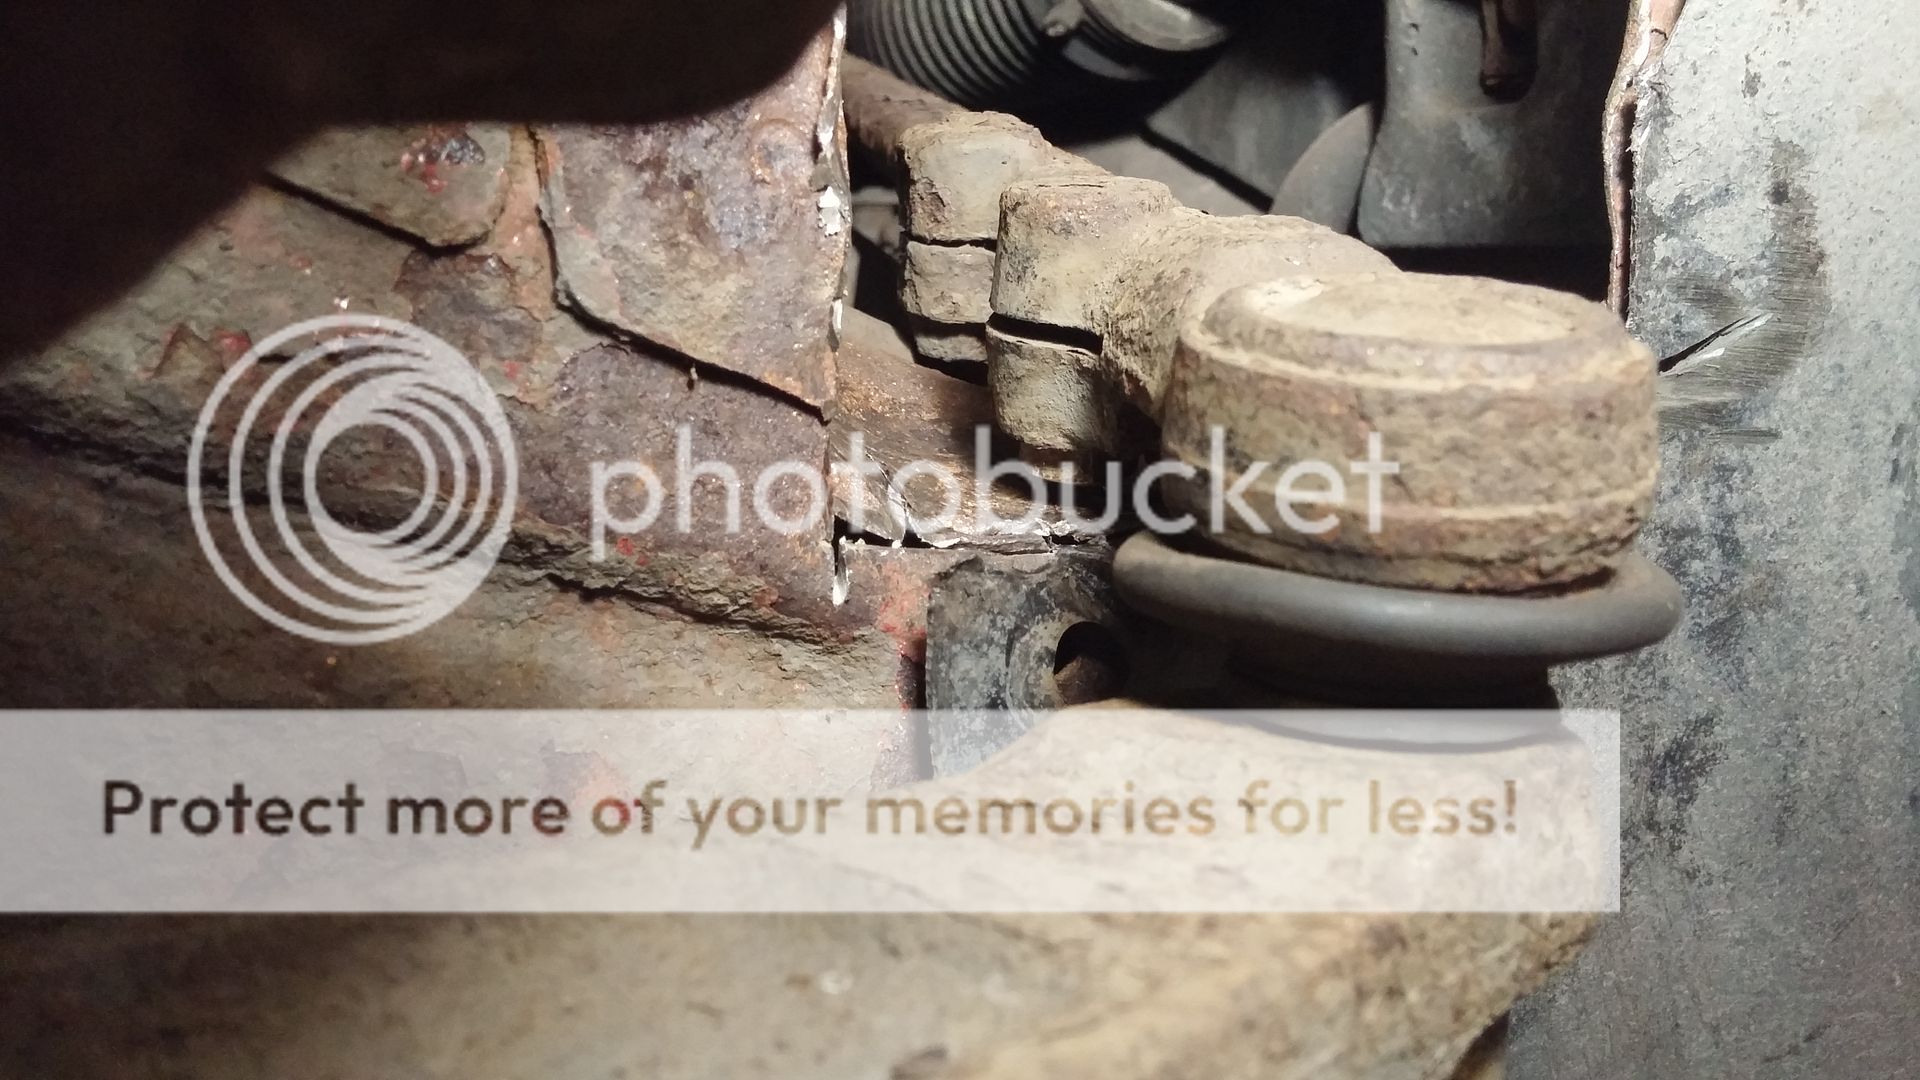
18. Turn the wheel to full lock and marvel at how you got the cut out completely wrong. This is why the TRE bolt is in finger tight, remove it and tie the TRE up out of the way while you start bashing the beggar again with a hammer.
19. Repeat 18 multiple times until you have full lock.
20. Repeat on the other side, this time you need to move the coolant header tank out of the way to get the top strut nuts off.
21. I don't know how important it is but I plan to weld the chassis rail before painting.

20160831_215823_zpsquj2je8b.jpg

20160831_215806_zpsn1y24jke.jpg


This photo gives you a good idea how far you need to cut down if you look at the position of the plastic rivet. I got it completely wrong initially and gave myself a load of extra work.
 
Last edited:
You have to trim the bottom or the hole that they come through to stop them catching. A little more clearance can be gained by swapping the arms side to side too
 
Last edited:
You can see from allibros pic that if you swap the arms and flip the tre the lock bolts end up at the back. Because the hole slopes this gives more room. There's also a knob you can grind off the tre
 
Yeah, that pesky lock bolt is a real pain I spent hours bashing at the chassis rail to get enough clearance for it. Even though I now have full lock I might do this anyway, just to give myself a bit more clearance. I plan to weld up the cuts I've made and it would lessen the grinding afterwards hopefully leaving everything stronger.
BTW DD if you want to copy my instructions for installing the kit and include them somewhere in your website or include a copy in the boxes you send out then feel free. The instructions for the rears are in my build thread too, edit as you feel necessary.
 
Thanks for that Alibro!
I'm tired just reading that so I think I'll lie down for a while.
I may just wait until DD starts making the modified struts with the TRE brackets higher up.
I think the safety worries with that design might mean you'll have a long wait. Get the 40mm kit, swap the steering arms as he suggested and you'l have very little to cut out except the tin work..
 
Last edited:
Back
Top