Freelander 1 Interior diy fabric upgrade.

This site contains affiliate links for which LandyZone may be compensated if you make a purchase.

Lukas430000

Active Member
Posts
88
Location
Livingston, Scotland
Hello troops.
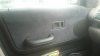
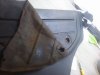
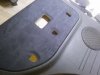
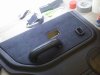
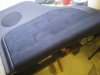
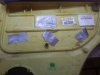
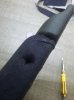
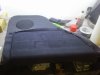
After my adventure with clutch and other stuff and loosing my job I am on a scavange. Well cheapers anyways. I decided to upgrade an interior. Already fitted darker zebra print seats with 2+2 setup. I like it that way. Shame back doesn't split but I can live with that. And here is my question. Did anyone in here did diy fabric interior? What I have in mind is that to buy a fabric by the meter and do my own cutting and glueing everything. This will include four doorcards and roof lining. I can't afford new door cards as need money for other stuff unless someone have free door cards on the go. Roof lining is a bit saggy and door cards past their best already as start splitting from plastic. I can get some dark grey or charcoal fabric from flebay and buy tin of spray glue. I know it's possible. Anything is possible. But if one of forum users done it before? Any guidance or help will be apreciated. Maybe some pics?
Thanks Guys
 
I've trimmed classic car seats but not a Freelander. However all seats are much the same when it comes down to it. You'll need to cut and sow the panels together as all seams are inside. If you take the cover off a seat, you'll get a good idea of how it all fits together.
I'd get automotive seat fabrics too. General fabric isn't UV stable and can literally disintegrate where the sun hits it. For a really plush seat. Why not use leather side panels, made from cheap offcuts. Use a matching alcantera (fake suede) for the larger centre panel. You'll need to find an old industrial Singer sowing machine, to sow all the pieces together.
 
Thanks Nodge. I only want to retrim roof lining and door cards to match seats. Seats came from 3 door model and I like them. What I am looking for is to rip fabric from door cards. It is desintegrating in hands anyways. I think it is only small bit at the top of door card. And glue new dark grey or charcoal material back on. Seen some waterproof ripstop stuff on ebay for cheapers.
 
Looks good Nodge looks good. Charcoal grey and I am sorted.
Be careful with the adhesive. You don't want to soak the material. You need just a light dusting of spray glue on both surfaces. Let it flash off, then press the material onto the surface it's being applied too. Make sure it's tight and wrinkle free. It might be prudent to practice you technique on an offcut of the material first;)
 
Last edited:
did mine a week or two ago and turned out great. use a heat resistent adhesive and spray on the door card. leave for a few seconds to settle and then place the cloth. don't spray on the cloth or hush putting the cloth on the adhesive or the glue will soak in the fabric and will be permanently stained.
 
ok here are the promised photos:
The 1st imagi is the finished doorcard. the rest were taken while replacing the fabric. sorry but they are not step by step.
 

Attachments

  • 15542114_10210085120778511_8982820877724224120_n.jpg
    15542114_10210085120778511_8982820877724224120_n.jpg
    30.7 KB · Views: 389
  • 16112600_10210370219345797_2644738522231472225_o.jpg
    16112600_10210370219345797_2644738522231472225_o.jpg
    134.2 KB · Views: 329
  • 16113306_10210370233626154_1567293373258564457_o.jpg
    16113306_10210370233626154_1567293373258564457_o.jpg
    180.5 KB · Views: 361
  • 16113457_10210370236946237_562580190645800537_o.jpg
    16113457_10210370236946237_562580190645800537_o.jpg
    147.5 KB · Views: 322
  • 16143551_10210370230786083_8415775075587125160_o.jpg
    16143551_10210370230786083_8415775075587125160_o.jpg
    137.7 KB · Views: 302
  • 16177630_10210370225665955_507273416389273189_o.jpg
    16177630_10210370225665955_507273416389273189_o.jpg
    138.1 KB · Views: 310
  • 16177663_10210370236226219_3027986258186263718_o.jpg
    16177663_10210370236226219_3027986258186263718_o.jpg
    156 KB · Views: 294
  • 16178838_10210370227826009_4265657293648373815_o.jpg
    16178838_10210370227826009_4265657293648373815_o.jpg
    118.2 KB · Views: 330
yep. The origional cloth trim was just horrible after 16 years and comming off so this was the cheapest and most effective fix.
 
Wow. That is absolutely fantastic job. That is amazing result with the interior. My car is back from garage after adventures with valves and clutch. Works fantastic. Engine is done so need to take care of the interior. Just found a pool in rear storage box. Quick safe drilled holes. But need to investigate.
 
Wow. That is absolutely fantastic job. That is amazing result with the interior. My car is back from garage after adventures with valves and clutch. Works fantastic. Engine is done so need to take care of the interior. Just found a pool in rear storage box. Quick safe drilled holes. But need to investigate.
that is a common issue. its either condensation or pannel joints. take off the floor trim, get a water hose and spray from under the car towards the underside of the car and look for any leaks. check if water gets trough from between the pannel where the welding is and seal with sealer or similar.
 
check
Wow. That is absolutely fantastic job. That is amazing result with the interior. My car is back from garage after adventures with valves and clutch. Works fantastic. Engine is done so need to take care of the interior. Just found a pool in rear storage box. Quick safe drilled holes. But need to investigate.
check this out:
 
Back
Top