P38A HEVAC screen light issue

This site contains affiliate links for which LandyZone may be compensated if you make a purchase.

P38Seb

Well-Known Member
Posts
121
Evening all, you were incredibly helpful last time I posted so I hope you can help again.

My HEVAC screen has an annoying bulb issue. Most of the time it doesn’t illuminate, yet at seemingly random times it’ll light up - such as a trip to Bristol it lit up as I parked up, but hasn’t since, it might tomorrow though?

I’ve changed the bulbs with a new kit, I’ve done the zebra cable fix and that’s solved the stuck pixels, I know the screen works as I can shine a torch on it and see the info, but for the life of me I can’t seem to work this out. I’ve fiddled with the wires and tried to check they’re in securely which it appears they are.

What’s the next step? Whole new HEVAC unit?
 
Have you done the obvious and checked the connectors between the holder and the board? Tabs on the holder could be loose
You say obvious.. from memory I don’t think I did. I’ll get that checked in the morning and report back!
 
Evening all, you were incredibly helpful last time I posted so I hope you can help again.

My HEVAC screen has an annoying bulb issue. Most of the time it doesn’t illuminate, yet at seemingly random times it’ll light up - such as a trip to Bristol it lit up as I parked up, but hasn’t since, it might tomorrow though?

I’ve changed the bulbs with a new kit, I’ve done the zebra cable fix and that’s solved the stuck pixels, I know the screen works as I can shine a torch on it and see the info, but for the life of me I can’t seem to work this out. I’ve fiddled with the wires and tried to check they’re in securely which it appears they are.

What’s the next step? Whole new HEVAC unit?
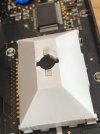
Check the metal strips from the bulb holder in the plastic housing where they solder into the pcb for cracked joints.
Check for corrosion on the HEVAC connectors or loose pins.
Do the dash lights respond to the dimmer control?
 
Check the metal strips from the bulb holder in the plastic housing where they solder into the pcb for cracked joints.
Check for corrosion on the HEVAC connectors or loose pins.
Do the dash lights respond to the dimmer control?
So I’ve pulled the unit apart and taken a look:

The solder appears okay - no obvious signs of cracked solder.

No corrosion in the connections. I have sprayed these with contact cleaner to hopefully rid anything that may have been there out.

All the lights respond to the dimmer control as well, including all the bulbs on the HEVAC, except for the screen bulb as it doesn’t illuminate at all.

I’ve looked at the connection between the green bulb and the tracks and it looks like they are slightly scored from previous bulb figments, could this be the issue? If so what’s the solution, contact cleaner and the Mrs’ credit card as a scrubber? I’ve attached a photo.
 

Attachments

  • IMG_1955.jpeg
    IMG_1955.jpeg
    243.8 KB · Views: 120
So I’ve pulled the unit apart and taken a look:

The solder appears okay - no obvious signs of cracked solder.

No corrosion in the connections. I have sprayed these with contact cleaner to hopefully rid anything that may have been there out.

All the lights respond to the dimmer control as well, including all the bulbs on the HEVAC, except for the screen bulb as it doesn’t illuminate at all.

I’ve looked at the connection between the green bulb and the tracks and it looks like they are slightly scored from previous bulb figments, could this be the issue? If so what’s the solution, contact cleaner and the Mrs’ credit card as a scrubber? I’ve attached a photo.
You can clean up the contact surfaces with a pencil eraser, a fairly coarse one does the job.
 
You can clean up the contact surfaces with a pencil eraser, a fairly coarse one does the job.
Thank you! I’ll dig out my pencil case. I’ll give that a try as well.

I’m going to pop to a local Landy specialist tomorrow after I’ve got it regassed and see if they can shed any light before I buy a unit of eBay.
 
Thank you! I’ll dig out my pencil case. I’ll give that a try as well.

I’m going to pop to a local Landy specialist tomorrow after I’ve got it regassed and see if they can shed any light before I buy a unit of eBay.
If you cannot find the fault, assuming you can solder, it would be possible to rewire the feed to the bulb.
 
If you cannot find the fault, assuming you can solder, it would be possible to rewire the feed to the bulb.
That was something I considered. I’d seen someone wire in from the other bulbs, but that then only worked when side lights were activated.

Is there anything that’s an ignition 12v I can run a wire off?
 
Appreciate it, thank you!
OK, on the HEVAC, there is a white connector, Pin 1 = aux power supply; #2 battery power supply; #ignition switched supply; #4 earth. I f you look at the connector, one row has only 3 pins, with this at the bottom as you look at the connector, pin1 is the first on the left of the 3 pin row, then #2; #3. Top row the first on the left is pin 4 then #5; #6; #7; #8.
Check you have power between earth and the 3 power inputs. You could then add a pair of wires from #3 and #4 to the bulb. YOU MUST DISCOONECT THE METAL STRIPS FOM THE PCB if you do this.
Amazing! Really appreciate the effort you’ve gone to here!

Best way to removed the metal strips, would heating up the existing solder and removing them that way? Or just snip them?
 
Awesome. I’ll try the eraser mentioned further up first before I go grab the solder iron.
 
Awesome. I’ll try the eraser mentioned further up first before I go grab the solder iron.
Also check you have voltage on the pins 1 to 3 and earth as the problem may be external to the HEVAC. A tast is best done with a test lamp (side lamp bulb with a couple of wires soldered on) rather than a DVM which may give misleading results.
 
Back
Top