freelander 1.8 engine removal, lift up or drop it down which is easier?

This site contains affiliate links for which LandyZone may be compensated if you make a purchase.

gdog141079

New Member
Posts
6
Location
cheltenham gloucestershire
:confused: hello all... i am new to your forum and would really apreciate your expertise, i am currently setting out to change my partners engine in her freelander 1.8 xei, i have removed wiring loom, pipes etc etc, i am now stuck weather to lift the engine gearbox etc out the top or drop it down from underneith, i am stumped on what bolts/torks to undo on the prop shaft as i have never worked on a 4x4 or rear wheel drive before, once i have found this out and disconnected the gear linkages and stays etc i would like to know what would be easier to remove the lump. i was thinking dropping the sub frame and lowering the whole engin ird and gearbox etc removing engine bolting new engine to gearbox etc and lifting it back in to place, just so unsure what to do any help would be appreciated guys and galls thanx :doh:
 
if you do a search on the freelander section from about 2 years ago, someone wrote a really good thread about taking an engine out of a freelander. easiest way seems to be drop it out the bottom. the guy in question (damn my memory, can't remember who it was) started dropping it, then progressively jacked the front of the car up supporting the road wheels at each time. think he finally dropped it onto a pallet and pulled it out with a pallet truck.

good luck.
 
If your just replacing the engine judging by your description, just take the engine out the top and leave the gearbox and ird in. If you take off the crank pulley you'll have enough room.
Taking the whole lot out is a lot more involved and more time consuming because it'll involve unattaching prop,driveshafts and front wheels.
 
Oh and Optimus it was Northern Irelander that dropped the engine out from underneath,
and G13SJC did a good thread about his project freelander and he took his out the top
 
Yes indeed :D

G13SJC removed his up and out, I'd would have gone this route but I don't have a hoist, nice if you have one, but hard to justify buying one for low usage.

Crank pulley has to come off this way.

Pics courtesy of G13SJC, enjoy!
 

Attachments

  • G13SJC engine-bay.jpg
    G13SJC engine-bay.jpg
    33.4 KB · Views: 4,288
  • G13SJC engine-hoist.jpg
    G13SJC engine-hoist.jpg
    43.3 KB · Views: 3,713
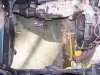
To drop the whole lot, subframe and all is an option, but you're going to be splitting the engine at the bell housing anyway.
Mad Hat Man has some good pics of the 2.5 V6 engine/gearbox out on its frame.

My method was plan C and I did it all single handed. My Ford mechanic neighbour did step in in the refit stages.

Crank pulley doesn't have to come off when dropping the engine, it is tight though for the upper engine bracket mount (which isn't a problem when lifting the engine up and out)

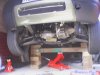
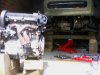
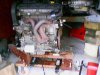
I did have to make an engine cradle, best lifting aid I ever made, has served as a trolley for shifting and moving many heavy objects.

I have pointed to the cross member on the cradle, the sump doesn't let the engine sit upright. It will kilter forward, so support under the oil filter housing.

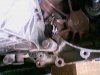
The cradle also had two car jacks mounted and bolted to the cross member and main frame of the cradle. This allowed the engine to be pitched at any angle when getting the spigot shaft to line up.

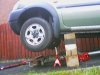
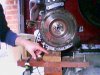
The castor wheels, allowed movement, forwards, backwards, left and right.

The main beam (railway sleeper) was used under the sills (jacking points) whilst smaller blocks (1 above to clear exhaust and prop, 4 below for the height)
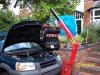
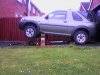
Gave enough height to roll engine forward (28" approx from bumper valance to ground, notice the massive height difference from a standard red/white axle stand)

The pics show FL jacked up on the drive as a trial height lift.

It was lowered down again and backed up into the garage (I anticipated rain).

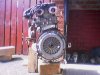
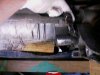
When all bits were removed, starter, alto, inlet/injection manifold etc, leaving last few bolts in the bell housing, I positioned cradle under the sump, raised the two jacks slightly to take the strain, a wooden wedge was used at this stage to support the IRD above the subframe.

last few bolts were removed and engine glided out. It was then lowered to the deck with FL at normal height :cool:

It sat there on the cradle, while I jacked the main body up in stages.
Due to the angle of the front end, for each lift (block at a time) the engine had to be pushed back slightly to clear radiator, front cross member. Castors made easy work of this.

As mentioned the upper engine bracket was tight, a few mm to clear ;) it did score on the inner bay but taking a bit more time would have got round this.

Some pics taken at the time enjoy! (not the best quality as the main camera on the phone was knackered, had to resort to the 1MegaPix)
 

Attachments

  • NI's freelander jacked up in garage1.jpg
    NI's freelander jacked up in garage1.jpg
    24.1 KB · Views: 8,978
  • NI's freelander-jacked-up-2.jpg
    NI's freelander-jacked-up-2.jpg
    26.1 KB · Views: 2,716
  • NI's freelander-jacked-up.jpg
    NI's freelander-jacked-up.jpg
    29.9 KB · Views: 3,092
  • k-series-new-clutch.jpg
    k-series-new-clutch.jpg
    29.9 KB · Views: 1,887
  • NI's k-series 3.jpg
    NI's k-series 3.jpg
    25.9 KB · Views: 1,585
  • NI's k-series-cradle 2.jpg
    NI's k-series-cradle 2.jpg
    35.5 KB · Views: 1,796
  • NI's kseries-jacking-cradle.jpg
    NI's kseries-jacking-cradle.jpg
    35.4 KB · Views: 1,755
Last edited:
Refit wasn't quite as much fun, it had all gone so well up until then.
All in, complete job was a full days labour, but this was done over several evenings, including making the cradle and blocks etc.

It was an early hours of the morning job (around the time of this post) and after much head scratching, couldn't figure out as to why the engine wouldn't slide home back into the bell housing. It was right in until the last few mm.

There was a lot of resistance (the new clutch plate was mm perfect.....I thought! why aint the spigot shaft going in??)

At this stage, after trying every possible way to line the engine up, I was ready for throwing in the towel for the day, plus I had to get up for work the next morning/in a few hours.

It was at this point that my Ford mechanic neighbour crawled back underneath and spotted something fouling in the bell housing

:wtf: LR had decided to throw an 'add on' flywheel shield. It was this shield that caused all the hassle, it looks like it was made of a coke tin.

The following afternoon the shield was well and truly removed from the vehicle.

Offering up the engine to the gearbox again allowed it to be slide home first time, literally fell into position :) :D

To anyone attempting this procedure, please cut the shield away (open ended hacksaw or dremel being the weapon of choice) and post to LR's design team complaints dept.

Notice the surgical gloves I wore to surgically remove the offending item.

The shield is supposed to be an oil drain in the event of an oil leak and it is supposed to prevent excessive water getting into the flywheel.
I have a template of the hole left and it wouldn't be hard to seal it back up again, if I intend to white water raft in the FL.

There are countless threaded holes in the PG1 bell housing from when it was adopted from Rover, LR have done a crap job on covering up the hole.

Despite lack of sleep and much head scratching, it was a very satisfying project, worth having a go.

Some acoholic beverages were consumed to celebrate, speaking of which there goes my 2000th post....yay! Fiesta!

:tea:

:5bcheers2:

:5bparty:
 

Attachments

  • NI's flywheel-shield 1.jpg
    NI's flywheel-shield 1.jpg
    22.9 KB · Views: 1,253
  • NI's bent-flywheel-shield 2.jpg
    NI's bent-flywheel-shield 2.jpg
    29.5 KB · Views: 2,140
Last edited:
Separating 3 drive shafts without good reason is not a good idea especially as you will need to take off the bell housing anyway. I have seen some photos of taking the engine out from the top but if you can you will have more room to manouvre if you take off the bonnet.
Commonest mistake I have seen is not to secure the crane as close as possible to the top of the head and run out of lift on the crane. Don't scrimp on the crane either, hire a good one and prevent an accident. Also bear in mind the surface you are working if you are going to pull the crane with the engine on out from the vehicle, I have seen one nearly go over when working on ridged concrete.

Have you felt the weight of a FL bonnet, best left in place IMHO

G13SJC's pics show the height required.

The K-series weighs a mere 95kg, gearbox some 40 odd kg, IRD 30-ish kg

All in, thats the weight of a Tdi engine :p a crane is great (if you have one) probably essential when dropping into a RWD car that has a longitudinal engine and drivetrain,
but for the FL it goes to show how easy it is with simple conventional tools and blocks of wood. Everything can be dismantled and put back in it's place, car jacks went back to the two cars they came from (with an extra hole or two), the beam now doubles up as a garden seat ;)
 
if you do a search on the freelander section from about 2 years ago, someone wrote a really good thread about taking an engine out of a freelander. easiest way seems to be drop it out the bottom. the guy in question (damn my memory, can't remember who it was) started dropping it, then progressively jacked the front of the car up supporting the road wheels at each time. think he finally dropped it onto a pallet and pulled it out with a pallet truck.

good luck.


hi thanx for that, i will take it out the bottom after all, i already have the wheels exhaust etc off so il just remove prop, linkages etc and drop it down, dont really fancy messing with the crank pulleys etc. thanx again
 
Back
Top