Discovery rear body mount replacing

This site contains affiliate links for which LandyZone may be compensated if you make a purchase.
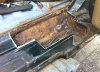
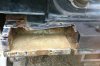
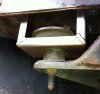
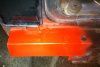
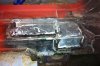
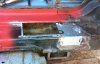
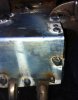
A bit more work on the big 'ole - well it is now :eek:.....
25877d1318438748-discovery-rear-body-mount-replacing-img_1469.jpg


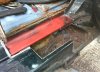
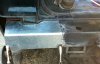
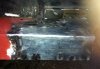
started to manuf repair plates and trial fit....
25878d1318438748-discovery-rear-body-mount-replacing-img_1470.jpg

25879d1318438748-discovery-rear-body-mount-replacing-img_1471.jpg

25880d1318438748-discovery-rear-body-mount-replacing-img_1472.jpg


Also found out - peeps wot replaced the floor didnt put the rubber supports between the floor and the chassis - that is why the back end dropped - now it is (sort of) in the correct position, there are 1/4" gaps where the rubber packing pieces are meant to be - looks like more bits to be robbed off the convertable ;).

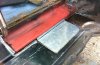
hopefully getting my box section tomoz to strengthen the corners :D

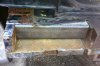
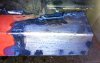
oh - and before anyone says i should have replaced the X-member - that's what will happen at some other time - its gorra be back on the road by Sunday PM.:eek:
 

Attachments

  • IMG_1469.jpg
    IMG_1469.jpg
    197.4 KB · Views: 1,492
  • IMG_1470.jpg
    IMG_1470.jpg
    172.4 KB · Views: 1,457
  • IMG_1471.jpg
    IMG_1471.jpg
    163.8 KB · Views: 1,416
  • IMG_1472.jpg
    IMG_1472.jpg
    144 KB · Views: 1,497
Last edited:
A few more pics - n/s quarter this time. Only completed to first fit today. needs a bit of fettling to be accurate, but it gives you an idea and shows the 50mm sq box fitted in position to add strength.

first pic shows rear body mount without rubber pad underneath. The section with tube in is mounted on top.
I might try and refit both bushes after all the welding has been done and the boot floor rubbers have been fitted, but for now, it aligns up pretty well.
25904d1318525544-discovery-rear-body-mount-replacing-img_1474.jpg


Rear corner cut away
25905d1318525544-discovery-rear-body-mount-replacing-img_1475.jpg


Cleaned up and 200mm of box section in place.
25906d1318525544-discovery-rear-body-mount-replacing-img_1477.jpg


First fit of cover plate. This will need to be fettled to sit flush with the rest of the X-Member and I may well put a couple of puddle welds through to the Box section too.
25907d1318525544-discovery-rear-body-mount-replacing-img_1478.jpg


If I had to do it again, I would be tempted to fit the box section over the rear body mount as well as under the door frame. Better still put a length along the whole X-member.
 

Attachments

  • IMG_1478.jpg
    IMG_1478.jpg
    126.3 KB · Views: 1,485
  • IMG_1477.jpg
    IMG_1477.jpg
    157.4 KB · Views: 1,333
  • IMG_1475.jpg
    IMG_1475.jpg
    148.1 KB · Views: 1,369
  • IMG_1474.jpg
    IMG_1474.jpg
    75 KB · Views: 1,499
Last edited:
Todays piccies..........

Second fit of ns corner section.
25922d1318619350-discovery-rear-body-mount-replacing-img_1478.jpg


Final Fit of Door frame section and tacking of second section.
25923d1318619350-discovery-rear-body-mount-replacing-img_1392.jpg


Cleaned up after fitting of all three pieces above os body mount.
25924d1318619350-discovery-rear-body-mount-replacing-img_1396.jpg


Centre patch (not flush fitted) and cleaned up door frame replacement section.
25925d1318619350-discovery-rear-body-mount-replacing-img_1394.jpg


NS section fitted, cleaned up and primer coat.
25926d1318619350-discovery-rear-body-mount-replacing-img_1393.jpg


I feel like I am getting somewhere at long last :D
 

Attachments

  • IMG_1393.JPG
    IMG_1393.JPG
    106.1 KB · Views: 1,291
  • IMG_1394.JPG
    IMG_1394.JPG
    110.5 KB · Views: 1,285
  • IMG_1396.JPG
    IMG_1396.JPG
    131.9 KB · Views: 1,422
  • IMG_1392.JPG
    IMG_1392.JPG
    136.1 KB · Views: 1,390
  • IMG_1478.jpg
    IMG_1478.jpg
    126.3 KB · Views: 1,282
Last edited:
very good mate!!

that's some precision cutting there for the new metal to sit flush!
On my old disco I just patched over where it needed, but recently on the defender floor box I did it like that, flush, and was a pain to cut it right, there was an angle involved too though..

what are you spraying it with? is it red oxyde in spray?
 
Red Oxide (otherwise known as red lead) was effective in the old days, and was famously used on the Forth railway bridge. The active ingredient was lead tetroxide which along with other lead paints could cause lead poisoning, and it has been withdrawn from use.

Red lead paints produced since the 1990s don't actually contain any lead. The red colour is just a pigment added by the marketing people to take advantage of public memory of real red lead primers.

You, most ikely, have a zinc oxide based primer, but I find it is better to use an acid etch primer.

A good guide paint prep & primers can be found at http://www.mig-welding.co.uk/primer.htm
 
Last edited:
Todays update


Priming the section over the OS body mount
25950d1318703838-discovery-rear-body-mount-replacing-img_1399.jpg


cutting out OS corner section(showing Box section in place & weld thru primer)
25951d1318703838-discovery-rear-body-mount-replacing-img_1400.jpg


View of Puddle Welding (Speshully for Ryder ;))
25952d1318703838-discovery-rear-body-mount-replacing-img_1401.jpg


Initial clean up
25953d1318703838-discovery-rear-body-mount-replacing-img_1402.jpg


Iron Phosphate primered
25954d1318703838-discovery-rear-body-mount-replacing-img_1403.jpg


Red Primered (showing Acid etch primer n rear door where grinder caught it :eek:)
http://www.landyzone.co.uk/lz/attac...covery-rear-body-mount-replacing-img_1404.jpg

All ready for Colour matching tomoz and on to Sill repair with Pikeys assistance.
 

Attachments

  • IMG_1399.JPG
    IMG_1399.JPG
    102.4 KB · Views: 1,276
  • IMG_1400.JPG
    IMG_1400.JPG
    127 KB · Views: 1,136
  • IMG_1401.JPG
    IMG_1401.JPG
    103.1 KB · Views: 1,062
  • IMG_1402.JPG
    IMG_1402.JPG
    107.5 KB · Views: 1,084
  • IMG_1403.JPG
    IMG_1403.JPG
    112 KB · Views: 1,080
  • IMG_1404.JPG
    IMG_1404.JPG
    68.1 KB · Views: 422
Last edited:
Back
Top