Disco rebuild project

This site contains affiliate links for which LandyZone may be compensated if you make a purchase.
Thanks for the info chaps :0)
I managed to undo most of the screws holding on my rear 1/4, but it was the spot welds holding it onto the front door frame that got me stuck. I was gonna drill them out, but I did not know how to put it all back together after, so I left it alone. I am gonna have another look at it before I paint her up..
 
On the 5 door the rear quarter is screwed along the door frame, teeny little nuts on the inside to remove the trim and then there's a few screws.

I'm hugely confused how they spot weld an aluminium panel to a steel pillar!
 
Thanks for the info chaps :0)
I managed to undo most of the screws holding on my rear 1/4, but it was the spot welds holding it onto the front door frame that got me stuck. I was gonna drill them out, but I did not know how to put it all back together after, so I left it alone. I am gonna have another look at it before I paint her up..

Put the drill down and step away from the spot welds!!

I presume you are looking at these spot welds on the right hand edge in the pic??
2012-08-20192643.jpg

That is an aluminium to aluminium spot weld and does not need to be drilled.
The ali panel is fixed to the steel pillar using tiger seal and bolts and seam sealer
Once all the bolts are undone, (refer to the rave pages a few posts before for ALL the locations, beware there are two on the outside of the B pillar top coved by a pull off pillar trim ) you the just need to seperate the two panels. the edge of the two are seam sealed then over painted in body colour. So you need to break the seam using a sharp knife or chisel.
2012-08-20192723.jpg

2012-08-20192655.jpg

Hope that helps
 
Ahh, I see now.. Picture paints a thousand words. Thanks for putting them up :)
I never really sussed that of course they would not of welded ali to steel :rolleyes:
 
Nothing like getting stuck in! You **** yourself cos you've just wrecked your own car, you're petrified cos you don't know i you've got the capability to finish the job, you're cheesed off cos 'the damn thing is such a rotten bag of ****' and you're distressed at how much it costs to repair it all.

Then when it's finished you can be happy
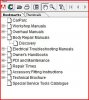
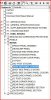
 :D

nice quote this... sums landrovers up :D nice to see another d1 being saved.:)
 
Which part of the Rave manual were those pics in? I've downloaded it but can't find anything on 200tdi!
 
Which part of the Rave manual were those pics in? I've downloaded it but can't find anything on 200tdi!

Screen shots below of how to find it.....
 

Attachments

  • step1.JPG
    step1.JPG
    32.3 KB · Views: 293
  • step2.JPG
    step2.JPG
    56.6 KB · Views: 288
Not posted any updates for ages sorry….
Have been doing bits each weekend when I have time but the weather over the winter means it has taken ages to make progress, also had to take a break for a few weeks after damaging my eye by getting grinding sharps imbedded in my pupil. Have now replaced my crappy plastic safety specs with full bolle blast goggles as I don’t want to experience that again!
Chassis painting
2012-09-01124859.jpg
2012-09-01124854.jpg

Welding inner and outer sill together
2012-09-15142037.jpg

2012-09-15181714.jpg

2012-09-15181726.jpg

Sill ends and post bottoms primed
2012-09-15181801.jpg

Rotten seal belt mount sorted.
2012-09-16142951.jpg

2012-09-16150703.jpg

2012-10-06141322.jpg

New sill in position
2012-10-06150422.jpg

2012-10-06150435.jpg

2012-10-06150447.jpg

Welded in
2012-10-06182121.jpg

2012-10-06182725.jpg


Bottom of A post
2012-10-06150438.jpg

Sorted
2012-10-13174724.jpg

2012-10-13174731.jpg

Realised that I haven’t taken any recent progress pics and the passenger side is almost complete so will do some more pics next weekend to bring the thread up to date
 
With the threat of snow this weekend I was looking for something I could do inside the garage to try and stay warm.
I had discovered that a couple of the pistons had seized on the brakes so ordered up all the parts a while ago and decided today it was time to strip the caliper’s down and refurb them with the new pistons and seals.
Did a search and couldn’t find a guide on here so thought it was worth documenting the process that I followed.
This is for one of the fronts but the method was the same for the rears (just quicker)
Removed the pads, then undid the brake pipes and removed caliper (no pics but you all know what that bit looks like!) then back inside the warm garage and get the calipr in to the vice.
2013-01-13144302.jpg

Used my air gun to push the pistons almost fully out, used my multipurpose thingy tool (a bit of 8mm flat steel bar) between the pistons to stop them popping out. Warning: do not try to stop the piston with your hand as they pop out with quite a force when they go
2013-01-13145125.jpg

2013-01-13145134.jpg

On the front caliper one inlet does a pair of opposing pistons and the other inlet does the other pair so repeat the air gun step for the second inlet and you are left with this
2013-01-13145324.jpg

Before trying to split the caliper it is wise to remove the bleed nipples at this point to stop them from being damaged in the vice
An 11mm deep ¼ dr socket makes it easy
2013-01-13150139.jpg

2013-01-13150203.jpg

4 16mm bolts hold the two caliper halves together (only 2 on the rears) and they will be tight so make sure you use a decent 6 sided socket
2013-01-13145533.jpg

Once split you will see two o rings that seal the two halves, remove carefully if reusing these.
2013-01-13150629.jpg

The two pistons easily pulled out the last few mm by hand
2013-01-13153917.jpg

Leaving nasty black gloop / fluid in the cylinder
2013-01-13150904.jpg

Prised out the outer wiper seal and retaining ring and discarded
2013-01-13151103.jpg

Removing main seal from cylinder
2013-01-13151242.jpg

Thorough clean of the wiper seal seating area with a gasket scraper blade.
2013-01-13151937.jpg

2013-01-13151132.jpg

Cotton buds for main seal seating area
2013-01-13153342.jpg

2013-01-13153811.jpg

Leaving it clean ready for reassembly along with a quick clean of the work area to stop any dirt getting in while I rebuild them.
2013-01-13153827.jpg

2013-01-13155810.jpg

New parts
2013-01-13155920.jpg


Fitted inner seal to the cylinder then gave the new pistons a smear of red rubber grease to ease fitting. You mustn’t use anything but brake fluid or red rubber grease to lubricate or you will damage the seals.
2013-01-13160930.jpg

Pistons pushed fully home
2013-01-13163316.jpg

Wiper seal fitted to retaining ring first then placed into recess and then tapped into place by laying multipurpose thingy over it and applying equal pressure to press it in ( a swift tap with a hammer)
2013-01-13162539.jpg

2013-01-13163602.jpg

2013-01-13164423.jpg

All four pistons and seals fitted, caliper halves bolted back together (reused original o rings)and bleed nipples fitted
2013-01-13171911.jpg

I will be giving them a coat paint to tart them up and fit them later
 
Last edited:
With the threat of snow this weekend I was looking for something I could do inside the garage to try and stay warm.
I had discovered that a couple of the pistons had seized on the brakes so ordered up all the parts a while ago and decided today it was time to strip the caliper’s down and refurb them with the new pistons and seals.
Did a search and couldn’t find a guide on here so thought it was worth documenting the process that I followed.
This is for one of the fronts but the method was the same for the rears (just quicker)
Removed the pads, then undid the brake pipes and removed caliper (no pics but you all know what that bit looks like!) then back inside the warm garage and get the calipr in to the vice.
2013-01-13144302.jpg

Used my air gun to push the pistons almost fully out, used my multipurpose thingy tool (a bit of 8mm flat steel bar) between the pistons to stop them popping out. Warning: do not try to stop the piston with your hand as they pop out with quite a force when they go
2013-01-13145125.jpg

2013-01-13145134.jpg

On the front caliper one inlet does a pair of opposing pistons and the other inlet does the other pair so repeat the air gun step for the second inlet and you are left with this
2013-01-13145324.jpg

Before trying to split the caliper it is wise to remove the bleed nipples at this point to stop them from being damaged in the vice
An 11mm deep ¼ dr socket makes it easy
2013-01-13150139.jpg

2013-01-13150203.jpg

4 16mm bolts hold the two caliper halves together (only 2 on the rears) and they will be tight so make sure you use a decent 6 sided socket
2013-01-13145533.jpg

Once split you will see two o rings that seal the two halves, remove carefully if reusing these.
2013-01-13150629.jpg

The two pistons easily pulled out the last few mm by hand
2013-01-13153917.jpg

Leaving nasty black gloop / fluid in the cylinder
2013-01-13150904.jpg

Prised out the outer wiper seal and retaining ring and discarded
2013-01-13151103.jpg

Removing main seal from cylinder
2013-01-13151242.jpg

Thorough clean of the wiper seal seating area with a gasket scraper blade.
2013-01-13151937.jpg

2013-01-13151132.jpg

Cotton buds for main seal seating area
2013-01-13153342.jpg

2013-01-13153811.jpg

Leaving it clean ready for reassembly along with a quick clean of the work area to stop any dirt getting in while I rebuild them.
2013-01-13153827.jpg

2013-01-13155810.jpg

New parts
2013-01-13155920.jpg

Fitted inner seal to the cylinder then gave the new pistons a smear of red rubber grease to ease fitting. You mustn’t use anything but brake fluid or red rubber grease to lubricate or you will damage the seals.
2013-01-13160930.jpg

Pistons pushed fully home
2013-01-13163316.jpg

Wiper seal fitted to retaining ring first then placed into recess and then tapped into place by laying multipurpose thingy over it and applying equal pressure to press it in ( a swift tap with a hammer)
2013-01-13162539.jpg

2013-01-13163602.jpg

2013-01-13164423.jpg

All four pistons and seals fitted, caliper halves bolted back together (reused original o rings)and bleed nipples fitted
2013-01-13171911.jpg

[FONT=&quot]I will be giving them a coat paint to tart them up and fit them later[/FONT]

I changed my pads on christmas day haha ;) was first day off for ages so had some free time, found a few stuck pistons was going to have to do that job but didnt really wanna do that :( luckily bump had a set of fromt calliper at good price so saves me rebuilding and inly cost a few £ more :)
 
What a great job.

I wish I had taken the time to remove the quarter panels on mine but I didn't know I could do it as I had only started using landyzone back then.

You are working very methodically and the quality of work is far better than many garages I have seen so well done!

I have another three months before the GreenHornet comes off the road for the second spate of modifications, that's if it passes the MOT tomorrow lol.

Guess you will have to change the avatar so the front end is updated !!

Cheers fella that is high praise indeed considering your thread was one of the ones that inspired me to have a go.

I decided that removing the 1/4 panels was the only realistic way I had of doing it properly but as I am working outside it does mean I spend the start and end of each session removing the panel and replacing it at the end of the day. Though at the moment it is just held on with two bolts to speed things up.

I had this plan in my mind to just work my way round the motor and got all the panels that I thought I would need in one go at the start. Having never welded or done any real bodywork the whole process has been a voyage of discovery and there are already parts that I did at the start that if I was doing again would be done to a better standard. However at the end of the day it is a weekend toy and I don't plan on getting rid of it so as long as it passes the MOT at the end and is more solid than I started I will be happy.

You're right about the avatar, about the best I could do at the moment though would be a front end view with it on axle stands :D
 
Back
Top