You are using an out of date browser. It may not display this or other websites correctly.
You should upgrade or use an alternative browser.
You should upgrade or use an alternative browser.
Defender bodywork rebuild...
- Thread starter discomania
- Start date
This site contains affiliate links for which LandyZone may be compensated if you make a purchase.
Yes that is part of the fuel tank - stupid design! If you look at the pictures above, what you will see is the gap between the cradle and the tank and then the other one is of this area fully sealed.
Ah, I can see in those photos, mines rusted on the dimple bit on the bottom. New fuel tank it is then!
Will have to see about filling that gap as well.
Wonder what the point in building in an obvious mud trap like that was...
discomania
Well-Known Member
- Posts
- 6,949
Nice work fella.
So, as someone who has tried both, which is the best way to refit front wings?
Inner and outer together or inner first? Mine are in bits now and I can go either way!
I would say put the two parts together and then lift into position - get someone who is either like minded, or will take and follow instuctions so you can get both ends lined up well.
Putting the inner on first makes that job really easy, but you then have to push and pull and bend and jack things until you can get the outer wing to line up properly. Also it was really difficult to get them both to line up with them already roughly positioned on the car and I did employ the use of a jack to get the inner wing to finally pop into position. Being it was a new paint job as well it was a small nightmare everytime the jagged edges of the wing got close to my bulkheads new paint!
You can do a better job of all the little bolts that go along the top edge of the inner wing with the outer wing sitting upside down, then you can then push the inner wing into position and do the two screws into the captive nylon nuts below the headlight.
Good luck!
discomania
Well-Known Member
- Posts
- 6,949
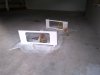
Tank in!
Got another couple of coats onto it and it's basically sealed into a skin of fibreglass and resin. I'll let it dry fully for a few days and then give it a light sanding and probably paint it with something good and gooey. Then lashings of waxoyle. Overkill! Not on a Landy!
Got another couple of coats onto it and it's basically sealed into a skin of fibreglass and resin. I'll let it dry fully for a few days and then give it a light sanding and probably paint it with something good and gooey. Then lashings of waxoyle. Overkill! Not on a Landy!
Attachments
discomania
Well-Known Member
- Posts
- 6,949
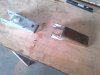
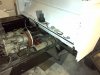
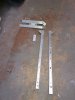
Right, needed to sort out some inner sills before I could get the seatbox and floors back in properly, so I decided to make one and will then get the original and the new one galvanised.
Attachments
Last edited:
tomseries3tom
New Member
- Posts
- 916
- Location
- birmingham
Looks really good mate
Nice one, thanks for the wing fitting advice!
Totally agree with your sig too... Had a britpart door seal turn up last week and guess what... Yup, the rubber thickness varied massively and was so thick at one point it wouldn't compress enough to let the door shut... Another britpart item in the bin.
And before anyone asks... I was expecting a bearmach part.
discomania
Well-Known Member
- Posts
- 6,949
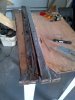
I managed to get my old sill stripped ( caustic soda bath then set light to it with methhanol and kerosene then plunged it into cold water and paint gone!) and then it, my new one and two Discovery tow bracket arms I made for myself down to the galvanisers. Got them back and etch primed the lot, so thats the sills in, seatbox in and floors laid in to check all the bolt holes etc...
I saw Aldi were doing 3m of self adhesive 3M foam tape for about £2.50 (like that used for the seals between the gearbox tunnel and floor pans etc.) so I bought 3 packs of that which will save me about £30. MRC8626 (tunnel to bulkhead seal) is £3.95 alone.
There always was, and still is a bit of a gap between the sill and the floor pan on the N/S, the seatbox obviously has the battery box there, so it seems the extra depth of the battery box metal etc causes the seatbox lip to sit higher at the back, so the floor then sits a bit proud here. Is that normal?
Attachments
Last edited:
discomania
Well-Known Member
- Posts
- 6,949
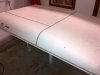
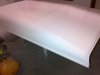
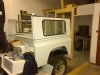
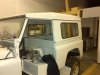
Split the roof and sides on Friday night, and painted the roof also, not before seam sealing the gutters and the seams to try and stop water ingress, I went easy with it so it's not that detectable once painted.
Got the sides done on Saturday morning, really pleased about this as I can now get it all rebuild (minus doors and bonnet) but they are not critical to the actual rebuidling of the Landy. Being that I am often covered in paint and thinners wearing gloves there are not too many photos as I dont want to ruin my phone!
I also have my new glass for my side and rear window.
Attachments

discomania
Well-Known Member
- Posts
- 6,949
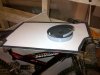
I got my glass fitted this evening, brought them home so I could do them lying flat on the carpet making it easier as a 1 man install.
Have not put the filler strips in yet as I wasn't getting anywhere just prying the seal apart a bit and trying to force it in. May need to go and talk nicely to an autoglass workshop and see if they would fit the strips or I will buy the tool. They are not going anywhere just now anyway.
2 new tub to side panel seals are on there way along with some lights for the rear end (my NAS reverse and fog lights arrived on saturday too). This week I expect to have the roof and sides bolted back in.
Will be good to have it all bolted together again! That as far as I am concerned is the bodywork done at that point. Bonnet and doors are not critical to the rest of the rebuild, I'll do them last.
Attachments

discomania
Well-Known Member
- Posts
- 6,949
Cheers, looking at the simplicity of that one I made one.
discomania
Well-Known Member
- Posts
- 6,949
discomania
Well-Known Member
- Posts
- 6,949
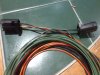
Got the rear end all done with lights etc, new rear loom from O/S to N/S made and pulled into conduit.
I still havent squared up the sides to the tub - once I get that done it's time for soundproofing the interior.
Anyone recovered there seats? How easy or not is it?
I still havent squared up the sides to the tub - once I get that done it's time for soundproofing the interior.
Anyone recovered there seats? How easy or not is it?
discomania
Well-Known Member
- Posts
- 6,949
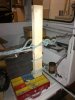
Tonight I pulled the rear of the tub in with a piece of rope and twisted it with some timber, pulled it in a treat. You can see from the first photos the general alingment issues, when the tub was stripped, cappings off, floor out, crossbraces off etc. it must have let the tub expand a little at the top. So thats the sides lined up and bolted down. It can be tweaked when the doors go on if need be before the interior makeover covers up the bolts and things.
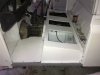
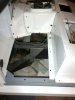
Fully sealed and fitted the front floors and tunnel - I wanted to get it pretty tight so it took a fair bit of time going round all the fixings lining it all up and getting it to sit properly. I am not looking forward to the day I need to do a clutch or something!
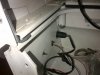
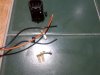
I also wired up the plugs for my NAS fog and reverse lights, I hope to get all the back end lighting up and running by tomorrow night, that leaves only the N/S wing loom to be sorted out and sockets soldered up to all the connections.
Fully sealed and fitted the front floors and tunnel - I wanted to get it pretty tight so it took a fair bit of time going round all the fixings lining it all up and getting it to sit properly. I am not looking forward to the day I need to do a clutch or something!
I also wired up the plugs for my NAS fog and reverse lights, I hope to get all the back end lighting up and running by tomorrow night, that leaves only the N/S wing loom to be sorted out and sockets soldered up to all the connections.
Attachments
-
 IMG-20121210-01274.jpg302.3 KB · Views: 446
 -
 IMG-20121210-01272.jpg565.3 KB · Views: 449
 -
 IMG-20121210-01270.jpg256.3 KB · Views: 438
 -
 IMG-20121210-01268.jpg268.3 KB · Views: 530
 -
 IMG-20121210-01275.jpg545.3 KB · Views: 524
 -
 IMG-20121211-01276.jpg339.7 KB · Views: 416
 -
 IMG-20121211-01278.jpg340.6 KB · Views: 447
 -
 IMG-20121211-01279.jpg398.9 KB · Views: 423
Pikey
Dummy Ejection Facilitator..
- Posts
- 47,185
- Location
- in Baron Wet Bum's Slave pit..
Ratchet strap is simpler and easier to use. Had to do exactly the same to th4 90.
jamesmartin
Well-Known Member
- Posts
- 91,886
- Location
- louth lincs
back door ?
discomania
Well-Known Member
- Posts
- 6,949
Ratchet strap is simpler and easier to use. Had to do exactly the same to th4 90.
Yes, I cursed myself when I realised I had left all my ratchet straps in a tesco crate elsewhere - rope and wood was at hand!
discomania
Well-Known Member
- Posts
- 6,949
back door ?
What my rope and wood door? Whats the matter with it - it won't rot (wait, that CLS is not treated!)
jamesmartin
Well-Known Member
- Posts
- 91,886
- Location
- louth lincs
misalignment ,sides arent an issue