Defender bodywork rebuild...

This site contains affiliate links for which LandyZone may be compensated if you make a purchase.
Been doing a lot of small jobs that take time but don't make for great photos.

Anyway, that’s the electrics basically complete, just need a length of split corrugated conduit for the N/S front, started putting some bitumen flashing tape onto various drumming panels which has deadened them a bit. I'm now on the search for an acoustic deadening product I can stick to the inside of the 90. If I could even get the seatbox done and carpeted I could put the seats back in, so ideas on a postcard please.

For the rear loom connections I went for plugs with spade terminals in them, I then simply terminated the lights with female spade connectors. I prefer this to bullets as they are easier to pull apart if they get a little foosty, the connections are all crimped then soldered, and it was the best way for doing multiway connections as required in the rear loom for O/S N/S electrics, multiple feeds and trailer connections. I'd have ended up with about 20 plugs and sockets and lots of daisey chained wiring.
 

Attachments

  • IMG-20121211-01281.jpg
    IMG-20121211-01281.jpg
    216 KB · Views: 507
  • IMG-20130111-01359.jpg
    IMG-20130111-01359.jpg
    369.9 KB · Views: 489
  • IMG-20130110-01357.jpg
    IMG-20130110-01357.jpg
    274 KB · Views: 526
  • IMG-20130110-01356.jpg
    IMG-20130110-01356.jpg
    299.6 KB · Views: 451
  • IMG-20130107-01348.jpg
    IMG-20130107-01348.jpg
    274.7 KB · Views: 532
  • IMG-20130107-01343.jpg
    IMG-20130107-01343.jpg
    287.3 KB · Views: 466
Last edited:
I have been a bit slow on this project recently, the doors have been a pain for me but I am getting there - same old issue, to rebuild or not to rebuild. Both of them are within the rebuilding territory but I was looking for something I could just paint more or less. I sourced a near mint condition, corrosion free door. It just has a few small 50p sizes dings in the skin.

I got my old doors stripped, the NS door is now for sale, it just needs a new base welding in and some attention to a ding in the skin.

I'll probably end up rebuilding the drivers side door and re-skinning it unless I track down a decent one for reasonable money.
 

Attachments

  • IMG-20130213-01514.jpg
    IMG-20130213-01514.jpg
    562.6 KB · Views: 516
  • IMG-20130215-01516.jpg
    IMG-20130215-01516.jpg
    445.7 KB · Views: 637
  • IMG-20130215-01518.jpg
    IMG-20130215-01518.jpg
    425.8 KB · Views: 569
Started the rebuild of the drivers side door, it's down at the local chemical strippers just now and will be taken straight to the galv yard afterwards unless when I see it all stripped I opt to do some more welding to it.

Once I get it back from the galv yard it will be the case of applying a coating of seam sealer to the face of the frame which comes into contact with the skin to stop vibrations and to help lock it into place. Benefit of the galvanised door is that zinc and aluminium next to each other galvanically do not react.
 

Attachments

  • IMG-20130304-01581.jpg
    IMG-20130304-01581.jpg
    352.8 KB · Views: 564
  • IMG-20130304-01579.jpg
    IMG-20130304-01579.jpg
    459.7 KB · Views: 2,629
  • IMG-20130304-01577.jpg
    IMG-20130304-01577.jpg
    314.9 KB · Views: 544
  • IMG-20130304-01582.jpg
    IMG-20130304-01582.jpg
    270.5 KB · Views: 532
  • IMG-20130304-01583.jpg
    IMG-20130304-01583.jpg
    342.1 KB · Views: 584
  • IMG-20130305-01584.jpg
    IMG-20130305-01584.jpg
    1 MB · Views: 589
Cheers, yes I hope I will make good progress now. I have decided I want the 90 on the road before the tax runs out on the Disco so I can get the Disco off the road and sort out some wee bits and pieces on it. I have been a bit slow at getting into it this year.
 
Got the door back from the strippers and it's now at the galv yard - with any luck I will have it back by Tuesday or Wednesday and I can get it re-skinned.

IMG-20130307-01585.jpg
 
Collected door frame from the galvanisers and etch primed it and the skin before I build the door.

The beauty of the zinc is that in close proximity to aluminium it will not react the same way steel and aluminium does. However, I decided I would give this door the best chance in life and primed it all. The seam sealer I am going to use to bond it a bit will also adhere to the primer much better than it would the bare aluminium or zinc.

I just hand painted a couple of coats of etch on.
 

Attachments

  • IMG-20130314-01618.jpg
    IMG-20130314-01618.jpg
    820.9 KB · Views: 2,156
  • IMG-20130314-01620.jpg
    IMG-20130314-01620.jpg
    671.2 KB · Views: 2,250
  • IMG-20130314-01619.jpg
    IMG-20130314-01619.jpg
    819 KB · Views: 466
Last edited:
Boring update today, but by the end of next week I expect the doors to be painted and on. Been basic stuff recently, putting all the bolts into the roof, covered all the seatbox and removable panels with my self adhesive soundproofing, hope all this is going to make a noticeable difference!
 

Attachments

  • IMG-20130416-01706.jpg
    IMG-20130416-01706.jpg
    252.1 KB · Views: 341
  • IMG-20130416-01705.jpg
    IMG-20130416-01705.jpg
    793.1 KB · Views: 347
  • IMG-20130416-01703.jpg
    IMG-20130416-01703.jpg
    304 KB · Views: 332
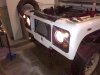
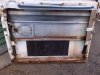
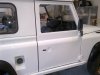
Getting very close now, all that's left to be painted is the bonnet and I will leave that to more or less the very end now.

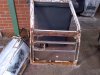
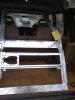
So hinges and doors were all done, I upgraded to new TD5 hinges for the cadmium plating they have and the nylon washer to stop them rubbing the paint off.

IMG-20130425-01768.jpg

IMG-20130508-01808.jpg

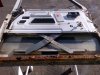
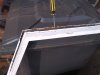
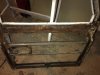
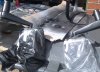
I also put a new bottom skin on the rear door.

IMG-20130430-01784.jpg

IMG-20130506-01798.jpg

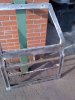
Making sure to paint the steel first, this is the reason LR doors corrode so badly, aluminium in contact with steel when wet is a big problem. The aluminium sacrifices itself as it's more reactive than steel. Simply painting both or even only one of the metals will stop the galvanic reaction. I painted the frame with hammerite and the aluminium with etch primer before sticking them together with body sealant. Even if this door sits wet, it should not corrode for a long time. My drivers side door is even better as I rebuilt it with a new skin, but first I had the frame galvanised. Zinc and aluminium are more or less next to each other on the anodic table, this means that they will react VERY slowly as there is little potential difference. In the case of zinc and aluminium the zinc will react first, only once all the zinc has gone would the steel underneath start to react with the aluminium. However, I painted the two metals as well, so first the paint needs to fail!

IMG-20130506-01797.jpg

IMG-20130507-01803.jpg

IMG-20130507-01806.jpg

This was actually the second time the front doors were painted, the first time one of them had fish eyes all over it - I think there was possibly some wax or silicone that found it's way onto the otherwise perfectly clean surface before I got the paint on, the other had a couple of runs on it as I wasn't working in great light. Although a bit annoying I didn't mind too much in the end as it meant the doors got another coat of paint which is good when doors are likely to be banged into things.

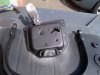
Waiting for hinge gaskets, spacers and door seals to arrive, hope these arrive soon.

I lost a vent flap bolt nut, if anyone has one spare I would give it a good home!
 
Last edited:
Cracking thread although I wouldnt have glassed the fuel tank, i've just bought one from the sortout that had been done 6 months prior and a small amount of damage had let water in, crept everywhere under the sealant and trashed the tank in record time

I have now gone for an hammerited then sealed tank and have fitted the tank first, bolted in place then spacers and then fitted the guard,

this has given me a decent gap between tank and guard.. so no longer an 'in contact rust trap' and it means removal is easier as i can remove the guard without the tank dropping down as well, tank is unbolted after,,

just meant fitting longer bolts

8708186122_d7f55ac012_z.jpg


Cheers Steve
 
...i've just bought one from the sortout that had been done 6 months prior and a small amount of damage had let water in, crept everywhere under the sealant and trashed the tank in record time...

Steve, thanks for the comment. Problem with the 90's tank is that the guard stupidly is fixed to the tank from the manufacturer, so I would have had to drill the spot welds which also form the sealing method for the two halves to remove it.

I siliconed the guard to tank gap all the way round with a deep bead of silicone, I then made a hole and pumped the whole area full of dinitrol. So, even if the glass cracks it shouldn't let water into this area and if it does it is technically rust proofed in there.

I do agree a lot with your comment, looking back now I should have just siliconed the two parts then painted the whole lot as that would have sufficed. Sometimes I get carried away! I might give the whole thing a light rub down and paint some sort of seam sealer type stuff on the whole thing so it protects the glass a bit.
 
Top thread, I'm am going through the same process:)

I've been following your thread Billy, your 90 is looking good, also hats off to you for doing it outdoors and having to deal with all the other nonsense that outdoor projects have. I did my Disco on my friends farm and it was only the welding and things and it took 2 years as everything was delayed or stopped due to weather.
 
Got a lot done this evening:

Etched and painted all the rear window retainers black and refitted the rear window. Well I didn't do the bottom one it was corroded badly and didn't come off well. I will make something up when I make my rear door card.

Refitted the OS door, fitted the lock too and some of the window channels and trim (some were a horrible mess so I've ordered some new bits).

Door lined up fairly easily and got the lock working well, door shuts with a nice thump rather than the tinny rattle I used to have. I was looking at a new 90 at the dealers a year or so ago and remember thinking if only my doors could sound like that! So I was chuffed mine did that. Where the door curves it seems to be sitting a little proud. The bottom section sits perfectly as does the top, it always did this but I hoped I would have been able to iron this out, maybe not. Not sure if I can be bothered playing with hinge shims though. I've got 2 in between the door and the hinge to help push it in already.

Etched and painted the mirror arms and broke the OS mirror when it fell off the wheelie bin it was drying on, they look really good though - new mirror ordered - I didn't break it, the wind did, so no bad luck!?!

Etched and painted the door check hardware and fitted to the OS as I've already damaged the paint on my hinges letting the door swing out too far - I think I will have a touch up session at the end of this as there are 3 or 4 marks that are annoying me.

Refitted a valve stem cap I stole for my Discovery, did the valve clearances, cleaned up the top end of the engine and refit everything.

As you can see my intake pipework is sitting with no air filter. I am not sure what to do here. It had a stupid pod thing on it since the 300 went in as a temp fix in 2009. I was going to fit the Wolf filter box I have but as my 300 is in the 200 position it won't work the way I want it too. So options are I build my own air box to use a common filter such as the Disco one but it's a space and neatness issue too. I don't want it to look pants.

So ideas please!
 

Attachments

  • IMG-20130521-01857.jpg
    IMG-20130521-01857.jpg
    422.8 KB · Views: 408
  • IMG-20130521-01855.jpg
    IMG-20130521-01855.jpg
    332.1 KB · Views: 411
  • IMG-20130521-01853.jpg
    IMG-20130521-01853.jpg
    330.6 KB · Views: 2,097
  • IMG-20130521-01852.jpg
    IMG-20130521-01852.jpg
    307.8 KB · Views: 399
  • IMG-20130521-01850.jpg
    IMG-20130521-01850.jpg
    365 KB · Views: 433
Well I finished painting her tonight - bonnet and rear cross member!

I have about 200ml of paint left so I guess that worked out quite well!

The next thing will be to complete the front bumper, I started on a custom bumper back at the beginning of the project (didn't have my priority's right there!) which needs completed now.

I think at that I could take her for her MOT, but I will probably get her nearer 100% before I do that or I am sure I will just start driving her and not finish things like the head lining and full soundproofing and carpeting.
 

Attachments

  • IMG-20130625-02076.jpg
    IMG-20130625-02076.jpg
    161.3 KB · Views: 274
  • IMG-20130625-02074.jpg
    IMG-20130625-02074.jpg
    295.7 KB · Views: 279
  • IMG-20130625-02073.jpg
    IMG-20130625-02073.jpg
    152.4 KB · Views: 282
Last edited:
Back
Top