Crankcase Breather Mod TD4

This site contains affiliate links for which LandyZone may be compensated if you make a purchase.

joe27979

Well-Known Member
Posts
1,354
Location
west Norfolk
Hi guys,
Ive seen a few posts on this mod and decided to do the upgrade on my TD4.

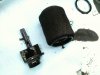
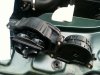
I changed the filter assembly on the engine breather back in March and you can see how oily it has become already!

not much to say about the mod really except i'll report back on how it is working after a few weeks.
Pics below explain it all, cost me £19 from my local BMW dealer - you can make out the part number on the box :eek:)

Hope this helps some of you understand what the component is and what the new part looks like.
 

Attachments

  • 1.jpg
    1.jpg
    211.1 KB · Views: 3,676
  • 2.jpg
    2.jpg
    220.6 KB · Views: 2,728
  • 3.jpg
    3.jpg
    205.7 KB · Views: 2,961
  • 4.jpg
    4.jpg
    228.4 KB · Views: 3,892
Will be doing this myself too m8 . i have the part but waitin till weather holds up as i cant get landy to my garage .
What size is the torque head bolts please?? thats the only other thing i need to do/get before doin the job

cheers Drew
 
no cutting on mine either.
just put new o-ring into crankcase cap and slotted new part in.

would be nice to know the bit you had to cut?
was something preventing the new part from going in totally or not going in at all?
 
i think these guys were talking about the complete kit which included a new 'lid' which needed a little fettling to get it to fit, this was before everyone realised you could just order the cyclone bit on its own......
 
I fitted the whole kit as well - no cutting needed. Why and what did you cut? You may have compromised it by doing do.
 
Fink I found the cutting problem and posted pic's etc into Ming's original fred.
There is a small vertical rib inside the valve housing on some TD4's that does not line up with the small cut out in the web of the venturi plate of the BMW part.
There is not a lot of clearance around the web when installed.
Others checked and found theirs lined up but others did not like mine! Seems to depend on when the castings were made?
If you do have a misalignment then as you screw the top down it pushes the venturi plate to one side and it's possible it will become dislodged and fall off the rubber seal that holds it onto the top.
It won't work too well like that.
If it all fits then you are ok - if the small cut out and rib don't align then it may fall off.

Was all written up in Ming's (I mean Porky's) excellent fred.

Hope it helps??
 
Last edited:
If it all just dropped into place and sat level then you was ok.
If you needed to press it down to get the top on to screw it down then it may not have gone in straight and may need an adjustment.
I used the whole new BMW assembly >18 months ago - mine only dropped down about 3/4 of the way in then felt slightly springy - that's when I got the mirror out and started looking around it with a torch. Found the web and modded the cut out - it's only a 1.5mm slot cut into the web.
Haven't seen many posts of people having to mod the part-kit where just the venturi is used to replace the sponge filter in the original valve head - perhaps others can confirm their experiences?
Best I can suggest - your call if it needs checking.
 
ok in middle of soin it now , broke the hose or the nozzle of wotyecallit that sits bang infront of housing but my question is do i need to use the two different shaped rubber seals i got with the BMW part???

thanks much for now drew
 
I did mine some while ago and had to cut a notch into the rib bit.

Re the seals , I replaced mine with the new ones, they are exactly the same as the originals and slot into the recess around the base where the cover fits.
 
Back
Top