Jamiegreen
Well-Known Member
- Posts
- 628
- Location
- Wales
Well figured I might as well make a thread of it, "rebuilding" my entire ACE system.
And before you say it, don't tell me its a waste of time
So to start, I removed the ARBs from my doner disco, and began stripping it down

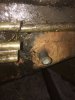
This nut does have thread locker on it, and better undone with a air gun or a large breaker bar.

Next is the actuator nut, now this one can be a little tricky, and is meant to be removed by a special tool made by Land Rover for stupid money... so I find the best way is to clean the nut area up with a small wire brush attachment and then hammer a socket on there. But of course this will just spin the ram, hence what the landrover tool is for, so to get round this, I used a pair of vice grips over a couple layers of cloth to grip the rod. (DO NOT CLAMP THE RAM DIRECTLY WITH A VISE OR PLIERS) even a small dent/scratch will disturb the seal as it retracts.

So once the ARBs were disasembled, I took them to my local hydraulics guy who has a press to remove the worn down "swivel" bush. We did try to remove the rubber bush in which the ram end bolts into but it looked a pain to get out and it didn't really show any wear. Also the bar to radius arm "bush" was in fine condition and was no need for replacement.
I then sandblasted the parts, although a wire brush will do just fine.


Then got the paint out, first a coat of rust inhibiting primer, I get all my paint from "Arc Rite Welding", an online store.


Then after that had dried a coat of black semi gloss chassis paint.


By now my local hydraulics shop had made up my stainless steel pipes, I will have to come back with the measurements as I haven't fitted them yet and want to make 100% sure. The picture shows the front and rear actuator pipes, these are of a slightly smaller dimension than the original 10mm pipes, these are around 7mm, hoping this wont make too much difference, this is why I haven't got the pump feed and return yet as he needs to order in a larger pipe diameter as I think it might create flow restriction problems using smaller pipe from the pump. Also, the new pipe going to the HP feed of the pump will only go to the top of the wheel arch and join the original pipe, the reason for this being there is some sort of restrictor inside the first flexi part of the original pipe coming from the pump that dampens out surges in pressure and reduces noise. THIS MUST BE LEFT IN PLACE.
The pipes and all fittings will cost me around £200 + Machining of the valve block. This may seem expensive but I chose to spend a fair bit more for stainless steel rather than standard hose, aside from the fact its damn good looking, it should last forever. And on a plus side it seems to fit inside the original pipe clamps along the chassis. Also still damn cheaper than the sh*t pipes LR produces.

So next the valve block... Remove the 2 nuts holding the retainer plate on both sides, and wiggle it off, a screwdriver to pry it off may help.

Now the fun part, remove the old pipes. Vise grips, use your feet, pull as hard as you possibly can, smack yourself in the face with the grips, swear at the valve block, go make a cup of tea, calm down, then continue.

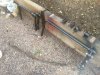
Here are the new pipes fitted in, 1 of the pipes is a larger diameter, this is the feed from the pump, which I thought using a smaller pipe than was fitted from factory might cause pressure issues. The original pipes are cut just at the shock mount and then joined with 10mm compression fittings. I tried to use all the original pipe clamps but silly me made a couple of the pipes too short, so had to miss where they would normally run. It seemed a tricky part was finding a way to keep the pipes away from the steering rod, but some zip ties etc and was all good. I might add a P clip somewhere in there too to secure them even better. More pics to follow of these but only took 1 for now.

here is the pipes running to the front ARB, I twisted them at a 180 degree angle where they go into the bajo connection similar to what the orignals do, to give them more movement when the ram moves up and down. I did put some wiring conduit on the pipes where they run up the plastic panel as they do slightly rest on this and I didn't want them to wear into the plastic... and yes it was the only colour stuff I had left... at least it matches the calipers.

Finally ALL DONE!, the machine shop finished my valve block, it cost £90 to have it done.


Got it bolted on, and joined up the pipes... So here is the finished product! oh and er, no I don't know why 1 of the pipes went too long.


So anyway, picked up a 5L bottle of dexron III (Yes I know its not the proper stuff but..money) and filled it up, first I took it for a quick drive with a little rocking to get the first bit of bleeding done, topped up the tank and repeated it a couple times. Then used Hawkeye to properly bleed and calibrate the system.. Some more harsh cornering, and it is all working perfect.. no leaks and no error codes. Now I can finally take those twisty roads at a nicer speed than a snail with no arbs connected.
Heres all the parts you may want to change, all available at BRIT-CAR or most other lr places.
ANR6554 BUSH - ACE SYSTEM ACTUATOR - DISCOVERY 2
RBX10170 ANTI ROLL BAR BUSH
RBX101740 BUSH ANTI ROLL BAR WITH ACE - DISCOVERY 2
RYF100420 DOWTY WASHER PIPE TO ACTUATOR DISCOVERY 2
ANR6653 NUT - DOMED PIPE TO ACTUATOR REAR TORSION BAR DISCOVERY 11
And before you say it, don't tell me its a waste of time
So to start, I removed the ARBs from my doner disco, and began stripping it down
This nut does have thread locker on it, and better undone with a air gun or a large breaker bar.
Next is the actuator nut, now this one can be a little tricky, and is meant to be removed by a special tool made by Land Rover for stupid money... so I find the best way is to clean the nut area up with a small wire brush attachment and then hammer a socket on there. But of course this will just spin the ram, hence what the landrover tool is for, so to get round this, I used a pair of vice grips over a couple layers of cloth to grip the rod. (DO NOT CLAMP THE RAM DIRECTLY WITH A VISE OR PLIERS) even a small dent/scratch will disturb the seal as it retracts.
So once the ARBs were disasembled, I took them to my local hydraulics guy who has a press to remove the worn down "swivel" bush. We did try to remove the rubber bush in which the ram end bolts into but it looked a pain to get out and it didn't really show any wear. Also the bar to radius arm "bush" was in fine condition and was no need for replacement.
I then sandblasted the parts, although a wire brush will do just fine.
Then got the paint out, first a coat of rust inhibiting primer, I get all my paint from "Arc Rite Welding", an online store.
Then after that had dried a coat of black semi gloss chassis paint.
By now my local hydraulics shop had made up my stainless steel pipes, I will have to come back with the measurements as I haven't fitted them yet and want to make 100% sure. The picture shows the front and rear actuator pipes, these are of a slightly smaller dimension than the original 10mm pipes, these are around 7mm, hoping this wont make too much difference, this is why I haven't got the pump feed and return yet as he needs to order in a larger pipe diameter as I think it might create flow restriction problems using smaller pipe from the pump. Also, the new pipe going to the HP feed of the pump will only go to the top of the wheel arch and join the original pipe, the reason for this being there is some sort of restrictor inside the first flexi part of the original pipe coming from the pump that dampens out surges in pressure and reduces noise. THIS MUST BE LEFT IN PLACE.
The pipes and all fittings will cost me around £200 + Machining of the valve block. This may seem expensive but I chose to spend a fair bit more for stainless steel rather than standard hose, aside from the fact its damn good looking, it should last forever. And on a plus side it seems to fit inside the original pipe clamps along the chassis. Also still damn cheaper than the sh*t pipes LR produces.
So next the valve block... Remove the 2 nuts holding the retainer plate on both sides, and wiggle it off, a screwdriver to pry it off may help.
Now the fun part, remove the old pipes. Vise grips, use your feet, pull as hard as you possibly can, smack yourself in the face with the grips, swear at the valve block, go make a cup of tea, calm down, then continue.
Here are the new pipes fitted in, 1 of the pipes is a larger diameter, this is the feed from the pump, which I thought using a smaller pipe than was fitted from factory might cause pressure issues. The original pipes are cut just at the shock mount and then joined with 10mm compression fittings. I tried to use all the original pipe clamps but silly me made a couple of the pipes too short, so had to miss where they would normally run. It seemed a tricky part was finding a way to keep the pipes away from the steering rod, but some zip ties etc and was all good. I might add a P clip somewhere in there too to secure them even better. More pics to follow of these but only took 1 for now.
here is the pipes running to the front ARB, I twisted them at a 180 degree angle where they go into the bajo connection similar to what the orignals do, to give them more movement when the ram moves up and down. I did put some wiring conduit on the pipes where they run up the plastic panel as they do slightly rest on this and I didn't want them to wear into the plastic... and yes it was the only colour stuff I had left... at least it matches the calipers.
Finally ALL DONE!, the machine shop finished my valve block, it cost £90 to have it done.
Got it bolted on, and joined up the pipes... So here is the finished product! oh and er, no I don't know why 1 of the pipes went too long.
So anyway, picked up a 5L bottle of dexron III (Yes I know its not the proper stuff but..money) and filled it up, first I took it for a quick drive with a little rocking to get the first bit of bleeding done, topped up the tank and repeated it a couple times. Then used Hawkeye to properly bleed and calibrate the system.. Some more harsh cornering, and it is all working perfect.. no leaks and no error codes. Now I can finally take those twisty roads at a nicer speed than a snail with no arbs connected.
Heres all the parts you may want to change, all available at BRIT-CAR or most other lr places.
ANR6554 BUSH - ACE SYSTEM ACTUATOR - DISCOVERY 2
RBX10170 ANTI ROLL BAR BUSH
RBX101740 BUSH ANTI ROLL BAR WITH ACE - DISCOVERY 2
RYF100420 DOWTY WASHER PIPE TO ACTUATOR DISCOVERY 2
ANR6653 NUT - DOMED PIPE TO ACTUATOR REAR TORSION BAR DISCOVERY 11
Last edited: