Centrefugal filter & Fuel filter

This site contains affiliate links for which LandyZone may be compensated if you make a purchase.

jcbdigger1970

New Member
Posts
133
Location
Chestfield, Kent
Hi peeps, trying to keep vehicle tiptop condition, due for a service and MOT late february, but I thought I would change the filters. Standard oil filter is'nt a prob, where is the spinner? how do I change, and also how do I go about changing the fuel filter behind o/s rear wheel. Mine is covererd in road dirt/rust so must be due changing. When replaced does it need bleeding?

Questions questions. hope you all can help:cool:

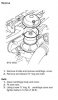
The centrifuge is high up on the left middle of the engine just under the manifold and bits.

It it easy to change, and DO fit a new O-ring when you do it.
The new can just drops onto a spindle. No clips or bugger all!

The fuel filter is in a crazy place.
I covered mine with a plastic baggy as soon as I got the car, and I make sure it all stays relatively clean. Whoever designed that place for a service item fuel filter was a total ignoramus.

Once you get it off, and fit the new one without huge gobs of grit dropping in, find a really tough poly baggy and pull it up over the filter like a sleeve, and tie it securely in place. Leave the bottom open so water and **** dosen't get trapped.

Once you are ready to fit the new filter it is a VERY good idea to fill it as full as you can with perfectly clean diesel fuel, or kerosene. This means that you have got rid of 99% of the AIR from the filter and fuel system and it will bleed MUCH more easily. The last thing you want to put in there is half a litre of Goddam air.

Bleeding is easy. Sit in seat. Leave door open. Turn IGN key to RUN position (NOT STARTER) and all dash lights are lit. Leave key ON throughout what follows. The fuel pump will run and make sloshing noises - which means AIR sloshing about. After a minute or so pump will stop. Do nothing else, but now stomp on the throttle FIVE times right down and right up, and the pump will start again. Do this till either you get fed up or the sloshy noises more or less stop.

Then try to start the bugger.

If it won't start right away, switch off, wait a bit then put and hold the throttle to the floor and THEN switch IGN on and run the starter. The book says keep cranking till it is running smoothly ....

CharlesY
 
Many thanks for that, attempting next weekend so maybe a bit worried bout the fuel filter change.

Trick might be to get an empty Heeenz Beeenz can washed out, and a 1 inch paint brush.

Put some kerosene or diesel (or better a 50-50 mix of both) in the can, put on goggles (so you don't get gritty oil in your eyes), take off the back right wheel, and give the whole filter head a good gentle scrubbing with the oily mixture and the brush.

It will soften the gruesome grot and you never know, you might get it quite clean again. Pay most attention to the top joint are of the filter - that's the danger zone when you come to fit the replacement filter.

Best NOT use petrol in case some components don't like the stuff. Anyway, it isn't nearly as good for the job as it evaporates too quickly.

Take a little time and care and all will be well. Remember, you WILL be being more careful than the average yobbo in the main stealer's shed.

CharlesY
 
I have done my fuel filter by filling with diesel, screwing it back on then starting her up - starts just the same as normal.

When fitting the new filter you have to remove the water drain tap (sedimenter) from the old filter together with the electrical connector and screw it into the new filter. Unless some filters come with new ones fitted, mine haven't.
 
not changed my fuel filter myself yet, but have heard it's very easy to damage the electrical connection on the sensor...

be either very carful when you remove it, or do it when there's a parts shop open...

maybe someone can clarify???
 
My 2004 TD5 doesn't have a water sensor fitted.

Seems like a good idea to me. One less complication I reckon.

CharlesY
 
My 2004 TD5 doesn't have a water sensor fitted.

Seems like a good idea to me. One less complication I reckon.

CharlesY

That is no bad thing, the electrial connector gets water into it and the connectors corrode. In the 4 years I have had the car, the warning light has never come on to alert me of water in the fuel, don't really see the point of it.
 
many thanks for the replies on fuel filter, will tackle when the other service items arrive from ebay, haha, genuine parts, fraction of cost.

However, still cant see the spinner location, maybe not looking hard enough., anyone else elaborate?
 
I'm doing same job on my TD5, so thanks for location of Spinner!

My peroblem is I can move the bloody oil drain plug, should I be trying with a warm engine or is it common for it the be locked up solid? I have tried pulling hard on the plug bolt head but I don't want to damage it causing more expence!!
 
Here is the location of the spinner oil filter -
 

Attachments

  • Disco Oil filter.jpg
    Disco Oil filter.jpg
    36.5 KB · Views: 3,672
I'm doing same job on my TD5, so thanks for location of Spinner!

My problem is I can (NOT?) move the bloody oil drain plug, should I be trying with a warm engine or is it common for it the be locked up solid? I have tried pulling hard on the plug bolt head but I don't want to damage it causing more expence!!

This isn't the first time we have heard from people with stuck tight TD5 sump plugs. My one wasn't tight when I first undid it, but some do seem to have been wildly over-tightened after a dealer service.

It's hard to know which "stuck bolt/nut" technique to go for in these cases. The worry is that the sump plug isn't a structural item - it only fills a hole, and so what it screws into may not be strong enough to withstand serious torque and leverage. The last thing you need is to rip the plug out complete with a circle of sump still stuck to it.

Don't use heat from a welder or blowtorch. You may set fire the the oil inside the motor.

I suggest you get a good socket on the head of the plug, and a decent bar on the socket, and try to TIGHTEN the plug a tiny wee bit just enough to feel it "move". If it does move, chances are it will come out as soon as you turn it to the remove direction. Most stuck nuts bolts and screws will behave like this. You may need to work it in and out in both directions to loosen whatever was sticking it.

But if it won't "move" and you are still feeling it is stuck, get a 4 ounce pin hammer, and tap the sump plug with light sharp raps at least a hundred times right on the head of the plug. Try again to undo it. If it won't, give it another 100 raps.

Patience will win in the end.

When you refit the plug, a good trick is to wrap two turns of plumber's PTFE tape on the threads of the plug. This not only helps to make a good oil-tight seal, but it also pretty much guarantees the plug will come out nicely next time.

Good Luck!

CharlesY
 
Last time I did an oil change, my sump plug would not budge - even though I had been carefull not to over tighten last time I did an oil change.

The flats of the bolt head started to round off and as it sits into a recess in the sump, its not easy to get to.

I tried to hammer on a slightly smaller imperial socket but gave up with this incase I damaged the sump.

In the end, we used the gas welding torch to heat the plug then quickly got the socket on and it came off.

The sump plug now has a good quality nut welded to the chocolate like material of the original - this sticks out from the sump recess as well to give better access.
 
Back
Top