TD5 90 Project

This site contains affiliate links for which LandyZone may be compensated if you make a purchase.
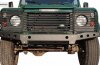
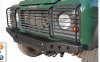
Fronts done today, took about 2.5 hrs old ones not as bad as rears but still well on their way out! Also changed the track rod ends for Lemforder new ones while I was there.

Next week A frame.
No doubt that will be a right giggle........and chance to skin my knuckles, smash my fingers, shout CNUT very very loudly, chuck spanners and generally decide I should stop sodding about with midlands happy shopper rust buckets, and should have bought a Unimog and be done with it, so yes i will be throughly enjoying myself with my Fender! All will be forgiven once its down iff the ramps o course!
Rumour has it that @bankz5152 has done three A Frames now, not sure its that cos the first two fell off though :p

PS have a sticker if you spotted I used the wring bolts for the Front Radius arms, they will do for now, until the correct ones come, and have been fully anti fret-ceramic spray greased so should pop back in in a jiffy.

IMG_8339.JPG
IMG_8338.JPG
IMG_8340.JPG
IMG_8346.JPG
IMG_8348.JPG
IMG_8349.JPG
IMG_8350.JPG
 
Last edited:
If polybushing, aframe arms aren’t that bad to do. As you know, wire wheel on bolt threads and leave soaking. I did 110 a frame arm removal yesterday. I expected to be jumping on a scaffolding bar but cracked the nuts in 5 mins :D
Loving the green arms :cool:
 
If polybushing, aframe arms aren’t that bad to do. As you know, wire wheel on bolt threads and leave soaking. I did 110 a frame arm removal yesterday. I expected to be jumping on a scaffolding bar but cracked the nuts in 5 mins :D
Loving the green arms :cool:
cheers mate, yep radius was a doddle really heard lots of horror stories, just used a podger to line up holes etc.
A frame is just a sod to get to etc.
Mind you i have read that some have major problems with the oil filter on a TD5, honestly they want to try working on a Lancia......
The main problem is corrosion, so soak, shock, heat if still not moving, don't waste anymore time or knuckles, just cut the thing off.
 
I forgot that you’d be doing it with body on. Are you removing the brackets from subframe as I think you need to get a spanner on heads. Also, two point down, one points up on those brackets. They aren’t done up to a major torque but you’ll struggle to clean threads on the upwards facing bolts :rolleyes: .If not removing it’s obviously just the big arm bolts. I did mine with scaff bar on breaker. They don’t sit so close to chassis on fender.
Fulcrum nut was a complete pita on d1. I cut that off. I’ve already started soaking that on the 110. When I undid the bolts through the fulcrum and arms the ball joint just sagged lol. Think it might be dead :D
You can see below one bolt on each side is upside down that connects the a frame arm brackets to cross member

327EEAEB-75A9-4A20-A81F-25AABB20DE08.jpeg
 
NEXT UP:

SupaPRo A-Frame complete with Lemforder BJ, all served with a side order of SupaPRo Panhard rod all garnished with Corroloess Glass reinforced paint......mmmmm tasty! ;):D


IMG_8409.JPG
IMG_8412.JPG
IMG_8413.JPG
IMG_8416.JPG
 
Have you noticed anything driving it after the new bushes?
yep,
The cab now goes in the same direction as the chassis, instead of two playing cards with one rotated a bit,& when you pull away cab moves with the wheels instead of like a slingshot a second later. :p:p
Seriously though just all round much firmer, tighter and now the only thing that rattles when you hit bumps is the coins in the ashtray etc.
The ride is perfect, more like a car, less sloppy and vague.
The supa-pro are spot on ride wise, perfect slightly to the firm side of centre really.
AFRAME is final piece ein puzzle, then its onto Swivels then repair doors n paint, and then.....

Well I am truely stuck nothing else to do, so i guess i will go LED hunting and start sodding about with lights again, rally want to flush fit some "gandalf staff type" tiny reverse lights.

Maybe @bankz5152 style bumpers I like what he has done with his front end, it looks like it wants to eat a Prius a day for breakfast, :Detc
 
Primer............ Corroless Rust Inhibitor
Paint.............. Corroless RF16 Glass reinforced chassis paint
Colour............ RAL6009 (Closest match to LR Epsom Green)
 
lol which is? imperial deep offset i think? obvious really when everything else on the thing is metric, how did i miss that?

what size though?

I think I ended up using a 33mm spanner after trying about 7 different ones :oops:

I can check for you when im back from Croatia :cool:

Maybe @bankz5152 style bumpers I like what he has done with his front end, it looks like it wants to eat a Prius a day for breakfast, :Detc

Well it has eaten a Golf and have a van a good lick :eek::p

Its a damn good bumper, very well made and very heavy duty. Though was on the spendier side being D44!

As for lights Equipe do a very tidy reverse light mount that replaces the number plate light and adds a small top led. Might get one for when the canopy is fitted.
 
Yea, i do like the D44 but its pricey etc, i dont tend to do as much 'tunnelling' as you though.;)

I had a look at Equipe, they seem to do just the standard ebay Chinese led stuff, nice to see they don't bump up the price though, but I thinking about this for bumper and flush mount reverse etc
 

Attachments

  • Screen Shot 2019-08-09 at 18.34.00.JPG
    Screen Shot 2019-08-09 at 18.34.00.JPG
    133.9 KB · Views: 229
  • Screen Shot 2019-08-09 at 18.34.08.JPG
    Screen Shot 2019-08-09 at 18.34.08.JPG
    75.1 KB · Views: 219
  • Screen Shot 2019-08-09 at 18.34.57.JPG
    Screen Shot 2019-08-09 at 18.34.57.JPG
    56.3 KB · Views: 216
  • Screen Shot 2019-08-09 at 18.35.21.JPG
    Screen Shot 2019-08-09 at 18.35.21.JPG
    72.5 KB · Views: 252
Just an hex perry ment,
The HD flanges are allegedly zinc coated, really? they have been in a room where someone once said the word zinc maybe just maybe....
Any hooo I gots to finking, buzz wheeled em, 3 coats of my favourite primer and rub back and 3 x LR epsom green metallic No lacquer as yet ..
IMG_8558.JPG
IMG_8559.JPG
View attachment 187807
IMG_8561.JPG
 
This is my high spec professional spray booth and paint bake oven, looks surprising like a tin shed I grant you...:cool: Final bake the inside for Lacquer


IMG_8564.JPG
IMG_8568.JPG
IMG_8569.JPG
 
Back
Top