Steve Noakes
Active Member
- Posts
- 131
- Location
- Sussex
Having bought the 110 from a great guy in Sussex, he builds steam cars for a hobby so the engine and underbody were in good condition and it runs great at 70mph.
The body and inside are the first small projects.
- Thorough clean inside which brought up the white internals a treat
- New radio and alarm, so nice to work on a vehicle with standard wiring and no laptop needed
- Found cheap central locking solenoids in Maplins so had to install them in the Landy. Used S/S flexible tap connector braid (£1.50 from Screwfix) to protect the wires which works well and looks good too. Works with the alarm so one click action to lock/unlock
- Went to LandRover Fest and bought new rubber flooring for the rear and bench seats which are too long but will be a project to shorten them (they were a bargain that had to be had)
- All door bottoms are rusted through, bought repair sections and will repair each door instead of replacing with new one
Please share thoughts, comments and advice.
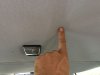
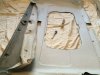
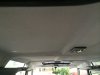
Remove roof lining and stick vinyl back in place
The roof lining vinyl is in good condition but had suffered the common delimitation from the backing material.
The lining sections were removed relatively easily using trim extractor tools.
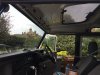
Roof is in very good condition.
I took the opportunity to add soundproofing to the roof panels to reduce the running noise.


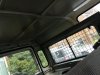
I stripped and re-stuck the vinyl from the linings which lasted nearly a year, then started to delaminate again.
So, finally had to buy new complete linings - see below for updates.
Refurbish the front plastics which have bleached to a dull grey
The front plastics have bleached so next job is to refresh them and clean up the metal work in the radiator bay.


Searched the internet and forums and chose
Forever Black Bumper & Trim Cleaner & Reconditioner Dye Kit
purchased from Amazon, delivered next day.
First step is to clean the plastic thoroughly using the supplied detergent and let it dry.
I'll post the photos in a few days once the refurb is complete.
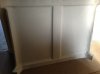
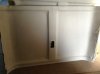
Cut down and install the rear seats
The bargain (£10) rear seats from LandRover Fest are too long for the 110 so instead of selling them on and buying new seats at much higher cost, we decided to modify these ones instead.
The seats were in OK mechanical condition apart from surface rust and the vinyl was in good condition except the retaining plastic clip had failed in a few places so the vinyl didn't look great.


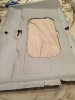
The seat was 165mm too long so first job was to cut 165mm off one end. All welds ground off and then metalwork cut down to size.

New mounting brackets were also welded into the new framework to pick up existing fixing points.


The re-welded frame was given 2 good coats of Hammerite and the support brackets in the wheel arch removed, de-rusted, and coated in Hammerite and Waxoyl underseal when installed.
New riv-nuts were installed for the lower seat mounting.
Most of the existing rivets had rusted badly so were drilled out and replaced with new XL head rivets. Underside covered in Waxoyl underseal and top painted with white Hammerite to tidy up the surfaces.

The top seat back vinyl was removed from the metal backing to replace with 9mm ply which was easier to make to the new length and also to resolve the vinyl fixing problems.
 9mm ply replaced metal backing.
  Vinyl stretched and stapled to ply, tidy fixing
Seat frame re-installed and new carpet is planned to be installed as the old carpet had too many un-used holes in it. Whilst fitting new carpet, took the opportunity to install additional underlay soundproofing.


New carpet installed on both sides, looks much better.
Last task was to modify and install the lower seat cushion. A few well spent hours with the sewing machine
and it looks good and fits perfectly.
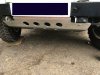
Repair and refurbish side steps
All 4 of the steps had seized up due to lack of use and rust.
The steps were removed after a fair amount of "coaxing" on the fixings, some of which needed grinding off to release the brackets.
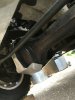
New riv-nuts were installed where the old ones had rusted solid. Made a riv-nut install bar from YouTube videos, works great and much cheaper than buying an install tool.
The steps were stripped to individual piece parts, sanded down to remove all rust using flap wheel and wire brushing wheel in a 4" grinder.
2 good coats of Hammerite and plenty of copper grease on the bolts and the steps look a whole lot better.
Step rubber were rivets replaced with XL black head rivets, look good
Before - rusted solid


After - refurbished, fully operational, and wife happy....
First jobs - replace radio and install alarm and central locking to front doors
Replacing the radio was relatively straight forward, the speaker cable connectors were compatible but a little bulky for the installation space, a bit of tugging and poking put everything in the right place.

The alarm was a good rated unit from ebay with the reseller local to me in case of any issues. Installation easy enough, good instructions supplied and key fobs are solid. The alarm is capable of triggering central locking solenoids which was one reason for its choice.

The central locking install to the front doors was straight forward for the mechanical installation, the electrics took a little time to plan how to get the wires into the doors as they weren't designed for cable entry. The stainless steel braiding from 15mm tap connectors turned out to be effective solution and only cost £2 each. The braid provides flexible movement and good protection for the cables, looks good too when door is opened.

2nd row of doors will be done when their bottoms are refurbished.
New front mudguards were installed to replace the old ones as the brackets had rusted badly and weren't worth repairing. Quick delivery from Paddock Spares and a few hours removing the old brackets, drilling out seized riv-nuts, installing new rib-nuts and vigorous wire-brushing of the chassis ready for copious waxoyl undersell. Job done.

Attachments
-
 IMG_5332.jpg90.2 KB · Views: 268
 -
 IMG_5334.jpg124.2 KB · Views: 273
 -
 IMG_5336.jpg192.4 KB · Views: 272
 -
 IMG_5338.jpg197.7 KB · Views: 301
 -
 IMG_5341.jpg182.7 KB · Views: 262
 -
 IMG_5342.jpg230.1 KB · Views: 265
 -
 IMG_0718.jpg103.2 KB · Views: 246
 -
 IMG_0719.jpg107.8 KB · Views: 231
 -
 IMG_5346.jpg125.4 KB · Views: 250
 -
 IMG_5345.jpg163.1 KB · Views: 240
 -
 IMG_5357.jpg86.7 KB · Views: 244
 -
 IMG_5358.jpg89.5 KB · Views: 447
Last edited: