Carry on from 'Project Big Blue'

This site contains affiliate links for which LandyZone may be compensated if you make a purchase.

b3nc123

Active Member
Posts
227
Location
Derbyshire
So its been a while since i last updated my project thread http://www.landyzone.co.uk/lz/f8/project-big-blue-208729.html. But i decided to start a new one seeing as the car isn't actually blue anymore.

Just wanted bring people that were interested in the last thread upto speed.

After using the Landy as it was for the remaining months it had left on the MOT it came to a few weeks before when i asked a mate who's a tester to have a quick look over it and see what would need doing. The main points that were picked up on were the side repeaters going like stink because i had removed the ones out of the rear bumper, the headlights needed adjusting and the rusty sills.

After fixing the first two i had a look at the sills, taking off the plastic cover revealed a couple of little holes.


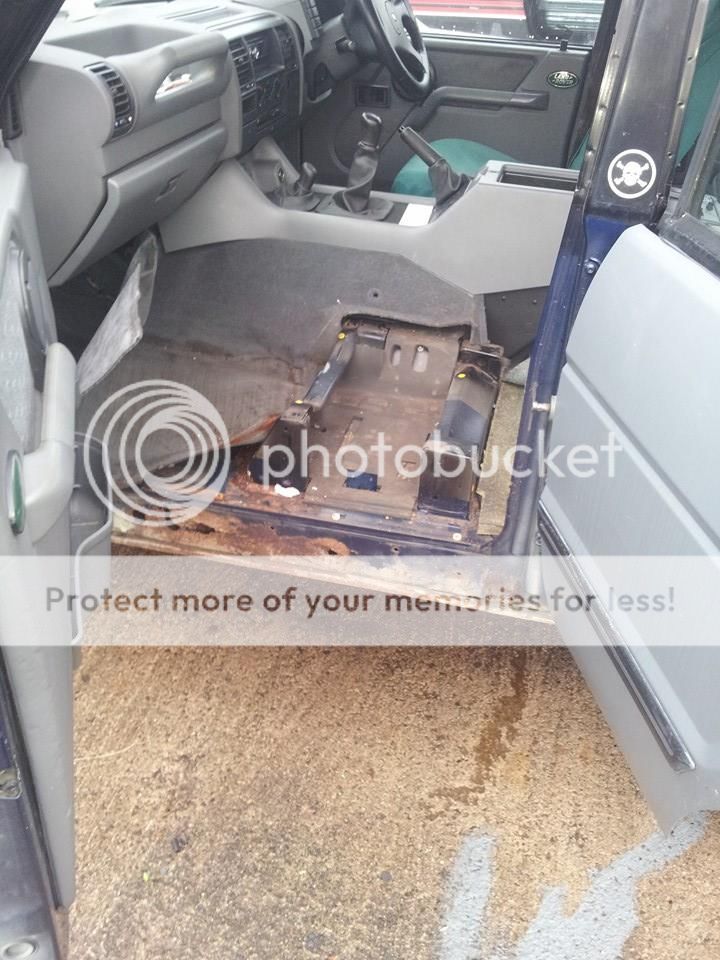
On further inspection it turned out the previous owner had done a 'quick fix' and decided to silicone a strip of metal over the original none existent sill on both sides before covering the whole lot in underseal. So out came the angle grinder and, starting with the nearside...


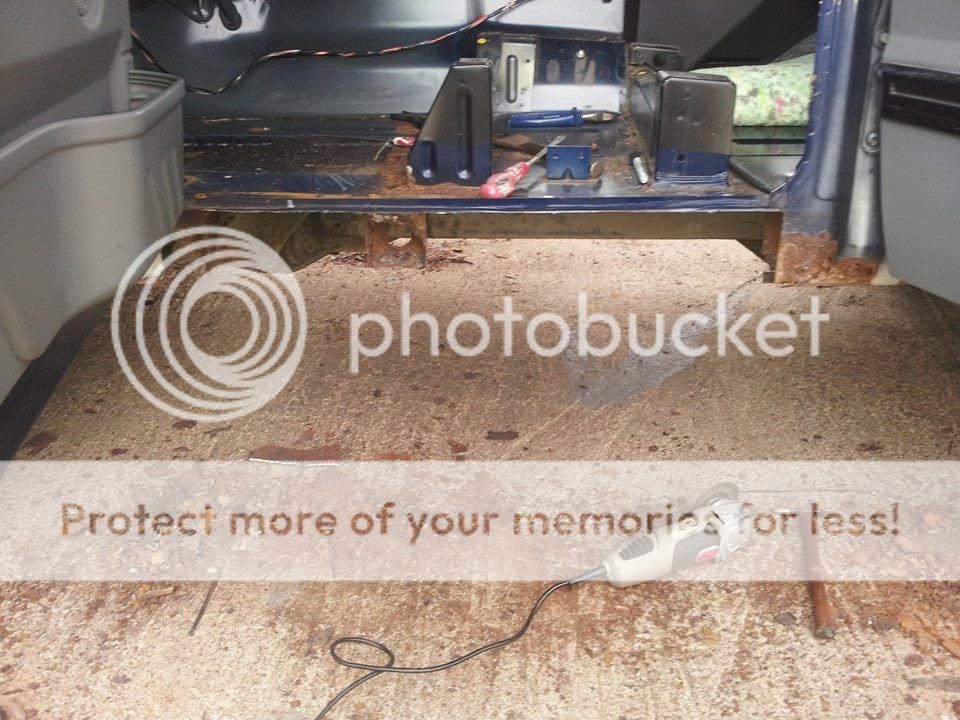
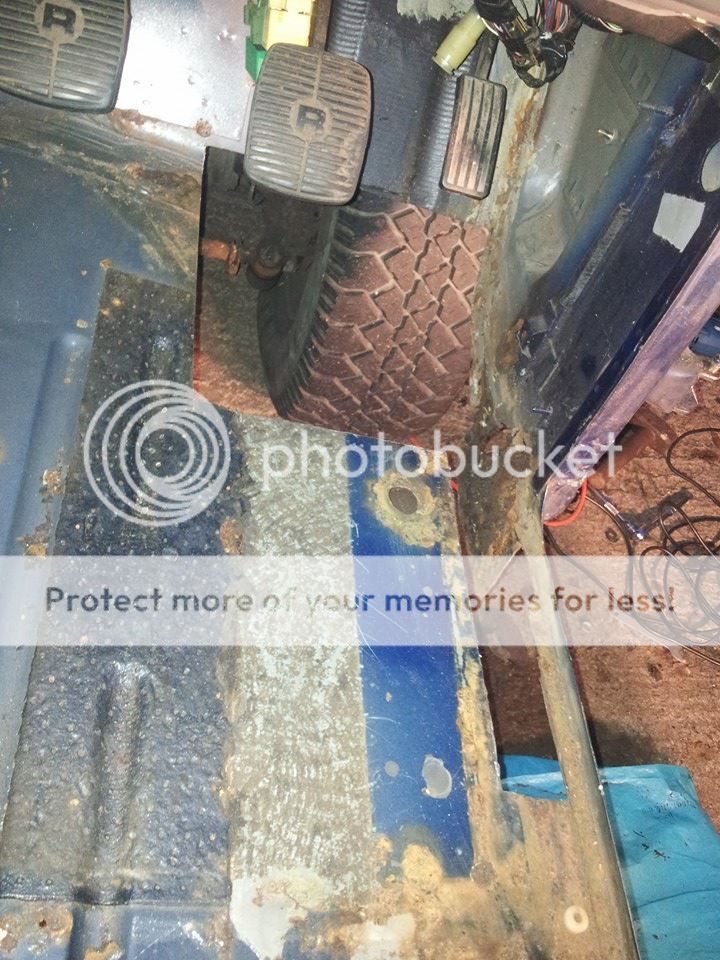
After seeing how soaking wet the spongy sound proofing was i wasn't surprised a couple more holes appeared in the foot wells.


I then set about about patching up the floor before tackling the sills.


The weldings not the prettiest in places but its slowly getting better.


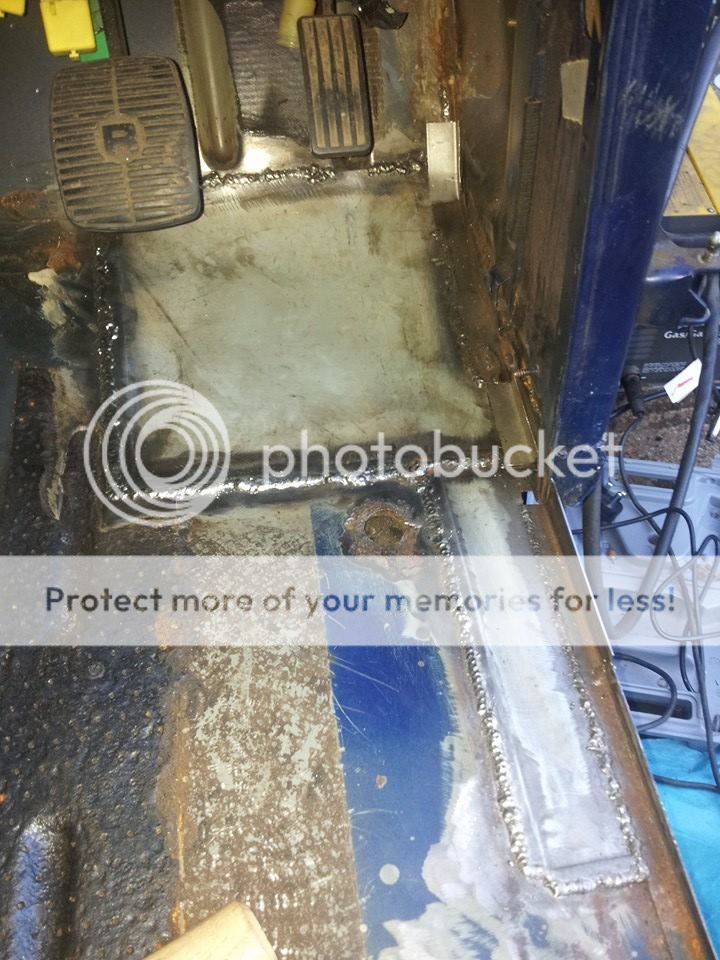
After that it was time to tackle make the sill replacements.
 
After going about things the wrong way i ordered some box section of various shapes and lengths. I then sat down and worked out how i was going make my sills and tree sliders, stupid i know.

I had ordered 3m of 60x100, 4m of 50x50 and half a meter of 90x90. I ordered the 90x90 last minute because a friend convinced me into making my own body mounts.

I'll let the pictures and a bit of inspiration from Green Hornets thread unveil what design i ended up having to use.


Looking at Green Hornets thread i decided to slit the section to get a better fit


I wanted the tree sliders to be longer but unfortunately i was limited with the metal i had. Hindsights a bitch!

I then started work on the body mounts and also made some floor to sill mounts out of 2mm thick plate i had lying around.


To finish off the body mounts i used some of the 2mm plate to make a 70mmx70mm packer (with the same diameter hole drilled in it) this was then tacked on top of the body mount. For some reason i never took any photos though.

After a lick of paint the sills and sliders were then offered up to the body mounts which i had already bolted in place before being tacked in place.


And this is where i am at the minute. Need more welding gas before i weld it all in place but i will get there in the end!!

Cheers Ben
 
Noghing wrong with that welding mate! And hey thats what the angle grinders for!! Smooth it out baby! Lol... nar seriously, looking excellent so far... keep the pics comjng... got to tackle my inner archesnon my classic soon so need the inspiration! Lol
 
Cheers for the compliments mate. Im surprised the angle grinder hasn't given up tbh lol, its had some serious use! More pics to come at the weekend hopefully. Glad its helping with the inspiration as well, be sure to stick up some pics when you do the arches!
 
So with the ****e weather putting a stop on things I have been forced to stay in and catch up on other things.

I have realised that when tacking the body mounts to the sills i now have no way of getting it back off the truck so i can weld it properly before putting them back on and welding the rest of the sill in place. With this in mind i am going to put the 2inch body lift on i bought the other week

(still waiting for the bolts)

Method will be to
- Grind off tacks and remove sill and body mount
- Install the body lift all round
- Bolt the homemade body mount in place with the new bushes washers including the 2inch spacer onto the outrigger
- Offer up the sill again and tack the body mount in place
- Un bolt the body mount and slide out the 2inch spacer, hopefully this will let the sill drop enough to clear the A and B pillar sections so i can weld it properly in the garage.

Main reason for doing it this way is to be sure the body mount is in the right place before it gets welded properly but i'm open to suggestions if anyone knows of a better way of doing it?

Cheers Ben
 
Looking good my friend, that welding looks spot on (no pun intended). I wish I had the balls to carry out work like this instead of always relying on a garage but I just haven't got the confidence. Look forward to your updates.
 
Good job on sorting the rot best way to do it cut it out and start again that welding looks good and will grind out

good luck
 
Bit of an update. My longer bolts arrived so today i spent half the day undoing all the bolts required for the body lift. The dremmel with the flexi extension and a little wire wheel came in handy for cleaning the threads before i started undoing things, as well as some trusty plus gas :)

Found some good threads on this Forum to provide the info i needed, most of what i needed to know was on this thread. http://www.landyzone.co.uk/lz/f8/disco-body-lift-66411.html

Having looked at steering column i'm not sure if its long enough but guess ill find out tomorrow, weather permitting!

Also found more rust when undoing the rear body mounts :mad: another job on the list.

Fingers crossed for good weather tomorrow and things go to plan... :rolleyes:
 
Thought i'd just bring this thread up to speed :)

As usual things are taking far longer than i expected but oh well, im in it for the long run.

Found a little hole at the rear of the car when i was doing the 2 inch body lift.


Welded and painted


Once the 2inch left was done the sills went on they're now welded in place and seam sealed. In my previous post (those many moons ago) i thought i would need a longer steering column but this turned out to be not true. Using the threads on here it was a pretty easy task to be honest.

It stayed like this for a few months then.


The motivation for finishing it off kicked in a couple of weeks ago when i purchased these:


Purchased them off a fellow LZ member and got some 30mm spacers as well.

There's no way i could have got away without extending the arches so the weekend after these went on.


Once again, searching on here brought up some really good threads on how to do it. Think i'm going to go for a Mr Noisy method and use expanding foam to fill the gap in the rear door, once its set ill cut / sand it back then apply a liberal coating of tiger seal.

Things i need to get done before the MOT:

Fit the extended seatbelt anchors.
Cut and re-weld the front bumper.
Cut and re-weld the rear bumper.
Fit extended break hoses.

Cheers

Ben
 
Last edited:
Got a few goodies to put on this weekend :)


+4inch extended brake lines
extended bump stops
heavy duty steering bars

I also got the extended rear seatbelt anchors made out of these:


They were fitted last weekend :)

Cheers

Ben
 
So after a couple of weekends slowly plodding on. The steering bars, bump stops and finally the extended brakes lines are on. The brake lines took longer than expected because we all know nothing is ever a simple job when we are talking about Landrovers. Seized unions and bleed nipples have nearly got the better of me this weekend but plus gas and patience won in the end.

After a bit of reading up i also treat myself to a new defender style steering damper (eye/pin) and the relocation kit sold by Glyn Lewis.


Took it for a little spin up the road after bleeding the brakes, makes such a difference!

Cheers

Ben
 
With the front end sorted i'm now focusing on tidying the back of the truck up. This afternoon i finally decided what i was going to do. I dont like how far the chassis rails stick out and because of the bodylift it all looks a bit strange.

So the grinder came out


I then didn't like how much the supporting beam (don't know the proper name) underneath the tailgate sticks out so they were profiled to something like this


And thats all i've achieved so far. Tomorrow i plan to weld the cross member back up with some 5mm plate and the sides with 2mm. I've also got my hands on 60mm diameter tube so the plan is to make a tubular rear bumper of some sort but i don't expect to get that done tomorrow.

Cheers

Ben
 
Little bit more done today.

Used a bit of 50 x 50 box to put back any strength that may have been lost from tapering the edges.


Then cracked on with plating the sides up.


Ground the welds back then the rain came :mad:


Think the profile looks a bit better now. Just need to find some bungs that will fit the holes for the body mount bolts. Any suggestions how i can make them, or even buy them?


Hopefully get some paint on tomorrow then make a start on plating the chassis and making the bumper :)

Cheers

Ben
 
Another little update.

Recovery eyes turned up so they went on the front bumper.


Got my hands on some 54mm diameter 5mm thick tube and a couple of pieces of angle so spent most of the weekend playing with the grinder and welder to plate the chassis back up and make the rear bumper. Coming on slowly :)


(one weld wonder :D)


Never really liked how some bumpers added a lot to the overhang of the truck so tried to bring it all back in as much as possible (without bobtailing it). Since the front bumper is now tubular i wanted the rear to be the same as well. Ran out of gas to weld the brackets fully :mad: the bumper will then get welded to the brackets. That'll be a job for next weekend.

Cheers

Ben
 
Just a small update, booked in for its MOT at 10:00 tomorrow. Fingers crossed it passes. Itching to get out and have a little play.

Not welded the rear bumper on just yet as i think i'm going to make some hi-lift jack points for it. Still working out how i'll make them at the minute, plus i still need to get me welding bottle exchanged.

Also a set of light guards came in the post the other day


They're for a 200tdi but they look better and chunkier than the 300s so i'm hoping they'll fit. If not, ill make them :D

Cheers

Ben
 
We now have an MOT!!!

Also refitted the clear indicators (only just got round to buying some more orange bulbs) and retrofitted the number plate until i think of a more permanent solution.


Need to crack on with the rear bumper and get the light guards fitted then the exterior will be just about done.

Now all i need to do is find out when / where the nearest pay n play / laning day is and get my ass to it. Itching to have a play in it.

Cheers

Ben
 
Some cracking work there mate! :)

Really like what you've done with the rear crossmember/chassis with regards to chopping it back a bit.
Giving me some good ideas as I'm planning on a body lift very soon and can't think of decent solution for the rear bumper. :eek:


Anyway keep up the good work! It's a very nice looking disco. :)

Looking forward to the next update! :D
 
Back
Top