Cubby Box Photos

This site contains affiliate links for which LandyZone may be compensated if you make a purchase.

Landyjd

Active Member
Posts
333
Location
NZ
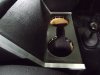
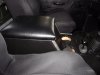
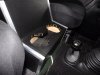
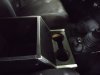
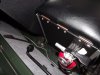
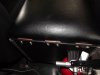
I promised I would post some more photos of my homemade cubby box (we all like pictures :)) once I had put some aluminium trim on and carpeted the bottom.

So here you go:
 

Attachments

  • DSCF7495.JPG
    DSCF7495.JPG
    218.8 KB · Views: 841
  • DSCF7492.JPG
    DSCF7492.JPG
    285.8 KB · Views: 624
  • DSCF7493.JPG
    DSCF7493.JPG
    270.6 KB · Views: 947
  • DSCF7496.JPG
    DSCF7496.JPG
    305.3 KB · Views: 790
  • DSCF7497.JPG
    DSCF7497.JPG
    153 KB · Views: 520
Some pics of the back of the box where I also added some trim. Hopefully you can tell what you are looking at, it's an awkward place to photograph.
 

Attachments

  • DSCF7500.JPG
    DSCF7500.JPG
    278.6 KB · Views: 922
  • DSCF7501.JPG
    DSCF7501.JPG
    198.4 KB · Views: 398
  • DSCF7498.JPG
    DSCF7498.JPG
    143.9 KB · Views: 326
thats very good...... how long did that take?

Fitting the aluminium trim was not as time consuming as I imagined. For the 90 degree bends at the front I just cut a triangle out of the aluminium angle and bent it which gave a nice result. The trim at the back was easy as it is just a matter of cutting to length and then filing the ends.

The hardest and most time consuming part was getting the two cuts correct on the non-90 degree angle where the sloping front of the box meets the horizontal part. I am quite fussy so I spent a while making sure they butted up correctly.

If you are reasonably skilled you could probably do this in half a day, though I took a little longer. It is worth the result though and I am very pleased with it.
 
Back
Top