The Little Discovery That Could (financially ruin me)

This site contains affiliate links for which LandyZone may be compensated if you make a purchase.

Tango91

Well-Known Member
Posts
140
Location
Bideford, Devon
New Disco, who dis?

Tom from the future here, turn back now, it's not too late to stop reading


IMG_4598.jpeg

So yesterday I made the biggest error of my life to date and and picked up this 99 TD5 GS for £1900. I'm pretty happy so far. Just over 200k miles, Structurally it seems really good. Minimal-ish rust. Mechanically... we'll see. A few months ticket left on it, which by my reckoning means i might actually make it to the next MOT before it explodes. My vehicles usually don't.

I told the SO that some people spend thousands on useless things like drugs or tickets for reformed 00's boy band gigs, so why shouldn't I invest in this future classic? But she still seems pretty mad for some reason. :rolleyes:

I picked this up off a nice couple on a farm near Salisbury, and now the task before me is to un-farmify it, by which i mean I'm going to slowly replace the wood screws and zip-ties with proper fasteners, the duct tape with electrical shrink-wrap, and the baling twine with proper wood screws and duct tape.

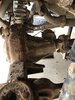
Please note the entire front clip and lights held in with cable ties. Only one of the headlights has decided to work today, which is nice.

First step has to be the crank pulley/dampener which sounds like a bag of spanners in a washing machine:


Followed by replacing the indicator fluid which is dangerously low and looks like it hasn't been replaced in years:

IMG_4594.jpeg


I'll be mostly probably posting interesting things I find along the way.

Peace.
 
Last edited:
Interesting way to hold in headlights!

Good luck with the new Landy. Looking forward to seeing it progress.
 
Got stuck in today.

I replaced the broken crank pulley and damper unit that was clattering. I ordered a used unit and a new bolt from Turners for ~£50. She runs like a top now, quiet and smooth. Chuffed with that.

Interestingly I found a few tricks to make replacing the damn thing easier than the guide on http://www.discovery2.co.uk/CrankPulley.html. and it actually took about an hour from start to finish.

  • I didn't bother with the tool to hold the waterpump pulley so that the viscous fan hub could be unscrewed, I used a long fairly sharp drift and just hammered the left hand edge of the nut until it broke free then just unscrewed it.
  • Similarly I didn't bother fabricating anything to hold the crank, i just put the car in 5th with the handbrake on, which worked ok.
  • To unscrew the big bolt holding the pulley on the crank, as others have done, I rested a long spanner on the passenger side frame rail and spun the engine over. However I unplugged the injector harness at the front of the head so it couldn't fire up and throw the spanner across the shop/through the radiator. A few tries before it went, i found it worked when I gave the spanner a bit of a run-up to the frame rail instead of putting it close.
  • To reinstall and torque the centre bolt I used a stonking great 3/4 drive torque wrench that's about 5 feet long. To clear the bonnet I took the bonnet prop out of the hole and wedged it against the top of the cylinder head cover with a block of wood to hold it higher. This allowed the bonnet to clear the handle of the torque wrench. I torqued it with the car in 5th and the handbrake on and it worked just fine.

I also took the opportunity to change out the auxiliary belt because damn:
IMG_4616.JPEG


So that all worked well.

Here's the bad damper unit in action: https://youtube.com/shorts/hvm-OZ6jq-I?feature=share

She sounds better now even when she's stone cold: https://youtube.com/shorts/o7_PQL-jwyw?feature=share


Then I figured I'd take a look at the air filter:

IMG_4622.JPEG


There was no air filter. Fantastic. the MAF screen was full of leaves and dead flies. Also, the airbox was 1/4" thick with dusty dried mud, like everything else on the front of this car.

I've heard of a few people that bought a used TD5 disco to find that the filter was gone, is there any sane reasoning behind this?

Then I finished up by welding the bias plate from the bottom of the gearstick assembly back together as it had snapped and the stick defaulted to between 1st and 2nd.

IMG_4626.JPEG


I know you can get them for like £12 but why spend when you have MIG? Now the gearstick returns to centre and I can find 3rd and 4th on the first try, which is nice.

I'm chuffed to bits with the way it drives now, hopefully new drag link ends will take a bit of the vagueness out of the steering.

A question: my car had air suspension but was changed for springs. How was the compressed air generated? If there was a pump and it still exists could I modify it for filling tyres etc? (read: air horns)

Cheers! :D

EDIT: The better half has informed me that she's 'slowly forgiving me' and thusly has named the Discovery "Dorothy" despite never having actually sat in it or seen it in the daylight. Women, eh?
 
Last edited:
There's an air compressor unit mounted to the outside of the chassis rail under the passenger side for the air bags, if it's still there.
 
There's an air compressor unit mounted to the outside of the chassis rail under the passenger side for the air bags, if it's still there.

It is, a WABCO unit, something to think about for the future.

On today's episode of 'Fixed in the Farmyard':

IMG_4645.jpeg


I don't actually know what on earth this "sealant" is but I'm leaning towards glazing putty? It's soft but, mercifully, can be rubbed off with your fingers. It's also EVERYWHERE on the roof and roof windows. Which still leak so mission accomplished i guess. :rolleyes:

Suggestions for a temporary not-farmer-fix? Aluminium tape? That thick clear vinyl weather sealing tape?

And on tonight's episode of "I'm sure that wasn't there when I looked at it before I bought it"

IMG_4644.jpeg


Oh well. Out with the grinder and wire brush to see what's left, followed by the welder and heavy steel plate. Followed by a half-chassis kit at some point, I don't doubt. I'm glad I have access to a commercial workshop and lifting equipment!

The actual rear tails of the chassis look pretty good (please god) but this is where the spring mounts attach, which I wasn't aware tended to be a particular problem?

Roll on Sunday so I can have a look/cry/buyers remorse/welding session.
 
Great write up so far. Really enjoying reading it.
Humm chassis rot on a D2, who would have thought it!

I don't think that there is a decent temporary fix to the sun roof. Better off striping them out and overhauling them.
 
As a complete aside, can anyone identify the wheels on this disco? I’d imagine they’re probably factory Land Rover wheels, but what kind?

700B819B-C644-45C0-ADAC-1885021282EB.jpeg


I have a pathological hatred for alloy wheels on off-road vehicles and I think deep dished steels are a bit overdone.

Wish me luck for the big chassis needle-scaling event tomorrow! :confused:

Thanks!
 
Your prediction was spot on, now say “you are suddenly going to come into great wealth” :D

I lost my old D2 "Jerry" to terminal chassis rot.
Back then I was skint and didnt have the confidence to do a chassis swap. What a fool I was.
 
Also don't poke that chassis too much, probably will end up with nothing left lol
^^ Ominous foreshadowing.


A cautionary tale for you folks tonight.

So, did you ever have one of those days? I've got a double gin on the go and more looks imminent so I shall explain.

I learned a few things today.

First was that there's a special place in hell for whoever decided to put those stupid chrome caps on the wheel nuts and cutting the damn things off so I don't have to hammer on a socket every time is quite high up my priority list.

Second, My disco apparently has one of those fancy transparent anti-roll bars in the back with the bluetooth drop links. Which would explain why the door handles drag on the pavement when you go around a corner. (Is that an MOT failure?) :rolleyes:

I guess that's on me for not checking but in my defence, I've not owned one of these before so I didn't notice it by it's absence. Oh well.

Third, the rear chassis legs don't look too bad behind the spring perches. Which is nice.

IMG_4656.jpeg


Unfortunately things go downhill a bit here

The front of the chassis seems to be in excellent (if muddy) condition. But from the body mounts in front of the rear wheels to the bracket for the watts linkage...

IMG_4657.jpeg


:oops: Oof. Once you start with the needle scaler there's no going back.

Liz Truss said it's disgraceful that we import cheese, but let me tell you, there's some bloody fantastic aged swiss made in Solihull right here.

I guess that would explain the lack of ARB, the mounts are... not.

The rot is on both sides of the chassis leg and on this outer side it goes all the way to the body mount outrigger, which it has also eaten part of. I can only assume the spring perch was the only thing holding the back of the car on.

This was at about 10am this morning, (Sunday) and up until this point I'd been having a reasonable day.
I'd just bought some cans of zinc primer and stone guard paint in anticipation of a straightforward patch job. (Ha!)

Now, A dilemma.

it's taken me 301/2 years to get myself the land rover I always yearned for and here it is. And after this, her indoors won't entertain the thought of another one. So I browsed around a bit looking for a hitman for hire but they all cost more money than I've got.

I could sort of see which way the wind was blowing and I know you can get a half-chassis for about a grand or so, which I also do not have the money for at the moment, because adulting is hard. So I'm going to have to save up for a few weeks. So this one needs to not snap in half for a few weeks until I'm less poor.

Right. A Plan.

So off I went. I'm lucky to have the use of the workshop at the yard where my crane is based, and I know where the fitter hides the keys to his snap-on toolboxes. :D

You probably know the drill, cutting out rust, grinding, cardboard template, cut the metal, fit it, change it, start again because you ballsed it up, tack it in, blow holes through the rust you're trying to weld to, cut it back some more, have a drink, another template, etc.

IMG_4667.jpeg


Mercifully, the bottom of the box to the left hand side of the welded seam was pretty solid for most of it. Here I'm replacing the bottom and corner with a section cut from some ~2mm walled box section.
Please excuse the welds, I am not proud and welding to rusty metal is not my forte.

IMG_4668.jpeg


That went in... okish except for at the back where the chassis section that went inside the spring perch is just completely gone.

I took a break for a cup of tea and to rock backwards and forwards in the corner while hyperventilating for a few minutes, which i always feel does you a world of good.

I cut a lot more rot out of the side of the chassis leg, the spring perch, and the shock mount which was skeletal at this point and started roughing out the side, working forwards to where it was less bad.

IMG_4669.jpeg


Again, please excuse the fugly welds, i swear I can run a nice bead on clean metal that isn't upside down two feet off the floor. Note the shock mount trapezoid-skeletal-thing that's all that was left after a good scaling.

IMG_4670.jpeg


After these two, I added one more of these thick (~5mm) plates, which i neglected to photograph, that slid in under the remains of the shock mount and tied into the not-entirely-awful "metal" that headed off down to the body mount outrigger. This bit had a few small holes in it so for good measure I added a thin ~1.5mm plate to the outside of it just in case.

IMG_4671.jpeg


Also filled in the bits I had to cut out of the spring mount there where the ground lead is clamped on.

I would have taken the shock completely off but the top bolt just felt 'wrong' despite moving which set off alarm bells; I was NOT in the mood to try and extract broken bolts from mission critical systems at this point in the proceedings.

I tidied up a few bits, added a bit to tie the bottom of the member to the reasonable metal where the watts linkage bracket was somehow still existing and whole.

Then I gave it a coat of zinc primer because we wouldn't want it to RUST now, would we? o_O

IMG_4674.jpeg


So not wonderful but hopefully less ticking-time bomb. I didn't even attempt to start on the inside of the chassis leg or, god forbid, the other side because a) It was about 8.30 pm and b) I'd learned my lesson and put the needle scaler back in the drawer. And c) because I don't dare at this point.

I tidied up and drove it carefully home, and when I went inside, brown from head to toe from the rust and dust and grinding and looking like a puppy that had been kicked, my wonderful, understanding SO who I do not deserve asked very diplomatically how bad it was, then told me i was an idiot and that she'd told me so and how much was a half chassis for the damn thing because I couldn't be running around in a screaming metal death trap.

I wasn't expecting it but she took pity on me (I really don't deserve her) and offered to lend me the bulk of the money for a replacement half, but she did take great pains to emphasise again that she'd told me so and she was right about the Jimny blowing up as well and that my next car would be a boring economical box and I wasn't even listening so why bother.

On the upside, i got some nice Pioneer speakers out of the jimny and fitted them in the disco to replace the broken front door speakers. So overall a good day :rolleyes:

Now I guess i need to go very carefully over the chassis to find out where the good bit starts and order the corresponding length replacement, which i suspect will include the rear outriggers.

I'm starting to think that the key to Land Rover ownership is a strong relationship. Or living in Dubai or something, I dunno.

Please send help.
 

Attachments

  • IMG_4655.jpeg
    IMG_4655.jpeg
    474.5 KB · Views: 147
I'm starting to think that the key to Land Rover ownership is a strong relationship. Or living in Dubai or something, I dunno.

Please send help.

I think the key is putting your hand over your ears and pretending you can't hear all the strange mechanical noises, and all the mild steelwork fizzling into dust.
I am impressed with what you are doing, personally I would have been looking longingly at a can of petrol and the matches before now as it would be either me or the Disco by now.:D
 
Lack of ARBs isn't an MOT fail. I built mine without them and have HD springs and adjustable dampers. Still handles acceptably on road.
 
Back
Top