You are using an out of date browser. It may not display this or other websites correctly.
You should upgrade or use an alternative browser.
You should upgrade or use an alternative browser.
Started Resto work on my S3
- Thread starter dirtyrhino
- Start date
This site contains affiliate links for which LandyZone may be compensated if you make a purchase.
dirtyrhino
New Member
- Posts
- 617
Hey, if there's tea and cake on offer, i'll go pretty much anywhere ")
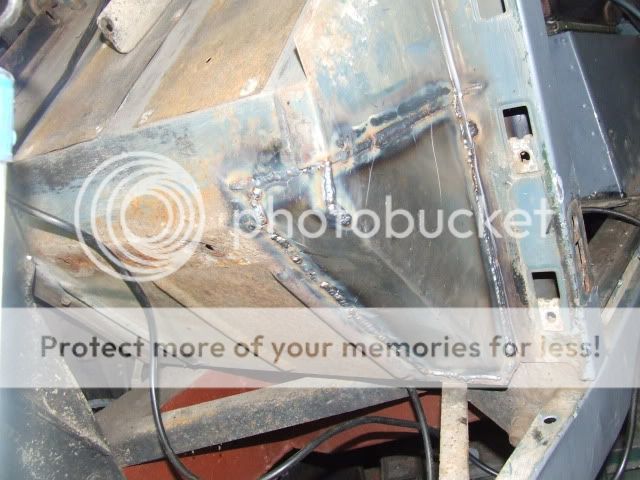
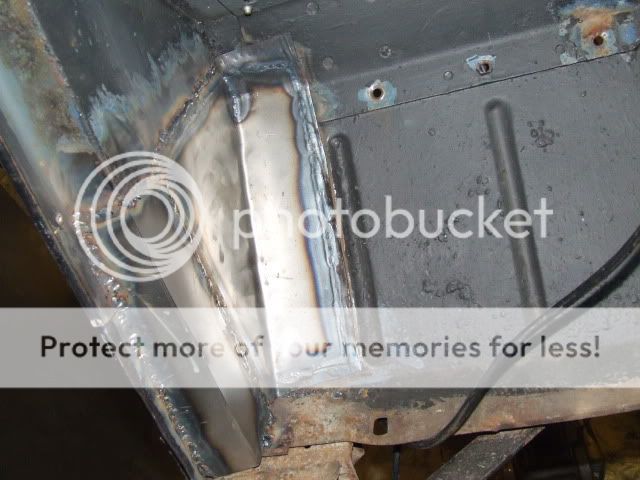
Ok, well, I started on the passenger footwell tonight, and Gladly, it's not as bad as I feared - I can get away with a nice crisp patch instead of a full panel replacement.
Akita, how bad are the wells in yours ? If you buy a replacement set of panels, it's a fairly straight forward task to chop out the ****e and weld in new ones if they're totally rotted out.... If it just needs patching, i hope this lot helps ya
It'll serve you to buy yerself a "Joggler" or a "Flange setting" tool - best £55 to spend on a metal working tool - make s nice, clean 10mm lip to weld onto....
Started by chopping all the **** out....just remember when hacking out rotted sections to try and leave a good 10mm lip - to weld the new panel onto. If the rot won't let you - do a full replacement.
Notice the bottom bracket has also rotted away, but happily just on the side for the door seal lip, and not the hinge or front wing support.
Normally, i'd replace the whole A pillar and bottom bracket, but TBH, the bracket lip is recoverable and only supports the seal, so a simple stiffener will suffise until next year when i put in a Galv bulkhead.
If I was the person who used glue and thin sheet, i'd probable do this with some evo-stick......
However, i'll just use the template to make this by beating the ****e out of some sheet steel with my 1/2lb hammer lovingly named "Murray":
I like to make my own panel work as much as possible. I find it's quite satisfying bashing steel into submission
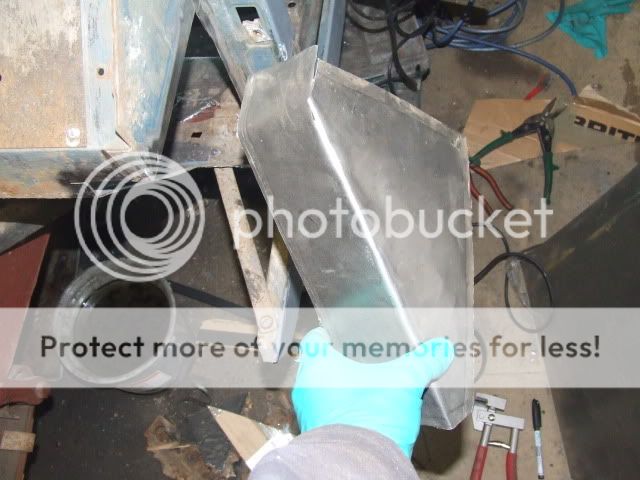
Tomorrow i'll get welding and make up the new skin and lip for the door seal.
Ok, well, I started on the passenger footwell tonight, and Gladly, it's not as bad as I feared - I can get away with a nice crisp patch instead of a full panel replacement.
Akita, how bad are the wells in yours ? If you buy a replacement set of panels, it's a fairly straight forward task to chop out the ****e and weld in new ones if they're totally rotted out.... If it just needs patching, i hope this lot helps ya
It'll serve you to buy yerself a "Joggler" or a "Flange setting" tool - best £55 to spend on a metal working tool - make s nice, clean 10mm lip to weld onto....
Started by chopping all the **** out....just remember when hacking out rotted sections to try and leave a good 10mm lip - to weld the new panel onto. If the rot won't let you - do a full replacement.
Notice the bottom bracket has also rotted away, but happily just on the side for the door seal lip, and not the hinge or front wing support.
Normally, i'd replace the whole A pillar and bottom bracket, but TBH, the bracket lip is recoverable and only supports the seal, so a simple stiffener will suffise until next year when i put in a Galv bulkhead.
If I was the person who used glue and thin sheet, i'd probable do this with some evo-stick......
However, i'll just use the template to make this by beating the ****e out of some sheet steel with my 1/2lb hammer lovingly named "Murray":
I like to make my own panel work as much as possible. I find it's quite satisfying bashing steel into submission
Tomorrow i'll get welding and make up the new skin and lip for the door seal.
b20wnx
Well-Known Member
- Posts
- 1,077
- Location
- wakefield west yorkshire
your working too fast for me rhino, you will have to look at my picture uploads to have a look how far i got... and how bad the floor is passenger side, havent got round to drivers side yet.....
anywhere for cake and tea, now let me think, who makes the best cakes that i know mmm who makes the best cups of tea and keeps em coming till you overflow..... think its my missus rhino and she says you can have bed and breakfast too lol
anywhere for cake and tea, now let me think, who makes the best cakes that i know mmm who makes the best cups of tea and keeps em coming till you overflow..... think its my missus rhino and she says you can have bed and breakfast too lol
dr pepper
New Member
- Posts
- 1,438
- Location
- lancashire
Both the A pillars on my s3 look as though they might be a mot failiure amonst everything else, not looking forward to snotting those up, even though I can get repair sections, from past experience getting things to line up again once the pillar has failed is tricky, as the bulkhead deforms with the integrity of the a pillars non existant.
All part of the show I spose.
Your repairs look good, an electric nibbler is a cool gizmo to have when doing that job.
All part of the show I spose.
Your repairs look good, an electric nibbler is a cool gizmo to have when doing that job.
I'll send you pic over the weekend of the cab rhino, see if it's what you're after, the roof skin is a bit of a state tho...
I tell you what, you're welding and fabricating skills are top notch! This Thread is making for a great read mate and damn you work quick! I have 2 bulkhead a-pillar repair sections ready to go on mine and I'm bricking it!
I tell you what, you're welding and fabricating skills are top notch! This Thread is making for a great read mate
and damn you work quick! I have 2 bulkhead a-pillar repair sections ready to go on mine and I'm bricking it! dirtyrhino
New Member
- Posts
- 617
Nice one, tom - cheers - do 1 pillar at a time is my advice. Did you order the replacement ones that come with the bottom bracket?
I've had bad experiences with a leccy' nibblers and power saws...me and power tools have a love/hate thing going on most of the time
Pillars are a pain in the proverbial but i've found that fixing a wooden brace to the bulkhead and fixing it to the chassis before cutting them out helps things line up a bit easier. no way fool-proof, though.
- do 1 pillar at a time is my advice. Did you order the replacement ones that come with the bottom bracket?I've had bad experiences with a leccy' nibblers and power saws...me and power tools have a love/hate thing going on most of the time
Pillars are a pain in the proverbial but i've found that fixing a wooden brace to the bulkhead and fixing it to the chassis before cutting them out helps things line up a bit easier. no way fool-proof, though.
Last edited:
crashbox
Well-Known Member
- Posts
- 12,347
- Location
- In the UK, thankfully.
Nice job. Good luck with the loom, you gonna buy a new one or repair it?
dr pepper
New Member
- Posts
- 1,438
- Location
- lancashire
Yeah thats a good idea re the bracing, I've done that with 1 bi 2 box as I've loads of it.
Only problem with my series is that both a pillars are knacked so any shiftings will allready have shifted.
Only problem with my series is that both a pillars are knacked so any shiftings will allready have shifted.
dirtyrhino
New Member
- Posts
- 617
Yeah thats a good idea re the bracing, I've done that with 1 bi 2 box as I've loads of it.
Only problem with my series is that both a pillars are knacked so any shiftings will allready have shifted.
Well That's a pain in the proverbials
dirtyrhino
New Member
- Posts
- 617
Gawd, it's fooking cold out there tonight - and slippery. Went arse over tit a few times between the garage and the house.
Still, got ma footwell all welded up tonight, hell, i even had time to make a new lip-seal aswell. Also started on the upper portion of the bulkhead which, although mostly solid, still had 1/2" of filler on the pillar side...But i'm freezing my knackers off, so it's tea and digestive time.
Still, got ma footwell all welded up tonight, hell, i even had time to make a new lip-seal aswell. Also started on the upper portion of the bulkhead which, although mostly solid, still had 1/2" of filler on the pillar side...But i'm freezing my knackers off, so it's tea and digestive time.
dirtyrhino
New Member
- Posts
- 617
Thank you very much for what you have put up so far. Although its not the full footwells (which i have to do) it gives me a rough idea. What tool did you use to cut it out with ?
I use my faithful tin sips, and a grinder with a 1mm cutting disc, murry, my lump hammer, peening hammer, a toffee hammer and a pair of modified pliers for folding bends.
Doing the full floors, it's not too bad - if you've ordered replacement panels, offer them up to the floor, and look at where they need to be welded/rivveted - it's makes what you need to do very clear. Mark it up, and chop with a cutting disc or nibbler, leaving a 10mm overlap for a decent seam for the weld puddle when you start to join it all up. Not a huge amount of panelwork on these is seam welded - most of it is Spot, so a good ****ting with a cold chisel and the spots will pop off - most of the good panels have the full flange, too
Last edited:
dirtyrhino
New Member
- Posts
- 617
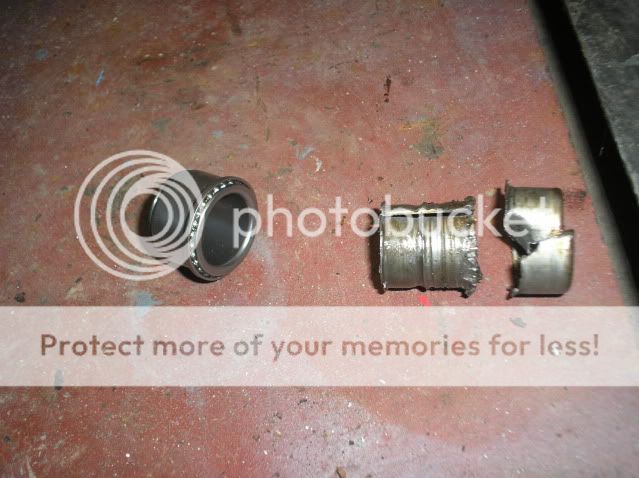
Nowt much doing tonight bit hacked off TBH - managed to pull the non-existent steering tube bearing out after much beating and swearing. Also fitted the new Stop cable, which replaces the bodged one shoved through the bulkhead.
I've offered up and profiled the new passenger side bulkhead panel ready to weld it up tomorrow. Bitch of a job, this side - there was more good steel, so I had to trim and profile it more.
I did, however, get a lovely huge box-o-bits today, which has made me a little happier - dumb irons, cables, seals, bearings, water pump and lots more
b20wnx
Well-Known Member
- Posts
- 1,077
- Location
- wakefield west yorkshire
hey rhino - no slacking or i be catching you up lol, your our inspiration, keep going and dont forget the pics..... i have had a change of plan and intend to work around the bulkhead, brakes and suspension, bodywork (bits that come off and go back on easy) cleaning, sanding, painting etc new seals all round then i am going to attempt the bulkhead,,,,, is this the wrong way round or perfectly acceptable...
plus the scrap men were round today eying up all the bits i was taking off, put the staffy in the rear tonight to give em a fright if they do come round..... plus me shotgun next to the bed and the rottwieler (the missus with PMT) on guard duty....
plus the scrap men were round today eying up all the bits i was taking off, put the staffy in the rear tonight to give em a fright if they do come round..... plus me shotgun next to the bed and the rottwieler (the missus with PMT) on guard duty....
markconnor33
New Member
- Posts
- 317
- Location
- Leeds
Nice job so far!
Don't surpose you fancy a 2.25 petrol engine.
I'm going to be taking one out of my S2 at some point in the spring, to fit a TDI.
It's currently got an electronic Dizzy on it (i've got the old one too) and a new Zenith copy carb. Runs great, but too thirsty for me (I make biodiesel).
Bit of smoke on startup, so could prob do with new valve seals/timing chain.
Cheers
Mark
dirtyrhino
New Member
- Posts
- 617
LOLZ - Fapping Pikeys - always up to summat
Do whatever makes you happy and keeps the flame burning fella. Sometimes I drift onto another part of the landy, just to break the monotony of it all - and i get easily distracted. Mostly by shiny things, or I just start on somewhere else completely.
If yer doing yer seals, just remember you'll probably have to take them off again when ya start on the bulkhead
Mark - I'd love a petrol lump, but i've got nowhere to store it ATM.
Wish I had a local BioDiesel bloke near me - I'd move over to vegoil again but I can't be arsed with sorting out preheats and filters again. It was fun on my Disco, until it started eating filters, and the local market started upping the prices.....christ - even Lidl started doing it >:/
Do whatever makes you happy and keeps the flame burning fella
. Sometimes I drift onto another part of the landy, just to break the monotony of it all - and i get easily distracted. Mostly by shiny things, or I just start on somewhere else completely.If yer doing yer seals, just remember you'll probably have to take them off again when ya start on the bulkhead
Mark - I'd love a petrol lump, but i've got nowhere to store it ATM.
Wish I had a local BioDiesel bloke near me - I'd move over to vegoil again but I can't be arsed with sorting out preheats and filters again. It was fun on my Disco, until it started eating filters, and the local market started upping the prices.....christ - even Lidl started doing it >:/
markconnor33
New Member
- Posts
- 317
- Location
- Leeds
Mark - I'd love a petrol lump, but i've got nowhere to store it ATM.
Wish I had a local BioDiesel bloke near me - I'd move over to vegoil again but I can't be arsed with sorting out preheats and filters again. It was fun on my Disco, until it started eating filters, and the local market started upping the prices.....christ - even Lidl started doing it >:/
No rush!!
Got to take the petrol out and fit a TDI in yet.
Project for spring, as just sourced a 300TDI to go in.
Petrol will be up for grabs when up and running.
Mark
dirtyrhino
New Member
- Posts
- 617
FFS - I'm NOT happy tonight. Passenger side bulkhead is being a total
"C U Next Tuesday" to line up and panel match. Finally got it how I like it, and the sodding MIG decided to have a hissy fit and starts throwing random amperage spikes in the middle of a seam. Tracked it down to a ****ty earth lead, so that's fixed and bulkhead is currently covered in a thin film of thinner.
Fitted ma steering column bearing....only to find the ****ing thing has shattered, so now I have to take the damn thing out again.
....old and ****ty new-one-that-needs taking out again.....BRITPART :doh:
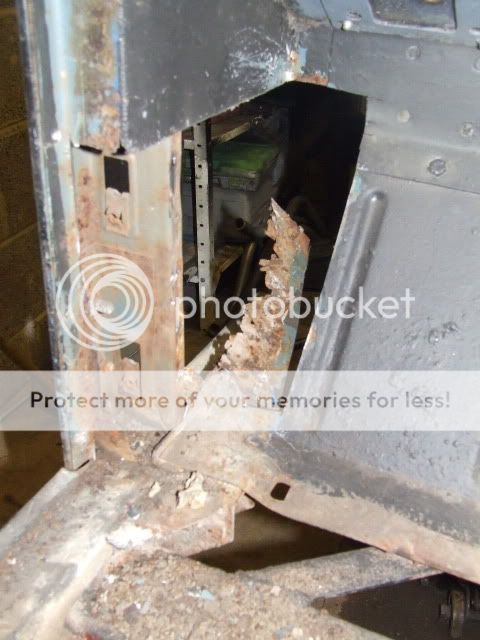
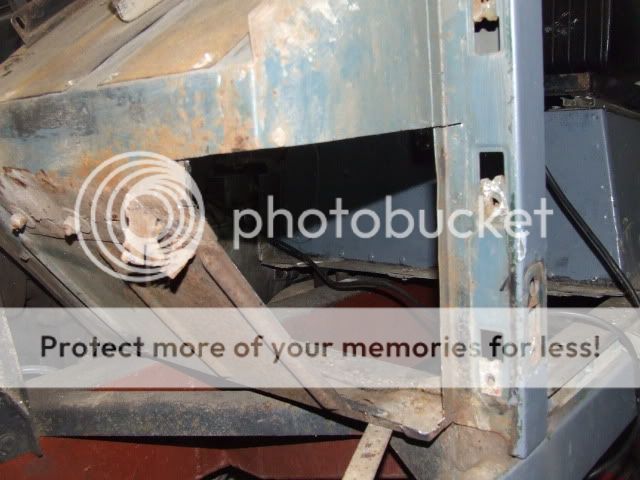
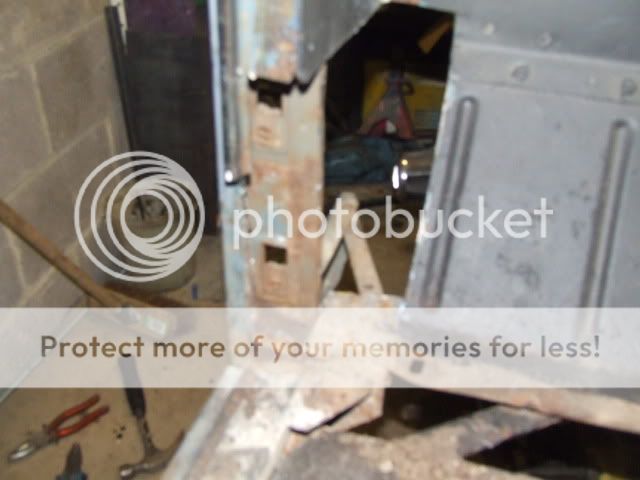
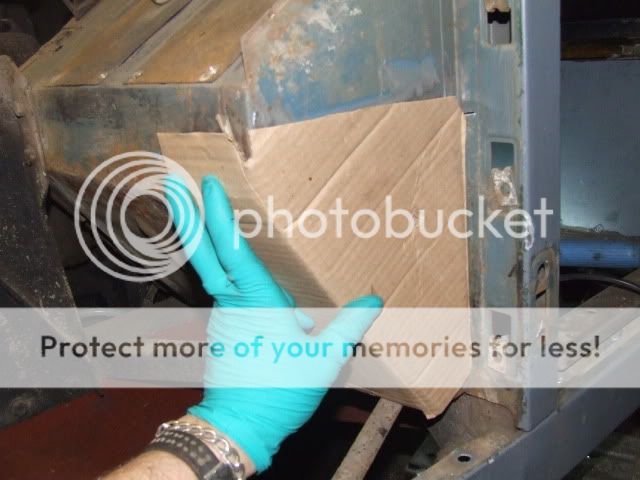
Tought i'd take the nose off this evening, and look at the comedy patch that I spotted when I bought it......
Three ****s with Murray...........

and the "welded" plate just popped off....Cream cheese doesn't describe it well enough......try " Anyone who welds like this needs a ****ing kick up the arse..."
So I shoved the cold chisel in the "repair" and a torrent of weldwire and ****e fell out....and then the plate fell off....
I know I mite come across as a bit of a snob sometimes, but how can ANYONE be happy with a weld that is clearly ****e, and then fill the bits that got missed with filler....yes filler...on a chassis.... theres no excuse for shoddy work, NONE at all.
The rot goes past a normal dumbiron repair unit, so i'll have to use some 4mm plate to extend the repair, and maybe a small lateral brace to add some rigidity. Thankfully, the rest of the chassis is in reasonable condition.
I've got a horrible feeling that this resto is going to go past my Deadline I set myself of Feb/March. MOT is due in April, and I want to run it before then
Still have to do:
Dumbirons
Seatbox repair
Truck Cab
Brakes
Spongy Clutch
Smoky engine / very slight misfire / waterpump/timing chain/tappets/
ANOTHER steering Bearing
Doors
Seals
Windows
Put it all back together
Paint
**sigh**
"C U Next Tuesday" to line up and panel match. Finally got it how I like it, and the sodding MIG decided to have a hissy fit and starts throwing random amperage spikes in the middle of a seam. Tracked it down to a ****ty earth lead, so that's fixed and bulkhead is currently covered in a thin film of thinner.
Fitted ma steering column bearing....only to find the ****ing thing has shattered, so now I have to take the damn thing out again.
....old and ****ty new-one-that-needs taking out again.....BRITPART :doh:
Tought i'd take the nose off this evening, and look at the comedy patch that I spotted when I bought it......
Three ****s with Murray...........
and the "welded" plate just popped off....Cream cheese doesn't describe it well enough......try " Anyone who welds like this needs a ****ing kick up the arse..."
So I shoved the cold chisel in the "repair" and a torrent of weldwire and ****e fell out....and then the plate fell off....
I know I mite come across as a bit of a snob sometimes, but how can ANYONE be happy with a weld that is clearly ****e, and then fill the bits that got missed with filler....yes filler...on a chassis.... theres no excuse for shoddy work, NONE at all.
The rot goes past a normal dumbiron repair unit, so i'll have to use some 4mm plate to extend the repair, and maybe a small lateral brace to add some rigidity. Thankfully, the rest of the chassis is in reasonable condition.
I've got a horrible feeling that this resto is going to go past my Deadline I set myself of Feb/March. MOT is due in April, and I want to run it before then
Still have to do:
Dumbirons
Seatbox repair
Truck Cab
Brakes
Spongy Clutch
Smoky engine / very slight misfire / waterpump/timing chain/tappets/
ANOTHER steering Bearing
Doors
Seals
Windows
Put it all back together
Paint
**sigh**
Last edited:
b20wnx
Well-Known Member
- Posts
- 1,077
- Location
- wakefield west yorkshire
i did a bit more on mine today, took out the drivers side panals to reveal - well your cream cheese would look good next to it. photos to follow, tried to get the seatbox out too but the bolts holding the seat belts in are a ficker to get to with spanner or angle grinder... i will overcome, i dont know what all the black tar stuff is i can only assume that its waxoil sprayed everywhere to cover the filler and holes and ****e that covers this beast.... the good news is i ordered brake kits last night so hopefully they will be here on monday or tuesday. £50 all 4 corners, shoes, cables, clips, cylinders. thought that was a good price...... still looking at shocks and come to the conclusion £50 for all corners instead of 120 for gas shocks... will wait till i have some more money to upgrade them, but having now seen underneath i know whatever i do will make the ride much better..... also did some scraping and undercoats today too.... (still trying to figure out a colour scheme....
dirtyrhino
New Member
- Posts
- 617
One thing I will say - it's nice to HAVE a ride that needs the work - makes me feel happy that i've saved another one from the Demon Rot and Bodging Bastards
I've decided on Sticking with an Airforce Grey and White / cream roof on mine.
Having seen my mates series this week, i'm now in two minds about going truck cab and canvas.
I've decided on Sticking with an Airforce Grey and White / cream roof on mine.
Having seen my mates series this week, i'm now in two minds about going truck cab and canvas.
Similar threads
- Replies
- 48
- Views
- 9K