Less Is More. The LR Series lives on.

This site contains affiliate links for which LandyZone may be compensated if you make a purchase.

JIMBOB LR

Member
Posts
47
Location
UK/Kenya
Hello everyone.

Because I was asked to, I will. My thread will be nothing but my series IIA and III. The plans I have for both and why.

Firstly, the III developed a problem with the gearbox. My concerns of which box I have is now history but I do have a concern of putting it back together. I talk about it here and a bit more...

Why Land Rover Series!? Well..https://www.landyzone.co.uk/conversations/land-rover-series-the-iconic-british-4x4.185918/#convMessage-282274

I have to say owing a series III in Kenya is very ideal. I've never regretted it and neither did my old folks. Kenya has grown into a bizarre place. Now a days you see some of the latest Range Rovers, Discoveries dashing around like no ones business. Not as many as Toyota Prado's but they are there in numbers. I don't regard them as anything much because I've never seen one out there in the thick of it being driven like a series would. Besides, not a threat to the simple, robust, and iconic series.

1709477969446.png

After twelve years with minimal use. I found the bushes like this. I drove 200 miles and nothing broke.

1709478011924.png

Fitted new bushes from Poly Bush. Cleaned the shocks and what a difference it made. Try do that to a modern car.

1709478084347.png

Oil to paste! Still nothing broke! New gaskets and seals with new oil. No fuss, no drama! If you keep ahead of the service intervals your series will roam the world with ease.

1709478147917.png

New coil, new points, new coolant, new ignition leads and a new radiator cap. Cheap as chips!! Engine purred and hauled ass!!

1709478306939.png

This oil bath system is bliss. Magnificent in all ways. Again twelve plus years in dusty conditions and nothing major. Cleaned with diesel and new oil filled to the marker. Simple and effective. I'll talk about a talked about upgrade instead of this in the coming posts. Total BS in my opinion and not worth a fart!!


1709478625203.png

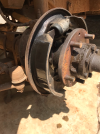
Rainy seasons in Kenya are treacherous. Pot holes one metre deep and wide are know to happen due to the lack of repair and neglect. Here we don't have the luxury of street lights everywhere or sufficient drainage. Driving at night or in flooded sections can be catastrophic. The near side really gets a pounding! I clipped the edge of what seemed a puddle but later realised it was something deeper and wider. Still, I checked the wheel bearings and seals and all was good.

The morale of the story...don't think and assume more is more because Less Is More. Apart from the gearbox being shagged my series is a true treasure to have in Kenya because of it's simplicity. A do anything. no nonsense 4x4. It's cost me less than £500 to get it where I wanted and about the same to repair the gearbox. BMW and the rest eat your hearts out because that will never happen in a life time.

I have more that needs doing to my series III before I start on the IIA. Another story to tell.

This is my pride and joy. I can't wait to get back driving again. More to come.
 
1709520906258.png

Sometime back my dad changed from 'commercial' to 'private' which meant that the need to have the LR inspected yearly by the transport authority was no longer. A type of MOT but rather slack. The process was the mother of nightmares! The emphasis was made to identify commercial vehicles from private (as if that mattered) by having stupid stickers and reflectors screwed and riveted across the front and back. I hated it! As you see here, they were the first items to be removed!

I was also ****ed off with the interior. It was dark and horrible. Out went the lining. That gear knob was flung as far as possible and what a relief! It was from a Toyota something and never worked because it would twist, fall off and eventually be left in your hand while shifting. Rubbish! I replaced it with the screw on from the series IIA....🤪

1709520971831.png

Look at the mess made. I still haven't removed that glue yet. I prefer the plainness of the series. Why do this!? I hope petrol will do the job to remove the glue...hmm...:rolleyes:

1709521096010.png

Here we have it!! The worst wiring ever!! This was done so poorly it kept cutting out the ignition every time. I stalled that many times on the road it become an embarrassment. Something had to be done. A bunch of wires tied up in a loop! Nothing made sense and nothing was insulated or soldered but twisted and taped!! I found the wiper switch, turn indicator connectors and the head light switch mated in such a way it just messed with the whole electrical system. I'm not an electrician but I know when things are F**KED!! This is typical of Kenya. Give your car to any repair shop and you are F**KED!! Moving on...I fixed it! Next....SAE and bullet connectors where it matters.

1709521134796.png

More rubbish trimmings/lining removed. I had to cut into the dash area to retrieve a bunch of wires which you'd not believe happened to be trapped by the dash!! WTF!! In time I want to swap the series III dash for a series II dash if possible or make one up from aluminium sheet. Something simple and neat. Rolled edges with neat cut corners. Because it's all about pieces riveted together this ought to be very possible. I got rid of the rubber mat as it slid under the pedals. Less Is More!

1709521654357.png

Lastly, the panel fitted between the cabin and rear (whatever that is know as) was removed because I wanted access to the back area from within. This was important to me because I want my kids and I to share the same space rather than alienate the space. Out it went! Another thing was that horrid interior trim backed with foam. Pointless. Out!!

This is not a restoration project or performance enhancement but a 'what is needed' one. My series isn't in that bad of a state and because I need it daily I tend to do what is possible in a relatively short space of time. I will however strip it down right to the chassis and redo everything as nicely as possible in the coming years.

I'll talk more about the necessary things needed to make it function better for my type of driving and conditions out here and the type of work I'll be using it for in the coming years.
 
Wherever you're in the world now, it seems there's no escaping the authorities complicating and adding to more rules and regulations.

I've found odourless parrafin quickly cleans old grease off. It might work well on the old sticky glue without stinking the cabin out.
 
Wonder if petrol and wallpaper paste would work, the paste to hold it there whilst the petrol soaked into the old glue?
 
Wherever you're in the world now, it seems there's no escaping the authorities complicating and adding to more rules and regulations.

I've found odourless parrafin quickly cleans old grease off. It might work well on the old sticky glue without stinking the cabin out.
Nothing like odourless paraffin here. I’ll use unleaded petrol and see how that works out.
Wonder if petrol and wallpaper paste would work, the paste to hold it there whilst the petrol soaked into the old glue?
😄 wall paper paste is a non recognised item out here. I’d have to import. I guess whatever I decide to use will remove the paint!

Petrol first then other methods. Thanks 👍🏽
 
Last edited:
Nothing like odourless paraffin here. I’ll use unleaded
petrol should not remove the paint, you might also have some luck with ethanol/methanol depending on what is available to you which also wont remove the paint. If you can get hold of it brake/clutch cleaner will almost certainly remove the glue again shouldn't remove the paint but may swell rubbers if it contacts them
 
petrol should not remove the paint, you might also have some luck with ethanol/methanol depending on what is available to you which also wont remove the paint. If you can get hold of it brake/clutch cleaner will almost certainly remove the glue again shouldn't remove the paint but may swell rubbers if it contacts them
Never thought of that one. Excellent. Thanks :)
 
Must get it off my chest!! This REALLY ****es me off!!

Someone decided this was a brilliant idea. Both the series got treated with it! How stupid!! Why not bolt a bracket on instead!?

Again, something to remove! It actually makes the LR look like it has something wrong with it. Definitely not permitted in the UK and most likely fail it's MOT. Correct me if I'm wrong.

1709562302788.png

Before I remove these idiotic things I must have a safe method of lifting using the Hi-Lift jack. Reflective strip that was riveted on removed! Nice!

1709562342400.png

Sharp edges, rusted, nothing sensible or thought through. What other options they did have...hmm...maybe look it up an design something nice...perhaps...perhaps not!! I bet it cost as much as getting it done nicely. I think I'd have got the front bumper laser cut with a slot to take the Hi - Lift and had a bumper with the same provisions for the rear. Not as cheap as this weld on crap but how cool would that be!? On the rear because my series has the two tail gate eyes welded on to the frame I could use a D-Shackle (suitable or have something machined to suit) so that it allows the Hi-Lift to be used - see below. Easy and simple. You'd not even notice it.

1709562398180.png

Double take! Both were done!

1709562451863.png

😔 why I ask...the most disappointing thing I see on my series that instantly makes my blood boil.

1709563327641.png

A nice idea and method. I'd prefer slots in the bumper if I'm honest.

The options are countless on this. A good design will always prevail over tacky ideas that look cheap and not thought through. I guess after the gearbox is sorted this will be my next thing to do. Wish me luck because getting this done over here will need balls of steel and the patience of ten thousand angels.
 
Wherever you're in the world now, it seems there's no escaping the authorities complicating and adding to more rules and regulations.

I've found odourless parrafin quickly cleans old grease off. It might work well on the old sticky glue without stinking the cabin out.
Here it's total BS!! You aren't allowed to import any vehicle older than eight years old but you can import engines that come from God knows where! No MOT's or regulations but they say vehicles older than eight years are not environmentally friendly bla bla bla. There are vehicles just five years old that emit more gases than the enterprise ship and in all the Star Wars movies you have watched!! Only those who value their cars service them.
 
1709615532092.png

Mount Suswa. Went to get my goats for breeding etc. I did trip after I'd replaced the engine coolant, shock rubbers, wheel cylinders, engine oil, gearbox oil and that was it. A round trip of 200 miles in the most inhospitable terrain.

1709615647067.png

We drove like kings, passing stranded cars of all makes that the 'fesh' 'moon dust' or whatever you may want to call it stopped even trucks. Fesh is a very fine powdery dust usually two foot deep. Underneath that lies anything from rocks, re-bar, concrete and whatever. We were covered in it!!

I had recently put back the rear window seal and filler strip using silicone grease hence the dust around it.

The way back was boring because we decided not to do the fesh again due to time and the goats were rather restless.

I have a video of this somewhere so will add it to this conversation.
 
You may not like the look of those jack brackets but a good to have in those environments for self recovery.
Front not so bad much like ones on a defender, rear horrible but looks like the answer in the video above.
 
A journey of 200mile on tarmac roads in my old landy over here has me fretting 😱
I’d rather frett but have a smile at the end of it. It was 50/50 dirt and road. The cops stopping us just to ask a stupid question was the worst part of the adventure.

Seems series LR’s are a poor man’s vehicle and quickly related to no insurance policy. But you see because it’s such an old vehicle I can only get third party at £28 per annum 😆 and that’s not an issue but a blessing.

Be it or not, loads of people driving as old vehicles still don’t insure them.
 
Brakes and unusual nipples!!

1709703639667.png

The vertical T and nipple apparently was the way to go. It was made locally by a brake and hydraulic shop. It leaked from a minute pin hole!

After having spent a lot of time figuring things out and talking to a bunch of ex - series owners I decided enough was enough!! Advice on advice! Change it to a Defender axle, Toyota brakes are the best.... :oops:

I tried a couple of tried and tested methods and nothing worked for me. The brakes were spongy and pedal went down to the bottom. After several attempts of bleeding the brakes I removed to check on the braking system itself. This was after I had spent a day with a mechanic who used to repair series back in the 80's. Hmm....

1709743334397.png

The wheel cylinders had seized. These were the original Girling ones The seals leaked and the inner cylinder walls pitted.

1709743471896.png

Good Lord!! The Girling's aren't cheap and that's if you can find them.

1709743546596.png

Brake fluid goes syrup! Use crap fluid and this is what you get.

1709743681598.png

A sign of something not right. On my series IIA the drums are evenly worn and despite being fairly worn there isn't a sign of distortion, cracking or scorching. An example of poor knowledge. Remove wrong, fit wrong. A service manual is the way if in doubt.

1709743729033.png

Brake linings were **** poor and cracked in some areas. I came to realise that the leading and trial shoes were not fitted correctly but the same of each as a pair. This doesn't work. This was the reason for the cracking. The heat and pressure on just that one part of the lining must have been enormous! It also made sense why even though the brakes were spongy they would catch and did not have any modulation because the contact area of the shoe lining and drum was only about 80mm rather than the whole lining surface.

1709745591210.png

Leaking Hub Oil Seal. This was a later scenario before I fitted the new brake linings.

It had stood still years before I drove it in 2015. Even then I did very little to it and drove a good 200 or so miles. When braking it pulled to the near side.

I had to replace the cylinders and because I wanted to keep the Girling ones. I replaced the seals instead to see what happened. The result was a poor one and brakes even though better still were spongy! I ordered new ones locally and fitted them. These were from BGF.

1709744312607.png

Who are BGF!?

1709744459369.png

What have I said before and will say it again! Local mechanics are just plain stupid!! These nipples were over tightened and almost round! Because of this and trying to remove them I simply had to go beyond and not only order them from the UK because they didn't have them here but also buy a flare tool and a roll of copper brake pipe.

1709744772790.png

Just like that my worries were over and at the same time be a magician! 🤪

1709744918464.png

WooHoo!! Perfect!!

1709749346302.png

Result!! Not as good as I wanted it but it was the right way. The right tools, material and mind set. The pipe needs to be as close as possible to the axle. Perhaps right angles instead of sweeping bends? I don't have a pipe bending tool and using a ring spanner end isn't that good. I like how you need to think of what could possibly happen and try and avoid it. I drive over thicket and small bushes, branches and when in deep ruts things can catch and pull off brake pipes.

1709745243384.png


1709745020366.png

I couldn't get shoe brake linings as in one piece (shoe and lining fitted) so I had to scrap/wire brush off the old lining from the existing shoes and rivet new ones on.

1709745406825.png

Perfect!!

1709747723813.png

I used this Draper Vacuum Kit to bleed the brakes after I was done with fitting new bits and replace the system with fresh brake fluid. The brake fluid reservoir also got cleaned out in the process. If I remember correctly this tool drew the fluid from the reservoir forcing it through the cylinder. I never tried the reverse method using syringes but will. The Draper tool was borrowed. They aren't expensive to buy. Clean and flush well with mild soapy water before storing.

My efforts paid off! Investing in a flare tool, new nipples, brake line, cylinders and brake linings did the job. I haven't driven the series since December 2022 and the brakes are still as was repaired. Bloody good!!

After the gearbox it will be a revisit to the brakes. Remove that is not need, fit was is. I was never happy with the cheap cylinders, the rivet lining method, the T vertical nipple on the near side, and some other minor bits I need to revisit.

When you think of it, you can replace or repair any part of a series without bleeding money. It will take you to any destination you can think of and back and by doing so will still not make you bleed money! I hear people say 'it's uncomfortable, uses too much fuel, heavy to handle..... That could be true and probably is but when you think of what it was made to do, it's shear size and weight and the components it's made from, fuel consumption or being a heavy vehicle to handle isn't something I think about. It has a very distinct sound, look, feel, and even smell.

That is a series Land Rover. Like it or hate it. It's a world class of a 4x4.
 

Attachments

  • 1709747622353.png
    1709747622353.png
    2.5 MB · Views: 26
Last edited:
Sweeping bends like yours are fine. I have been involved with off road trials for years and only a couple of times seen damaged brake lines [ usual culprit is a old bit of fencing wire wrapping the axle.
Can not see how you piped the 109 front brakes in pics. Common mod is to run hard pipe from the flexi pipe to the lower slave first and then back up to the top slave. This puts the bleed nipple at the top.
 
Sweeping bends like yours are fine. I have been involved with off road trials for years and only a couple of times seen damaged brake lines [ usual culprit is a old bit of fencing wire wrapping the axle.]
Can not see how you piped the 109 front brakes in pics. Common mod is to run hard pipe from the flexi pipe to the lower slave first and then back up to the top slave. This puts the bleed nipple at the top.
 
Back
Top