Soft dash restoration

This site contains affiliate links for which LandyZone may be compensated if you make a purchase.
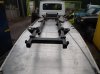
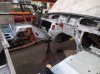
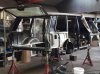
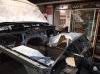
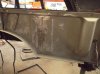
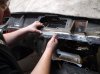
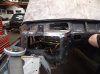
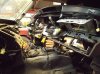
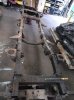
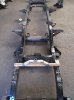
Battery tray was fitted and all the holes for the arch liners are
now drilled

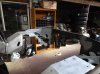
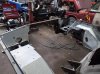
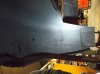
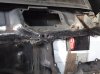
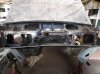
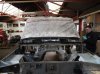
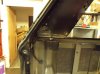
The rot in the corner is now gone too and scotch brighted the
quarter panel
 

Attachments

  • Range Rover offside front battery tray.jpg
    Range Rover offside front battery tray.jpg
    136.3 KB · Views: 853
  • Range Rover rear end paint prep 009.jpg
    Range Rover rear end paint prep 009.jpg
    86.5 KB · Views: 553
  • Range Rover rear end paint prep 002.jpg
    Range Rover rear end paint prep 002.jpg
    102.5 KB · Views: 536
  • Range Rover rear end paint prep 005.jpg
    Range Rover rear end paint prep 005.jpg
    80 KB · Views: 531
Afraid what was thought to be not too bad has turned out to be bad enough
to have to remove the dash, heater box and loom.

Then remove the front part of the scuttle panel, the panel has rotted around
the spot welds and the bulkhead has also gone in a couple of places.

I'll post some photo's later that i took yesterday, thumbs up to Phil & Lloyd
at Twenty Ten as the dash, steering column, heater box & loom were pretty
much out in under 2 hours

It was quite disturbing to see how poorly fitted the dash etc was when the car was
built, it will be much better this time.
 
Last edited:
A few photos of the rot and dash coming out and from today cutting
out the rot and welding in 2 plates into the bulkhead
 

Attachments

  • Range Rover dash out 017.jpg
    Range Rover dash out 017.jpg
    95.7 KB · Views: 695
  • Range Rover dash out 016.jpg
    Range Rover dash out 016.jpg
    110.9 KB · Views: 740
  • Range Rover dash out 015.jpg
    Range Rover dash out 015.jpg
    102.7 KB · Views: 748
  • Range Rover dash out 008.jpg
    Range Rover dash out 008.jpg
    119.2 KB · Views: 748
  • Range Rover dash out 006.jpg
    Range Rover dash out 006.jpg
    114.3 KB · Views: 2,439
  • Range Rover dash out 001.jpg
    Range Rover dash out 001.jpg
    86.9 KB · Views: 693
  • Range Rover dash out 014.jpg
    Range Rover dash out 014.jpg
    105.8 KB · Views: 789
Bulkhead is now sorted, chassis got stripped today and goes off to be acid dipped then galvanized tomorrow
 

Attachments

  • Range Rover engine & box off chassis 004.jpg
    Range Rover engine & box off chassis 004.jpg
    120.4 KB · Views: 560
  • Range Rover engine & box off chassis 014.jpg
    Range Rover engine & box off chassis 014.jpg
    120.6 KB · Views: 551
  • Range Rover engine & box off chassis 016.jpg
    Range Rover engine & box off chassis 016.jpg
    121.2 KB · Views: 577
  • Range Rover bulkhead repair 1.jpg
    Range Rover bulkhead repair 1.jpg
    115.5 KB · Views: 1,434
Last edited:
Wow, that's a pretty thorough resto. Looks great so far. :)

Mind if I ask how much this is costing so far?

Edit: Also, if you buy a new engine for it, what spec engine would be fitted?
 
Wow, that's a pretty thorough resto. Looks great so far. :)

Mind if I ask how much this is costing so far?

Edit: Also, if you buy a new engine for it, what spec engine would be fitted?

No point once your this far not being thorough, i'm a little anal
when it comes to attention to detail :)

I've not totted everything up yet but at a guess i could buy several
more classics with what i've spent.

I would probably put freshly built 4.6 in it from JE Developments, think
it would have approx 330 hp and a bit more torque
 
Last edited:
Chassis heading off to be galvanized, we went early and what a luck call
that was, on route back there were 2 separate accidents on the high rise section
of the north bound M5, it was backing up for miles.

Rear axle is being finished now and the new calipers are
getting painted

Another box of bits heading to the shot blasters
 

Attachments

  • Range Rover more bits off to the shotblasters.jpg
    Range Rover more bits off to the shotblasters.jpg
    76.7 KB · Views: 474
  • Range Rover calipers getting a coat of gold paint 1.jpg
    Range Rover calipers getting a coat of gold paint 1.jpg
    62.9 KB · Views: 479
  • Range Rover calipers getting a coat of gold paint.jpg
    Range Rover calipers getting a coat of gold paint.jpg
    60.2 KB · Views: 507
  • Range Rover rear axle being assembled 003.jpg
    Range Rover rear axle being assembled 003.jpg
    122 KB · Views: 552
  • Range Rover chassis on the low loader.jpg
    Range Rover chassis on the low loader.jpg
    128.2 KB · Views: 537
No point once your this far not being thorough, i'm a little anal
when it come to attention to detail :)

I've not totted everything up yet but at a guess i could buy several
more classics with what i've spent.

I would probably put freshly built 4.6 in it from JE Developments, think
it would have approx 330 hp and a bit more torque
Man, seeing threads like this where the parts all look fantastic....makes me feel bad about looking under mine. <_<

Somehow I'm not even close to being surprised. :p

Nice, thinking of any other changes or just the engine and alloys?
 
We are going to modify the bulkhead possibly to stop the centre section
being a water trap, other than that it'll stay pretty much stock.

Should have a rolling chassis next week :)
 
Thanks Geoff, i'm really looking forward to getting the chassis back, that's going to be Shutzed with 3M on
top of the galvanize so should last for ever :)

Then we can bolt the new axles in along with new fuel, brake and airlines etc
 
Last edited:
Front and rear axles are 99 % complete, just waiting on brake pads for the front
 

Attachments

  • Range Rover front axle assembled 003.jpg
    Range Rover front axle assembled 003.jpg
    114.6 KB · Views: 1,767
  • Range Rover rear axles assembled 004.jpg
    Range Rover rear axles assembled 004.jpg
    115.5 KB · Views: 1,346
Chassis is ready and will go fetch it on Monday, going round the shell cleaning up everywhere ready for painting etc

Just have to sort the scuttle out but looks like we have found a
good one so that will get welded in next week
 

Attachments

  • Range Rover engine bay clean up 005.jpg
    Range Rover engine bay clean up 005.jpg
    107 KB · Views: 589
  • Range Rover engine bay clean up 004.jpg
    Range Rover engine bay clean up 004.jpg
    110.6 KB · Views: 531
  • Range Rover engine bay clean up 003.jpg
    Range Rover engine bay clean up 003.jpg
    120.4 KB · Views: 623
  • Range Rover engine bay clean up 002.jpg
    Range Rover engine bay clean up 002.jpg
    111.7 KB · Views: 651
Shell getting seam sealed and 3M body sealer

Scuttle is also finished now
 

Attachments

  • Range Rover 001.jpg
    Range Rover 001.jpg
    106.4 KB · Views: 620
  • Range Rover 002.jpg
    Range Rover 002.jpg
    119.5 KB · Views: 544
  • Range Rover 004.jpg
    Range Rover 004.jpg
    113.6 KB · Views: 524
  • Range Rover 007.jpg
    Range Rover 007.jpg
    112.3 KB · Views: 526
Your really going through it with a fine tooth comb looks great so far well done!!

Thanks, going this far is the only way really, getting rid of every
bit of rust then sealing it up properly, we'll probably run out of petrol
before it goes rusty :)
 
Thanks, going this far is the only way really, getting rid of every
bit of rust then sealing it up properly, we'll probably run out of petrol
before it goes rusty

Lol.. if it were a diesel it could run on Mazola
 
Back
Top