Soft dash restoration

This site contains affiliate links for which LandyZone may be compensated if you make a purchase.
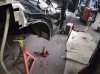
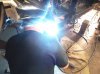
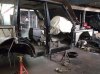
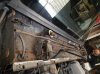
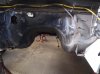
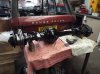
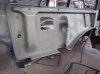
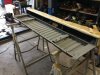
Pretty much all the rot removal is done now, new sills are fitted with just
a bit of work round the A post to do.

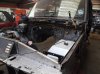
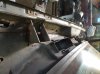
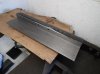
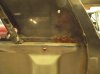
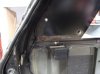
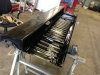
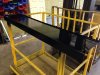
Tailgate is now rust free and ready to have the custom made skin fitted

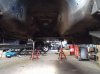
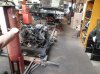
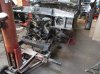
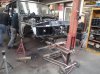
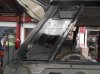
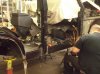
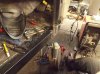
Should be separating the body from the chassis on Monday
 

Attachments

  • Range Rover new sill 2.jpg
    Range Rover new sill 2.jpg
    96.8 KB · Views: 489
  • Range Rover new sill.jpg
    Range Rover new sill.jpg
    117.8 KB · Views: 471
  • Range Rover tailgate rust free.jpg
    Range Rover tailgate rust free.jpg
    115.5 KB · Views: 496
  • Range Rover tailgate  prepped for new skin.jpg
    Range Rover tailgate prepped for new skin.jpg
    86 KB · Views: 587
  • Range Rover tailgate skin.jpg
    Range Rover tailgate skin.jpg
    119.6 KB · Views: 449
A bit if a delay but now ready for the chassis to drop off today.

A few photos of the sill being finished and lots of goodies to unwrap :)
 

Attachments

  • Range Rover new oil cooler & pipes.jpg
    Range Rover new oil cooler & pipes.jpg
    80.7 KB · Views: 414
  • Range Rover new discs & pads.jpg
    Range Rover new discs & pads.jpg
    66.8 KB · Views: 405
  • Range Rover new calpers.jpg
    Range Rover new calpers.jpg
    70.7 KB · Views: 406
  • Range Rover end off sill & arch.jpg
    Range Rover end off sill & arch.jpg
    126.2 KB · Views: 438
  • Range Rover welding shot 1.jpg
    Range Rover welding shot 1.jpg
    106.7 KB · Views: 427
  • Range Rover sill finished.jpg
    Range Rover sill finished.jpg
    116.5 KB · Views: 444
Collected the tailgate from my mates bodyshop and it's better than
when it was new :) need to take some photos though as i forgot


The chassis is now out :)

Time to attack the engine bay but not much to do really apart from
clean it up as its in great condition, i was concerned about the
bulk head but there's only a little surface corrosion to deal with :)
 

Attachments

  • Range Roverready to remove chassis (19).jpg
    Range Roverready to remove chassis (19).jpg
    86.5 KB · Views: 446
  • Range Roverready to remove chassis (17).jpg
    Range Roverready to remove chassis (17).jpg
    77.4 KB · Views: 441
  • Range Roverready to remove chassis (11).jpg
    Range Roverready to remove chassis (11).jpg
    100.6 KB · Views: 493
  • Range Roverready to remove chassis (10).jpg
    Range Roverready to remove chassis (10).jpg
    139.9 KB · Views: 453
  • Range Roverready to remove chassis (8).jpg
    Range Roverready to remove chassis (8).jpg
    126.7 KB · Views: 455
  • Range Roverready to remove chassis (5).jpg
    Range Roverready to remove chassis (5).jpg
    129.2 KB · Views: 502
  • Range Roverready to remove chassis (2).jpg
    Range Roverready to remove chassis (2).jpg
    128.9 KB · Views: 474
I'm not sure what to do with the engine as it runs very nicely and
compression tests are very good but its done 126,000 miles.

Possibly looking at getting it either rebuilt by John Eales or buy a new engine from him.

As you're going to so much effort and expense to restore, it would be a shame to have non matching engine/gearbox and vin numbers from the originality point of view.

if the engine is sound and the block good, a rebuild would IMHO be the better option.
 
dunkan.

i have a question for you.. following the bodywork, how are you doing on sourcing the OEM badges and decals ?
 
I've been bouncing the engine routes around for ages now and agree to a point that it would be better as far as originality is concerned but i'm building this for me and i'd rather have a brand new engine in it built by JE Developments

If it hurts the value later then i'll have to live with it.

To be honest i've not even thought about OEM Badges etc :)
 
haha ! As always it's your car and your choice, I know i would and can get a bit carried away with some performance upgrades, though you could always keep the original engine cocooned on a pallet ! It's always personal choice of originality or personal spec.

I've been toying with some minor performance tweeks on the 90 Classic i am doing at the moment but trying to keep it as OEM as possible.

I managed to find the OEM 'Range Rover' bonnet and tailgate badges (see the classic badge thread i've posted links there) and ordered those today as mine goes in for strip and paint in a couple of weeks and the OEM alloys for refurb. The tough one seems to be the Vogue SE tailgate badge, but if no luck i'll have a friend with sign company remake them.

I've found a source in the US that does the complete under bonnet decal set as well and i im trying to find a replacement sticker of the underhood purple sticker with multi language text but proving a bit tough too

I'm very impressed with the lvel you are going to.. mine isn't a soft dash and i got lucky on getting one relatively free of tin worm.. some minor scabs under the bonnet and the tailgate, but on the whole sound i'm looking forward to seeing yours done too
 
You'll have to let me know about the stickers, i've replied in the thread you mention as i know a 3D sticker guy who's on another forum i use, pretty sure he makes custom 1 offs, not cheap but the finishing touch is the decals being as accurate as possible

I'm glad you like the build, i never intended to go this far but like a lot of things it snowballed and here we are
now :)
 
Last edited:
A few more photos.

Front axle is built & the tailgate has its new skin :)

I started cleaning up a few areas and removed the cruddy metal rod bonnet
lift assist things. Hinges off and will be stripped and painted.

Not sure about this but i'm thinking of fitting P38 bonnet struts or would this be
too much of a mod ? :)
 

Attachments

  • Range Rover restoration the strip down 009.jpg
    Range Rover restoration the strip down 009.jpg
    138.1 KB · Views: 536
  • Range Rover gearbox tunnel.jpg
    Range Rover gearbox tunnel.jpg
    88.2 KB · Views: 465
  • Range Rover scuttle 2.jpg
    Range Rover scuttle 2.jpg
    92.1 KB · Views: 441
  • Range Rover re skinned tailgate.jpg
    Range Rover re skinned tailgate.jpg
    83.6 KB · Views: 532
  • Range Rover front axle 05.jpg
    Range Rover front axle 05.jpg
    97.8 KB · Views: 435
  • Range Rover front axle 3.jpg
    Range Rover front axle 3.jpg
    83.5 KB · Views: 462
  • Range Rover front axle 08.jpg
    Range Rover front axle 08.jpg
    103.8 KB · Views: 737
now that's an axle !!

yeah i knopw the feeling you kind of think, well if i'm doing this i might as well do that. you're pretty much going to have a showroom condition Classic.

On the bonnet gas struts.. if your not fussed about originality, why not.. that sodding bonnet rod on the classic gets in the way !!
 
The axle apart from the case and shafts is brand new now :)

That's exactly what happened and before you know it it's getting nigh on a full restoration :)

I shall look more into the bonnet struts, i'm more for getting rid of the actual rods under the screen that help lift the bonnet than the bonnet stay :)
 
Last edited:
oh one thing though.. the gas struts, will the result in pushing the bonnet up against the release lever.. it would be a shame to go through all that and have the bonnet out of line when shut due to the gas struts attempting to push it up all the time !!

I'm waiting for a delivery to arrive then off to the unit to remove the bonnet, cowl panel and tailgate before delivering the car for paint.
 
Yes it needs to be looked at very closely, hopefully once the struts are horizontal they wouldn't push up but until we try we wont know, perhaps try it with a scrap bonnet first and see what happens.

Good luck with the paintwork
 
Last edited:
That's definitely a way to check it out and get the set up right.

Have you had any luck sourcing the rear quarter window rubbers ? they seem very thin on the ground. The sunroof seal is getting tricky too
 
There is a chap up here in the West Mids making the rear quarter window rubbers or is about to but i think they're around £300 a pair

I was very lucky and found a pair in great condition at a breakers :) The ones on my car are totally shot.
 
Ouch !!

Yeah that was a very lucky find. mine are actually pretty good with just minor fraying at the edge.
 
Yes very lucky but also unlucky as the car was broken the week before and was sub 80,000 miles, a farmer had wrote it off picking it up through the windows with a fork lift apparently

I'd have bought most of it but it got snapped up very quickly
 
Removed the rear belts and corner trim that sits behind them, then took the vinyl covered exterior
panels off in preparation to paint the shell.

Found some rot under the nearside which will get dealt with and scotch brighted the offside quarter

Rear quarter glass also came out
 

Attachments

  • Range Rover rear end paint prep 003.jpg
    Range Rover rear end paint prep 003.jpg
    106.1 KB · Views: 377
  • Range Rover rear end paint prep 007.jpg
    Range Rover rear end paint prep 007.jpg
    71.7 KB · Views: 385
  • Range Rover rear end paint prep 005.jpg
    Range Rover rear end paint prep 005.jpg
    65.4 KB · Views: 384
  • Range Rover rear end paint prep 004.jpg
    Range Rover rear end paint prep 004.jpg
    65.3 KB · Views: 385
  • Range Rover rear end paint prep 006.jpg
    Range Rover rear end paint prep 006.jpg
    79.6 KB · Views: 382
Last edited:
Back
Top