You are using an out of date browser. It may not display this or other websites correctly.
You should upgrade or use an alternative browser.
You should upgrade or use an alternative browser.
S884s Defender 90 Full Galvanised Rebuild
- Thread starter S884
- Start date
This site contains affiliate links for which LandyZone may be compensated if you make a purchase.
So with both rear callipers built up and only needing pads putting in I decided to tackle the front callipers, couldn't do these earlier on as we ordered the wrong pistons, however we've now go the correct ones and are struggling.. 
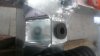
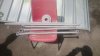
so here's a finished rebuilt rear calliper, bit of touching up to do here and there but nothing major

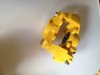
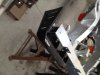
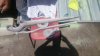
And here is the problem I'm having, as you can see the seal retaining rings to fit the front calliper piston seals are all bent, and no they didn't come like this, but instead we have bent every one that we've tried to fit any tips anyone has to help with this would be greatly appreciated

so here's a finished rebuilt rear calliper, bit of touching up to do here and there
but nothing major And here is the problem I'm having, as you can see the seal retaining rings to fit the front calliper piston seals are all bent, and no they didn't come like this, but instead we have bent every one that we've tried to fit
any tips anyone has to help with this would be greatly appreciated Attachments
Retroanaconda
Well-Known Member
- Posts
- 677
- Location
- SW Scotland
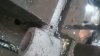
Aftermarket seal retainers are known for being ****e, they're not Britpart or similar by any chance are they?
Genuine parts only for caliper seals.
Genuine parts only for caliper seals.
Aftermarket seal retainers are known for being ****e, they're not Britpart or similar by any chance are they?
Genuine parts only for caliper seals.
They're not Britpart but I don't think they're anything decent to be fair, a genuine set are £9 these were only £2 which probably explains it
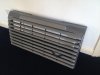
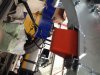
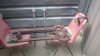
So This was also bought for the land rover, with intentions of hiding a big full width intercooler behind it, its off a brand new defender with delivery miles, however its in mint condition and it would be a shame to strip it down to paint green, hmm.. maybe I'll paint the rest of the land rover to match it instead.. :scratching_chin:

Attachments
- Posts
- 8,093
- Location
- East Midlands
They're not Britpart but I don't think they're anything decent to be fair, a genuine set are £9 these were only £2 which probably explains it
Get some expensive ones and they will slip in a treat. I got mine in with one of those brake expander tools which consists of two plates that you wind apart with a screw. I put the outer seal in the retainer and offered the whole lot up to the cylinder bore and then a few turns of the expander and you can feel it slip in. Keep an eye on it to make sure it is going in straight, because sometimes they try to skew, which looks like what has happened to yours. Lubricating everything with lots of brake fluid helps too.
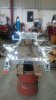
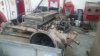
Not updated for a few weeks now so figured i'd update with something a little exciting, well quite exciting for us anyway!
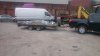
For the task we had planned we needed the use of the trailer, someone had very kindly loaded it with some nice axles, diffs, prop-shafts, gearbox's and a set off ramps off a wagon, all of which needed moving

Then the empty trailer was towed away to collect some precious cargo, yes the new chassis is finally here!

Any time we use my uncles L200 to fetch any landrover related parts, including the landrover itself, he makes us take a photo, he makes out like he hates them but we all know he's just jealous

Whilst bringing the chassis inside dad decided to go and get the forklift stuck down the hole between the brake test rollers, this meant jacking the forklift up then welding up some box section and chequer plate to recover it

Safe to say with the reflection from that nice shiny chassis sunglasses wouldn't of gone a miss in the garage today

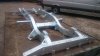
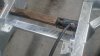
And with most Richards chassis' the first task was to jack out the chassis rails slightly to fit the chassis crossmember in there

Wasn't to hard of a job to be honest

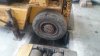
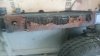
Once in we had a quick run around to fit as much as we could to the chassis whilst we was all over excited, this included the bump stops, rear bumperettes, brake flexi's and the rubber pins the radiator sits in

However I can safely say the radiator has seen better days and will have to be replaced for definite

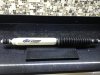
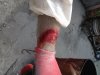
Also fitted the boots to the +4" shocks as well with stainless steel cable ties, then got a quick picture on the kitchen work surface under the LED's whilst the mother was out :bolt:

And that's it for todays update, will hopefully try and crack on a bit faster now with the chassis here, bit of an incentive to get it finished if anything
For the task we had planned we needed the use of the trailer, someone had very kindly loaded it with some nice axles, diffs, prop-shafts, gearbox's and a set off ramps off a wagon, all of which needed moving
Then the empty trailer was towed away to collect some precious cargo, yes the new chassis is finally here!
Any time we use my uncles L200 to fetch any landrover related parts, including the landrover itself, he makes us take a photo, he makes out like he hates them but we all know he's just jealous
Whilst bringing the chassis inside dad decided to go and get the forklift stuck down the hole between the brake test rollers, this meant jacking the forklift up then welding up some box section and chequer plate to recover it
Safe to say with the reflection from that nice shiny chassis sunglasses wouldn't of gone a miss in the garage today
And with most Richards chassis' the first task was to jack out the chassis rails slightly to fit the chassis crossmember in there
Wasn't to hard of a job to be honest
Once in we had a quick run around to fit as much as we could to the chassis whilst we was all over excited, this included the bump stops, rear bumperettes, brake flexi's and the rubber pins the radiator sits in
However I can safely say the radiator has seen better days and will have to be replaced for definite
Also fitted the boots to the +4" shocks as well with stainless steel cable ties, then got a quick picture on the kitchen work surface under the LED's whilst the mother was out :bolt:
And that's it for todays update, will hopefully try and crack on a bit faster now with the chassis here, bit of an incentive to get it finished if anything
Attachments
-
 Cross-Member-Not-Fitting.jpg59.6 KB · Views: 900
 -
 Galvanised-Chassis.jpg86.1 KB · Views: 926
 -
 Forklift-Jacked-Up.jpg84.5 KB · Views: 891
 -
 L200-Towing-Chassis.jpg81.9 KB · Views: 1,034
 -
 Chassis-On-Trailer.jpg78.1 KB · Views: 1,253
 -
 Full-Trailer.jpg85.9 KB · Views: 805
 -
 Jacking-Chassis-Rails.jpg73.1 KB · Views: 875
 -
 Rotten-Radiator-Base.jpg62.1 KB · Views: 842
 -
 Shocks-With-Boots.jpg127.7 KB · Views: 844
 -
 Radiator-Mounts.jpg55.1 KB · Views: 901
IamRobbie
Well-Known Member
- Posts
- 2,800
- Location
- Derbyshire, j28 M1
subscribed looking good so far!
looking good so far!looking ace keep the updates coming love following you're thread
You've set the standard for us to follow GATSO, we're just trying to keep up!
- Posts
- 11,040
- Location
- North of the Wall
Looking great. Had to jack my chassis rails apart too. Unfortunately, the near side rear tubular outrigger is set about 8mm too far back towards the rear of the vehicle. Might be worth checking before you bolt too much on. Wish I had.
So the majority of today has been spent shot blasting even more parts so they are fully ready to take to be galvanised, I also got a couple of pictures of the extended bump-stops mounted to the chassis:

And also the bumperettes mounted to the chassis, still debating whether or not to remove these and paint them body colour or get them galvanised as well

Before blasting we drilled the holes in the trailing arms so they don't explode in the galv tank under pressure

Then onto blasting, had quite a bit to do including the axles which need finishing off but I forgot to picture them

Even blasted the new heavy duty steering arms, felt weird taking them straight out the bag to blast off immaculate paint, but I guess they'll last longer in galv rather than paint

The Radius arms also came up quite well once blasted, the spring seats were also new out of the packet then blasted straight away

Dad also decided to show people what happens when you don't pay attention whilst shot blasting, a quick blast across the arm made quite a mess

So hopefully this week will see a trip to the galvanisers sorted giving us plenty to do next weekend
And also the bumperettes mounted to the chassis, still debating whether or not to remove these and paint them body colour or get them galvanised as well
Before blasting we drilled the holes in the trailing arms so they don't explode in the galv tank under pressure
Then onto blasting, had quite a bit to do including the axles which need finishing off but I forgot to picture them
Even blasted the new heavy duty steering arms, felt weird taking them straight out the bag to blast off immaculate paint, but I guess they'll last longer in galv rather than paint
The Radius arms also came up quite well once blasted, the spring seats were also new out of the packet then blasted straight away
Dad also decided to show people what happens when you don't pay attention whilst shot blasting, a quick blast across the arm made quite a mess
So hopefully this week will see a trip to the galvanisers sorted giving us plenty to do next weekend
Attachments
-
 Fitted-Bumperettes.jpg96.6 KB · Views: 825
 -
 Extended-Bump-Stops-Fitted.jpg111 KB · Views: 1,012
 -
 Shotblasted-Arm.jpg124.5 KB · Views: 880
 -
 Blasted-Heavy-Duty-Arms.jpg68.1 KB · Views: 872
 -
 Blasted-Radius-Arms.jpg79.2 KB · Views: 869
 -
 Drilled-Trailing-Arms.jpg78.2 KB · Views: 847
 -
 Pre-Blasted-Parts.jpg64.2 KB · Views: 850
- Posts
- 11,040
- Location
- North of the Wall
No picture showing. There are two brackets which bolt the tub on to the chassis around about there.
IamRobbie
Well-Known Member
- Posts
- 2,800
- Location
- Derbyshire, j28 M1
Ouch that arm looks sore!
MayorQuimby
Active Member
- Posts
- 290
Arms ready for galving now
IamRobbie
Well-Known Member
- Posts
- 2,800
- Location
- Derbyshire, j28 M1
Haha that made me laugh lol. Your putting some serious time into all those parts. Will love nice when galved I bet! Just hope it lasts alot longer that It would standard
No picture showing. There are two brackets which bolt the tub on to the chassis around about there.
Were you viewing the forum on a mobile or tablet? on my computer the pictures shows fine but on my phone I couldn't get it to show
Haha that made me laugh lol. Your putting some serious time into all those parts. Will love nice when galved I bet! Just hope it lasts alot longer that It would standard
We're hoping everything will last much longer anyway, the more time we spend hopefully the better results we'll get
- Posts
- 11,040
- Location
- North of the Wall
Were you viewing the forum on a mobile or tablet? on my computer the pictures shows fine but on my phone I couldn't get it to show
Nope, PC. Still not showing. Have you worked out what the bracket is yet? There are two of the ones I'm talking about. They are the seat belt to chassis brackets LINKY
Similar threads
- Replies
- 11
- Views
- 2K
- Replies
- 4
- Views
- 694