S884s Defender 90 Full Galvanised Rebuild

This site contains affiliate links for which LandyZone may be compensated if you make a purchase.
FFS :eek:

Why don't they tell you that when you're buying one? :rolleyes:

Too late to paint mine now.

It isn't! :) I clean, wash and paint standard chassis in sections under the vehicle. Obviously the top is difficult with the body on. Road salt mainly goes on a few areas, like the outriggers, you could just do them.

It is actually much easier to paint galv when it is a year or two old.
 
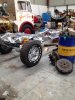
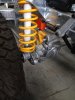
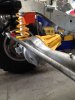
So although I haven't updated my thread on here for a while progress is still being made with the re-build, the rear end of the land rover now rolls on its wheels and we're quite happy with how it looks to be honest

rear-end-re-build-jpg.88832


rear-spring-fitted-jpg.88835


rear-caliper-fitted-jpg.88836


a-frame-to-axle-jpg.88837


So a while ago I believe that 'Al203' asked about the chassis dimensions for the outriggers that the rear tub sits against to the rear of the chassis cross-member, as I believe his dimensions were quite far off to fit his rear tub, our measurements aren't as bad but there is still a 3mm - 4mm difference between sides which isn't too bad, however the rear tub its yet to be test fitted

chassis-dimensions-1-jpg.88838


chassis-dimensions-2-jpg.88839


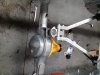
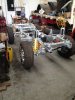
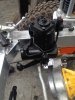
The front axle is being rebuilt with the last coat of paint going on the diff casing in the morning,

Then there is the task of re-tapping all the diff bolts in the axle casing which isn't too easy as every other one needs knocking through in order to fit the die-holder in

tapping-diff-bolts-jpg.88842


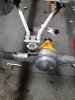
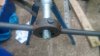
The re-tapping doesn't stop there however as every single piece that has been galvanised needs all the threads tapping out which is a lot of work in itself, especially when it gets to tapping the big stuff like the trailing arms

trailing-arms-tapped-jpg.88845


trailing-arm-bolt-jpg.88846


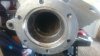
Or just tapping loads of continuous holes like on the end of the axle casings, then cleaning out the inside of the axle casings which also wasn't the easiest

axle-tapped-jpg.88844


As well as building our axles up we also began to blast fellow landyzone member 'XRIZLAX's axle casing for him

sandblasting-axle-jpg.88847


Hopefully by the weekend the front end of the land rover will also be rolling, we'll be happy to reach this stage as its good to see the land rover being rebuilt, I'll try to put up updates whenever possible :)
 

Attachments

  • Rear-End-Re-Build.jpg
    Rear-End-Re-Build.jpg
    127.5 KB · Views: 3,663
  • A-Frame-To-Axle.jpg
    A-Frame-To-Axle.jpg
    121.3 KB · Views: 884
  • Rear-End-Re-Build.jpg
    Rear-End-Re-Build.jpg
    127.5 KB · Views: 535
  • Rear-Spring-Fitted.jpg
    Rear-Spring-Fitted.jpg
    93.3 KB · Views: 3,213
  • Rear-Caliper-Fitted.jpg
    Rear-Caliper-Fitted.jpg
    97.9 KB · Views: 3,041
  • A-Frame-To-Axle.jpg
    A-Frame-To-Axle.jpg
    103.3 KB · Views: 8,490
  • Chassis-Dimensions-1.JPG
    Chassis-Dimensions-1.JPG
    48.7 KB · Views: 2,987
  • Chassis-Dimensions-2.JPG
    Chassis-Dimensions-2.JPG
    53.2 KB · Views: 3,036
  • Tapping-Diff-Bolts.JPG
    Tapping-Diff-Bolts.JPG
    65.9 KB · Views: 2,988
  • Axle-Tapped.JPG
    Axle-Tapped.JPG
    63.9 KB · Views: 2,926
  • Trailing-Arms-Tapped.JPG
    Trailing-Arms-Tapped.JPG
    53.7 KB · Views: 3,040
  • Trailing-Arm-Bolt.JPG
    Trailing-Arm-Bolt.JPG
    49 KB · Views: 2,788
  • Sandblasting-Axle.JPG
    Sandblasting-Axle.JPG
    63.9 KB · Views: 2,925
It's looking great! I am officially very jealous :D
What a good memory you have! My driver's side outrigger is spot on and the tubs sits nicely up against it and the rear tub lugs at the same time. The passenger side outrigger is at lease 8mm away from the tub. It's a big gap and I've still got to come up with a plan to fill it. Block of aluminium or some zinc plated or galvanised steel, if I get get something the right dimensions.
Looking forward to the next instalment :)
 
Haha yes we realised this once the axle was already on the vehicle, built the axle on a bench and it was laid upside down at the time, don't worry they've been changed now the picture was just took before hand ;)
 
looking good
but are you going to paint the galv or leave it as is ?
Thanks for the positive feedback, the galv will be left as it is, not painted, if it does start to look a bit tatty the underneath can be taken apart and painted in the future
 
Looking good mate. If it was me I would paint every part aswel as galving them. It easier to do it all now than to take it all apart again in the future, especially if you want to keep it. It won't take long for the galv to look tatty so a quick t wash and a lick of paint will tidy it up and add years to its life. After all the galv is just a sacrificial layer
 
ooh, think I may have had an accident looking at those galvanised axles - loooovley. I'd leave it all unpainted - it gives drivers with normal chassis something to drool over!
 
ooh, think I may have had an accident looking at those galvanised axles - loooovley. I'd leave it all unpainted - it gives drivers with normal chassis something to drool over!

Haha it is quite nice to see to be honest, its not something you get to notice very often with landrovers on the road

Yes, you want people to see that it's galvanised. there's no point if you just keep it to yourself!

Might help to leave it bare wherever possible for potential buyers too, its easy to tell people certain parts are galvanised but they cant always see through the paint! ;)
 
So again its been a while since my last post, but yesterday we managed to get the chassis rolling on all 4 wheels which we thought was quite an achievement

rolling-chassis-jpg.89749


front-suspension-jpg.89750


We also cleaned up and re-painted the steering box so that it could also be fitted

steering-box-fitted-jpg.89751


The diff nose is sitting pretty high now because of the suspension lift though

diff-nose-high-jpg.89752
 

Attachments

  • Rolling-Chassis.jpg
    Rolling-Chassis.jpg
    128.6 KB · Views: 2,906
  • Front-Suspension.jpg
    Front-Suspension.jpg
    102.7 KB · Views: 2,881
  • Steering-Box-Fitted.jpg
    Steering-Box-Fitted.jpg
    115.4 KB · Views: 2,887
  • Diff-Nose-High.jpg
    Diff-Nose-High.jpg
    101.5 KB · Views: 2,751
great work mate!
Ive just come across this and read the whole thing, really enjoyed it, very informative and its really starting to look the dogs!
Great to see another young'un doing a full rebuild, I'm 21 and would love to do a full galv build next summer if i can find the space. Im just in the process of fully rebuilding my axles too, yours has given me massive inspiration though, may well have to take my casings to be galvanised now..hehe

Im at uni in sheffield at the moment, would love to pop by once she's finished to have a drool and get some advice ;)

All the best with it anyway, I'm looking forward to seeing more posts :D

PS.. where did you get the bolts to connect the 2 halves of the rear callipers together once you'd split them? Im doing mine at the moment but couldn't find any part numbers for the bolts or any that were similar length :(
 
Why the hell is your diff sitting at that angle?

I've got a 2" terrafirma lift and my diff is just above horizontal.
 
Erm - I hate to sound negative, but are your grooved discs on the right way round. I bought some like that from EBC a couple of years ago and there were instructions saying they had to point in the other direction, so that, as the wheel went round the end of the groove closest to the hub was the first bit to meet the pad.

Maybe they'll match the upside down callipers though.

I've been watching this with a good deal of interest. I hadn't realised quite how many parts of a Land Rover could be galvanised. Great work so far.

Edit - I've just had a look at the top of the page and the back ones seem to be the right way round. You want 'em so that as the wheel goes round forwards the grooves are helping to throw stuff out rather than pull it in towards the centre.
 
Why the hell is your diff sitting at that angle?

I've got a 2" terrafirma lift and my diff is just above horizontal.

Hi there, we were a bit confused by the angle of the diff to be fair, however do you have an engine and gearbox sat in your chassis?

Erm - I hate to sound negative, but are your grooved discs on the right way round. I bought some like that from EBC a couple of years ago and there were instructions saying they had to point in the other direction, so that, as the wheel went round the end of the groove closest to the hub was the first bit to meet the pad.

Maybe they'll match the upside down callipers though.

I've been watching this with a good deal of interest. I hadn't realised quite how many parts of a Land Rover could be galvanised. Great work so far.

Edit - I've just had a look at the top of the page and the back ones seem to be the right way round. You want 'em so that as the wheel goes round forwards the grooves are helping to throw stuff out rather than pull it in towards the centre.

Haha yes thank you for spotting this, put them on in a bit of a rush to be fair, front callipers still need to go on so we'll probably swap them round when we do that, thanks for the positive feedback its much appreciated.

Amazing job your doing.
I'm in awe of your rebuild!

Glad you're enjoying the re-build, its always nice to know people enjoy seeing the re-build happen as much as we enjoy doing it :)
 
Back
Top